Happy Happy Nester

Weekly Inspiration for Your Nest

  • About
    • Contact
  • Recipes
    • Appetizers
    • Breakfast/Brunch
    • Desserts
    • Dinners
    • Drinks
  • Crafts
  • Decor
  • Trips
  • Shop My Favorites
    • Fall Decor
    • Kitchen
    • Pillows
    • Holiday Decor
  • Boutique of the Week

Home » Crafts » Upcycling Tin Cans with Scrapbooking Paper

Crafts DIY

Upcycling Tin Cans with Scrapbooking Paper

DIY crafts final

 DIY Crafts: Kitchen Containers


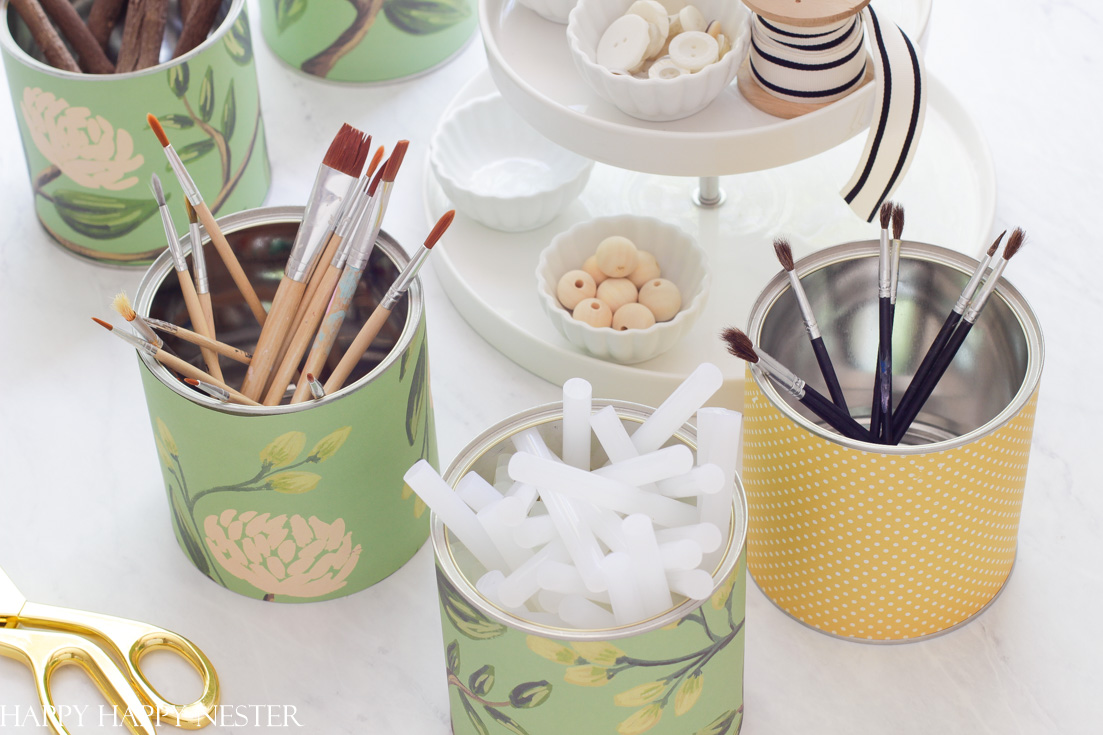
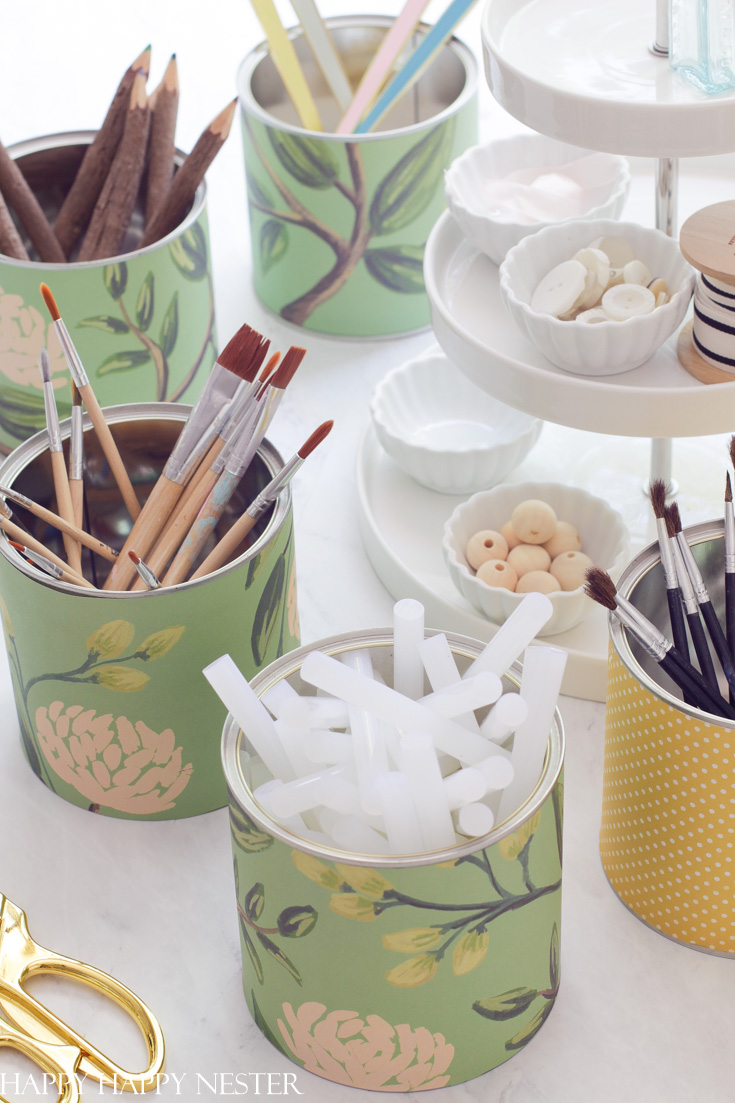
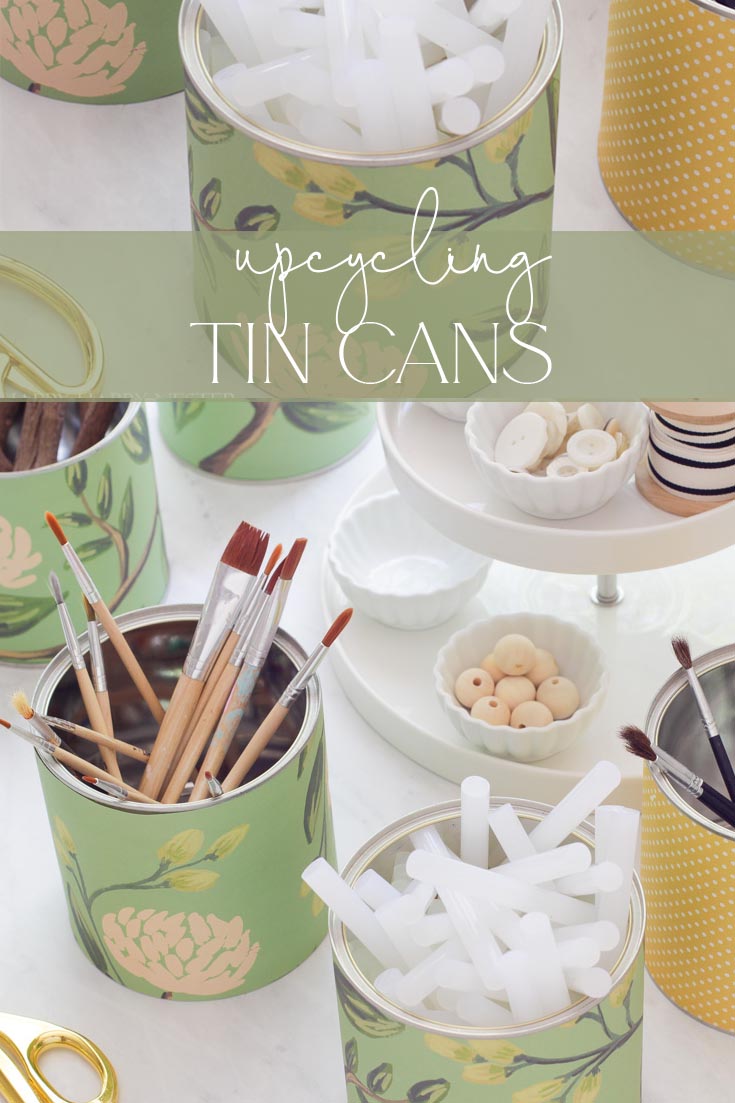
I love DIY crafts and especially ones that are practical and useful in our daily lives. 
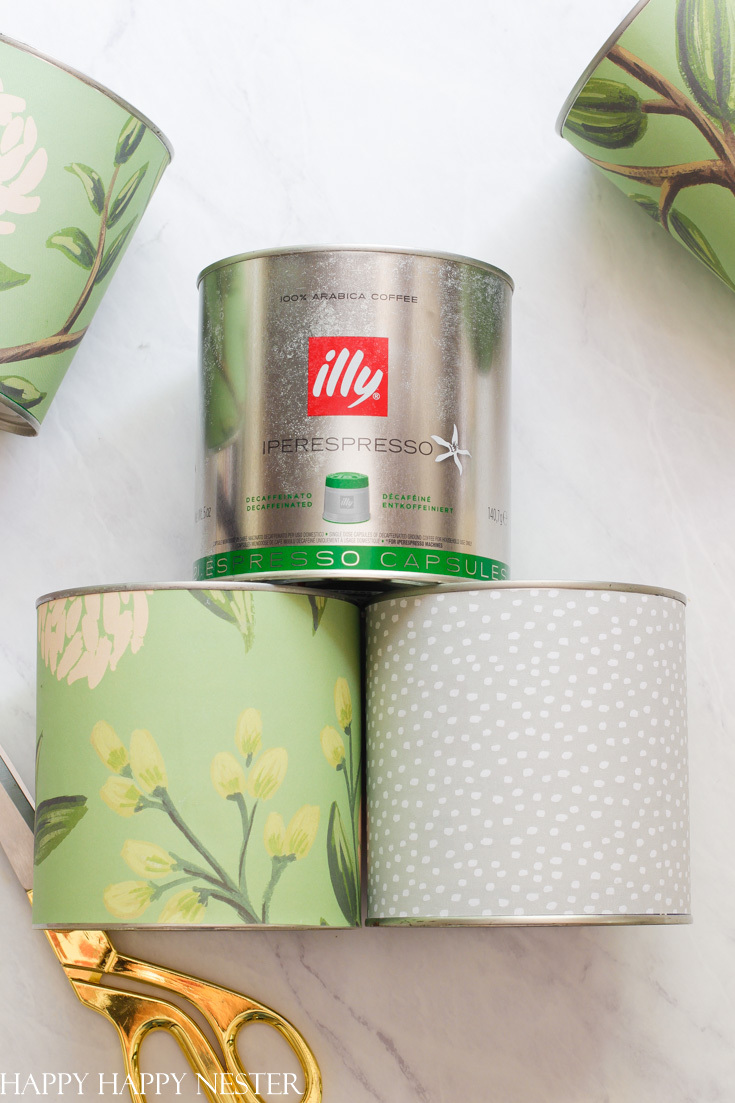
Our Illy Espresso coffee comes in these canisters that I wanted to upcycle. They easily transform into cute kitchen containers with just a little bit of paper, glue and a fun knob.  It is great to create storage in personalized colors that match your kitchen decor.  This DIY craft is so easy that you’ll want to make a few for your home!

 ~ A Note About the Nester ~
I love any type of paper craft. I have many drawers of scrapbooking paper and the funny thing is that I don’t scrapbook. I use the paper to create useful and practical craft projects for our home.
The following post contains Amazon Affiliate links. If you happen to purchase the product through my link, I make a few cents which helps my blogging habit. Thanks for you visit!
Here’s what you’ll need for this project:
Craft Paper (scrapbooking, wrapping paper)
1 Can of Adhesive Spray for paper
Ruler with a steel edge
1 X-Acto knife
1 Cute Knob
1 Nail and Hammer
1 Can of Spray Varnish
1 Roll of Chalkboard Label Paper
1 Chalk Marker Pen
DIY Craft chalkboard paper
Here is the chalkboard paper. I just love this stuff!  Here is a link on amazon: chalkboard label paper
 diy crafts adhesive

Also, you’ll need a  can of varnish if you are worried about the paper getting wet. Here is the Amazon link: varnish

DIY craft spray
You’ll need a can of spray adhesive to glue the paper down to the can.  Here is the Amazon link: spray adhesive

 Upcycling Tin Cans with Scrapbooking Paper Instructions:

So let’s begin! You’ll want to cut the paper with a paper cutter or a steel ruler and a X-acto knife.  I found scissors don’t make a straight edge. My scrapbooking paper didn’t quite fit all the way around the can, so I had to cut two pieces.  Once you have all your pieces, spray each side (one side at a time) of the paper with the varnish. Spray the cans outside if possible and let dry in between coats (like 15 mins drying time). I applied 3 coats to both the front and back of the paper.  Once, you’ve done that step, you are now ready to adhere the paper to the can. I wanted the paper to stick smoothly to the can so, I sprayed both the can and the paper with the spray adhesive solution.
diy crafts labels
Next trace and cut out your label shape on the chalkboard paper and peel off the back and place on the front of the can (opposite side of the seam).
DIY knob
My son did this step for me.  He got a nail that had a similar width to the screw and hammered it into the center of the lid.  Make sure to place the lid upside down so that you don’t bend it when you hammer.  I placed a nut on the screw since it was way too long and I couldn’t tighten the knob. Hope this step makes sense…. I know some people glued their knob on (with E6000 glue), but I wanted my lids to be sturdy.
diy craft pens
Next, you’ll use a chalkboard marker that is erasable.  I love this marker since it doesn’t come off if your hands touch it.  Also, the cool thing is that the ink will come off with a damp towel.  Here is the link:  chalk marker
crafts shelf
Here are my finished containers on my kitchen shelf. We are still using our canisters and love how they look. I hope you enjoyed this simple DIY crafts project.  Thanks so much for visiting and leave a comment and just say, “hi!”
Cheers,
DIY post signature
This post contains affiliate links to Amazon.

If you like this project you may find these posts interesting:

DIY crafts corkboard
Cork board Placemats
cellphone small jpeg
Personalize Cell Phone Cases
pencil small jpeg
Burlap Pencil Holder
diy crafts pin
  • Author
  • Recent Posts
happyhappynester
Follow me
happyhappynester
I named my blog Happy Happy Nester because I love everything related to the home. I’ve always enjoyed decorating my surroundings. Get cozy and stay for a bit, thanks for visiting!
happyhappynester
Follow me
Latest posts by happyhappynester (see all)
  • Make A Chunky Knit Wreath In Under 30 Minutes - January 21, 2021
  • DIY Food Kits for Adults- Learn Something New - January 20, 2021
  • DIY Heart Wreath Tutorial - January 19, 2021

MORE FROM HAPPY HAPPY NESTER

Subscribe To Our Newsletter

Join our mailing list to receive the latest news and updates from Happy Happy Nester!

You have Successfully Subscribed!


44 Comments

« Kale Salad
Gluten Free Coconut Macaroons for Valentine’s Day »

Comments

  1. Rose says

    March 13, 2018 at 7:31 am

    Where did you get template you used to cut out label?

    Reply
« Older Comments

Trackbacks

  1. Ab morgen werden alle im Müll nach Dosen angeln. Denn diese Ideen sind Gold wert. | nachrichten365.info says:
    November 20, 2016 at 10:39 pm

    […] happyhappynester.com […]

    Reply
  2. Tin cans are far more useful than you expect. Here’s how they can help organize your home – Save Your Health says:
    January 18, 2017 at 5:19 pm

    […] Clean them out and give them a new look. Learn how to do that here. […]

    Reply
  3. Cute Burlap Frame - (easy DIY burlap craft) says:
    February 12, 2017 at 1:17 pm

    […] Cute Tin Can Holders […]

    Reply
  4. 20 Creative DIY Tin Can Ideas for the Home – Chairmand.com says:
    July 28, 2017 at 3:17 pm

    […] Happy Happy Nester […]

    Reply
  5. Des astuces géniales pour ne plus jeter les boîtes de conserves. - 4K says:
    July 29, 2017 at 6:19 am

    […] happyhappynester.com […]

    Reply
  6. 17 Favourite Farmhouse How to get Organised Ideas - Raggedy Bits says:
    September 5, 2017 at 3:11 am

    […] crafty? Make your own Upcycled Tin Cans for Your […]

    Reply
  7. Od jutra zaczniesz zbierać puszki, kiedy tylko zobaczysz te genialne pomysły na wykorzystanie ich w domu – Klikam Czytam says:
    January 6, 2018 at 1:43 pm

    […] Źródło: happyhappynester.com […]

    Reply
  8. She Sands Down A Tin Can. When She Adds The Finishing touch I Want This In My House! - Las Cruces Chiropractic Care Center - the Blog says:
    January 30, 2018 at 5:50 am

    […] Clean them out and give them a new look. Learn how to do that here. […]

    Reply
  9. Tin cans are far more useful than you expect. Here’s how they can help organize your home says:
    February 7, 2018 at 3:29 pm

    […] Clean them out and give them a new look. Learn how to do that here. […]

    Reply
  10. Cutiile de conserve sunt mult mai utile decât vă așteptați! Iată câteva moduri în care pot fi refolosite în propria dumneavoastră casă says:
    February 12, 2018 at 12:12 am

    […] Cutiile de cafea și ceai sunt de multe ori suficient de mari pentru a fi reutilizate ca spații  de depozitare pentru obiecte mai mari.Curățați-le și oferiți-le un aspect nou. Aflați cum să faceți acest lucru aici. […]

    Reply
  11. 20 Creative Upcycled DIY Decor Ideas- A Cultivated Nest says:
    September 8, 2020 at 12:43 am

    […] Upcycled Tin Cans from Happy Happy Nester […]

    Reply

Leave a Reply Cancel reply

Your email address will not be published. Required fields are marked *

Recipe Rating


Home, Craft & Cooking Circle Membership

portrait
hello from the nester We love everything related to home, so get cozy and stay for a bit. Thanks for visiting our blog.
  • Bloglovin
  • Facebook
  • Instagram
  • Pinterest
  • Twitter

Holiday Printables eBook

search

Most Popular Posts

Home for the Holidays Blog Tour: White Christmas

December 2, 2016 By happyhappynester 115 Comments

Organizing Kitchen Labels That You’ll Love!

January 17, 2018 By happyhappynester 72 Comments

DIY Paper Flowers Tutorial | How to Make Paper Flowers

January 11, 2019 By happyhappynester 58 Comments

5 Simple Tips You Need to Know About My Room Color

May 28, 2018 By happyhappynester 57 Comments

If beautiful linens and comfort are important, then Hallstrom Home is for you. Rhonda creates gorgeous linens that are comfy and perfect for your home.

Linens and More: Interview with Hallstrom Home

October 29, 2016 By happyhappynester 57 Comments

Join Our Newsletter

Join our mailing list to receive the latest news and updates from our team.

You have Successfully Subscribed!

Affiliate Disclosure:
I am grateful to be of service and bring you content free of charge. In order to do this, please note that when you click links and purchase items, in most (not all) cases, I will receive a referral commission. Your support in purchasing through these links enables me to keep my design and customization prices ridiculously low and empower more people worldwide to blog with less worry and less hassle. Happy Happy Nester is a participant in the Amazon Services LLC Associates Program, an affiliate advertising program designed to provide a means for sites to earn advertising fees by advertising and linking to amazon.com.
Thank you! :)
- Happy Happy Nester

Categories

Archives

you might also like

Betty Crocker Desserts: Refreshing Chilled Treats

Easy Strawberry Yogurt Popsicle Recipe

Trip to France

Gift Basket Ideas Pretty in Pink

The Best Basic French Macaron Recipe

Copyright © 2021 · Happy Happy Nester by Janine Waite

Copyright © 2021 · Divine Theme on Genesis Framework · WordPress · Privacy Policy · Log in