Happy Happy Nester

Weekly Inspiration for Your Nest

  • About
    • Contact
  • Recipes
    • Appetizers
    • Breakfast/Brunch
    • Desserts
    • Dinners
    • Drinks
  • Crafts
  • Decor
  • Shop My Favorites
    • Fall Decor
    • Kitchen
    • Pillows
    • Holiday Decor
  • Boutique of the Week
  • Saturday Chitchat

Home » Crafts » DIY Vintage Ornament Wreath

Crafts Decorate Holiday

DIY Vintage Ornament Wreath

What initially inspired me in regards to project, is my friend’s beautiful vintage wreath in her home. And, ever since I saw hers I’ve always wanted to make one. She bought her wreath at a really cool flea market in San Francisco that sells antiques and vintage crafts. I did happen to spy one in a little boutique in our little town, and it was retailing for $165. If you do decide to make your own vintage wreath, it is a little bit of investment. The ornaments can be found on Ebay, antique stores, and at some thrift shops. If you don’t want to make the investment in vintage ornaments, you can make this wreath with new ornaments. These days, the ornaments look so antique, so there are some nice options. You could use mostly new ones (that look vintage) and then add a few real antique ornaments. Also, I did make a few of my new ornaments look old. I’ll explain how, later in this post. Anyway, let’s get started!

Supplies you’ll need:

12 in styrofoam wreath
About 40 medium size ornaments (I bought half on ebay and half at a wonderful vintage store)
About 40 or more small ornaments
Tinsel, 12 ft
Glue gun and glue sticks
Wire to hang the wreath
Ribbon for a bow, optional

Take stock of all your ornaments and supplies.

816a3-vintage_ornament_wreath_2

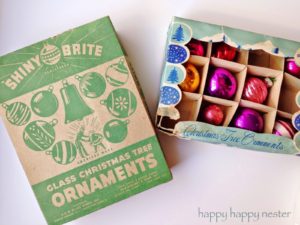
I bought most of my ornaments on Ebay, but I did buy a few at this wonderful shop in Danville, California. Cottage Jewel is definitely, a jewel of a shop in this quaint and beautiful town.

3c791-vintage_ornament_wreath_3

This little shop is packed with antique jewelry, dishes, furniture, and much more! If you are ever in the East Bay of San Francisco, you must visit this shop and the main part of Danville. You’ll have a great day shopping in all the wonderful boutique stores and then dining at all the great restaurants. And interesting little bit of Hollywood trivia, the Danville, Bridges Restaurant is where they filmed the dinner scene in the cute movie, Mrs. Doubtfire!
Not all tinsel is created equal, note how different these two are in color. Of course, you can always remove the little colorful accents, which I had to do to the one on the right. If you want to be true to the vintage, you can use antique tinsel. I did find some, and it cost $20 for about 6 feet. For comparison, Michael’s Crafts tinsel cost about $4.00 for 12 feet. I did go with the cheaper newer version from Michael’s Crafts. I ended up using the one to the right, since I wanted a lighter feel to my wreath. When, you choose one, just make sure the shade of tinsel will go with the look you are trying to achieve.
This 12 inch Styrofoam wreath from Joanne’s Fabrics is perfect. It was difficult finding the smaller wreath size. Just remember the bigger the wreath the more ornaments you’ll need. Also, the wreath does expand beyond the 12 inches, since you place ornaments on outer rim.
Wrap the wreath with the tinsel. As you wrap the tinsel, add drop of hot glue on one side of the wreath, and press tinsel into place. The tinsel adds filler and also provides something for the ornaments to attach to.

Tada! I actually think the tinsel wreath is pretty!

Next, tie the wire around the top of the wreath. Make sure to secure the loop so it doesn’t come undone. Don’t forget to do this step at this point of the process, since it will be tough to add the wire once the ornaments are attached.


Layout the ornaments on the outside of the wreath. Now, this is the time consuming part! When it comes to selecting the ornaments, I feel they should be all the same size. Once you have them organized, glue them to the wreath.


Next, place your ornaments on the wreath. Also, figure out which ornaments you want to feature and where you want to place them. Then start hot gluing your ornaments. You’ll want to place colors in a balanced way. If you look at my wreath, I dispersed the greens, blues, and yellow equally. If you have ornaments with stripes make sure they compliment each other and don’t clash. For instance, if one striped ornament has stripes going one way, have the other striped ornament on the other side of the wreath mirroring it. Don’t put them close together, unless you want a busy look. Here are some close up photos of the beautiful vintage ornaments!


I placed my wreath on our dining room mirror. I attached it with a 3M temporary hanger. I’m enjoying how the colors go so nicely with the room décor. I just may leave it up during the year, in a little less prominent place.


  • Author
  • Recent Posts
happyhappynester
Follow me
happyhappynester
I named my blog Happy Happy Nester because I love everything related to the home. I’ve always enjoyed decorating my surroundings. Get cozy and stay for a bit, thanks for visiting!
happyhappynester
Follow me
Latest posts by happyhappynester (see all)
  • Easy Spring Craft Ideas (DIYs) - March 6, 2021
  • Decoupage Easter Eggs With Cupcake Liners - March 4, 2021
  • Spring and Easter Decorations - March 3, 2021

MORE FROM HAPPY HAPPY NESTER

Subscribe To Our Newsletter

Join our mailing list to receive the latest news and updates from Happy Happy Nester!

You have Successfully Subscribed!


Leave a Comment

« Bunn Coffee Maker Brews Delicious Coffee
Salmon Recipe: Crusty, Crispy & Perfect Everytime »

Leave a Reply Cancel reply

Your email address will not be published. Required fields are marked *

Recipe Rating


Home, Craft & Cooking Circle Membership

portrait
hello from the nester We love everything related to home, so get cozy and stay for a bit. Thanks for visiting our blog.
  • Bloglovin
  • Facebook
  • Instagram
  • Pinterest
  • Twitter

Holiday Printables eBook

search

Most Popular Posts

Home for the Holidays Blog Tour: White Christmas

December 2, 2016 By happyhappynester 115 Comments

Almond Cookies are my family's favorite cookie. This recipe comes from my mom. It is easy to make and is a delicious and light cookie.

Amy’s Almond Cookies (Super Easy Recipe)

October 6, 2012 By happyhappynester 72 Comments

Organizing Kitchen Labels That You’ll Love!

January 17, 2018 By happyhappynester 72 Comments

DIY Paper Flowers Tutorial | How to Make Paper Flowers

January 11, 2019 By happyhappynester 60 Comments

If beautiful linens and comfort are important, then Hallstrom Home is for you. Rhonda creates gorgeous linens that are comfy and perfect for your home.

Linens and More: Interview with Hallstrom Home

October 29, 2016 By happyhappynester 57 Comments

Join Our Newsletter

Join our mailing list to receive the latest news and updates from our team.

You have Successfully Subscribed!

Affiliate Disclosure:
I am grateful to be of service and bring you content free of charge. In order to do this, please note that when you click links and purchase items, in most (not all) cases, I will receive a referral commission. Your support in purchasing through these links enables me to keep my design and customization prices ridiculously low and empower more people worldwide to blog with less worry and less hassle. Happy Happy Nester is a participant in the Amazon Services LLC Associates Program, an affiliate advertising program designed to provide a means for sites to earn advertising fees by advertising and linking to amazon.com.
Thank you! :)
- Happy Happy Nester

Categories

Archives

you might also like

Spice Rack Organizing Ideas

Pillows: An Interview with Vintage Dayz

Our Wedding Anniversary!

Farmhouse sign giveaway is on the agenda for today. Make sure to leave a comment and possibly be the winner of a custom design sign by the Painted Nest.

Farmhouse Sign Giveaway: A Custom Made Sign

Christmas Cloche

Copyright © 2021 · Happy Happy Nester by Janine Waite

Copyright © 2021 · Divine Theme on Genesis Framework · WordPress · Privacy Policy · Log in