This stunning Easter Egg Wreath adorned with gold leaf is lovely. After spotting a pricey version online, I opted to craft my own. The result is a splendid golden wreath that’s both one-of-a-kind and homemade. Gather faux wooden eggs, a gold leaf adhesive set, sealer, and gold leaf sheets, and you’re all set to create your own Easter egg masterpiece.

Gold leaf eggs are an ideal addition to any wreath, as they shimmer beautifully and evoke a delightful springtime vibe, especially when paired with green-speckled eggs, leaves, and branches.
So, to make this Easter wreath, you’ll need to make the gold leaf eggs. Lucky for you, I recently did a gold leaf Easter egg tutorial. And if you’re panicking right now, my DIY will walk you through the whole process, and you’ll find it is relatively easy to make these gorgeous gold eggs. And if you like the gold leaf eggs, make some additional ones to decorate your coffee table or a cute Easter tree.

Gold Leaf Easter Eggs
I love the whole look of the gold leaf. So, I figured I would give my wooden faux eggs a golden makeover. Now, I have to admit my gold-leafing skills are pretty basic. I feel that if I can make the eggs, then I’m positive you can, too.
What is gold-leafing
Gold leafing is a decorative technique where thin sheets of gold are applied to a surface. It often adds a luxurious and opulent touch to various objects and artworks.
The process of adding gold leaf eggs is first applying an adhesive solution onto the egg’s surface. Then, carefully place the delicate gold leaf sheets onto the adhesive-covered egg. Finally, seal the gold leaf with a clear coat to protect and enhance its lustrous finish.
Applying gold leaf onto the eggs creates visually stunning effects, adding a touch of sophistication to the overall appearance. Each shimmering gold leaf reflects light beautifully, elevating the aesthetic appeal of the eggs and making them truly gorgeous.

DIY Easter Egg Wreath
If you decide to give this wreath a go, you’re in for something truly special. I was honestly blown away by how mine turned out. It’s just so unlike anything I’ve seen elsewhere. I found something similar before, but the all-gold eggs are gorgeous.
Crafting Your Perfect Easter Egg Wreath: Step-by-Step Guide
Alright, let’s get into crafting an Easter egg wreath to spruce up your home this spring! Once you’ve got your faux eggs covered in gold leaf, putting together this wreath is simple.
Wreath Supplies You’ll Need
- Gold Leaf Wooden Eggs: The gold leaf eggs are the focal point, adding elegance.
- Grapevine Wreath: Provides a natural base for all the eggs.
- Gold Spray Paint: Adds a metallic finish to the grapevine wreath.
- Leaves: Add texture and depth.
- Faux Green Speckled Eggs: Introduces another texture and color to the wreath.
- Glue Gun: Secures decorations in place.
- Dried Hydrangea Blossoms: I had a bunch of dried hydrangeas sitting around the house, so I added a few to my wreath. Here is a link to some dried flowers.
Easter Egg Wreath Instructions


Step 1 – Gold Leaf Your Eggs
I have a thorough gold leaf easter eggs tutorial that you’ll want to check out. You’ll need at least 12 gold-leaf wooden eggs.


Step 2 – Spray Grapevine Wreath and Leaves
I love gold spray paint; it elevates anything to a pretty state. So, place some newspaper in a well-ventilated room, and spray your wreath and some dry leaves from your yard. I did not spray the backside of the wreath since it will hang on a wall.
Allow the wreath and leaves to dry before proceeding to the next step.


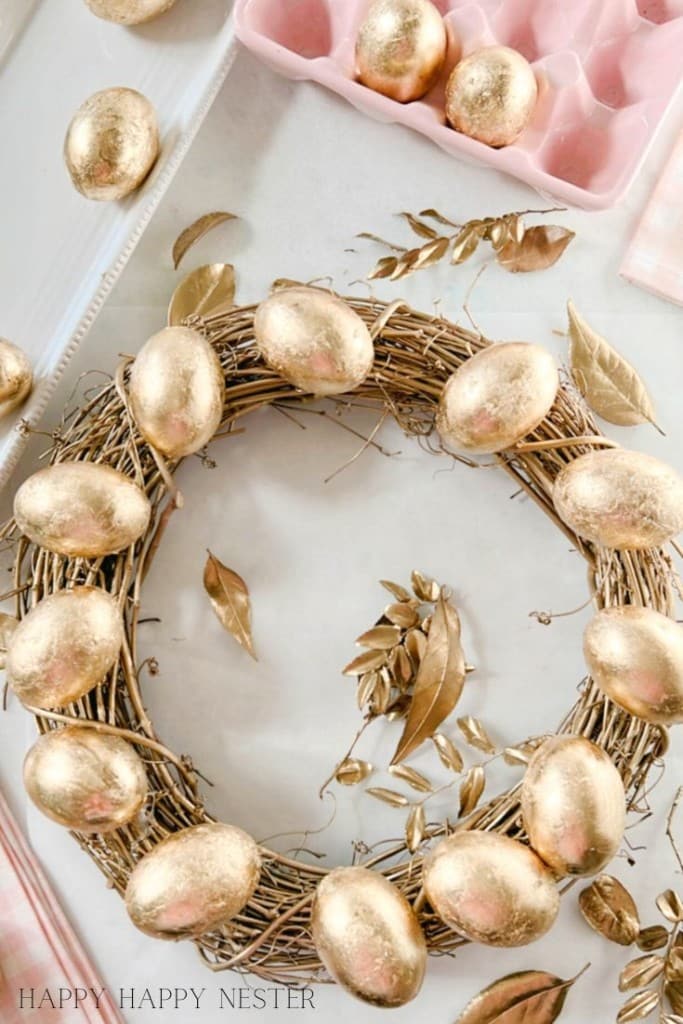
Step 3 – Attach Eggs and Leaves
Attach eggs with your glue gun. I spaced them out and placed them in random directions so that they looked a bit organic. Next, add the green-speckled eggs and attach the gold leaves to the wreath.

Where to Display Your Wreath
- Front Door: Hang your Easter egg wreath on the front door to welcome guests with a festive touch as they enter your home.
- Living Room: Display the wreath above the fireplace mantel or on a blank wall in your living room to add a seasonal focal point.
- Dining Room: Place the wreath as a centerpiece on your dining table or hang it on a wall in the dining area to create a charming Easter ambiance during meals.
- Kitchen: Adorn the kitchen wall or hang the wreath on a cabinet door to infuse a hint of Easter cheer into your cooking and dining space.
- Bedroom: Hang the wreath on the bedroom door or above the headboard to bring springtime joy to your private sanctuary.

To shop this post, tap on the image.


DIY Easter Egg Wreath: Tips and Tricks for Success
- Have All Your Supplies Ready: Make sure all your supplies are ready before starting the project.
- Take Your Time: Patience is vital when applying gold leaf – work slowly and methodically to achieve smooth, even coverage on each egg.
- Experiment with Placement: Play around with different arrangements of the gold leaf eggs on the wreath until you find the layout that best complements your space and aesthetic preferences.
- Ready-Made Gold Eggs: Consider buying faux eggs already covered in gold leaf to streamline the process and ensure uniformity in your wreath’s design.

Here are Some Other Egg Projects
- Gold Leaf Easter Eggs
- Decoupage Easter Eggs with Cupcakes Liner
- 9 Unique Easter Egg Ideas: Decoupage Eggs
On the internet, you’ll see the speckled gold leaf eggs, and you can totally use those instead of having to make the eggs. But for this project, I was obsessed with covering the whole egg in gold leaf for that elegance.
So, make sure to check out my Gold Leaf Easter Egg Tutorial since I share all my secrets on creating the perfect gold leafing technique for your eggs!
Well, with the arrival of spring, I wanted to send you warm wishes for a delightful season.
Thank you for dropping by to check out my Easter egg wreath DIY. I’m so happy to share my crafting adventures and hopefully inspire you to create a beautiful spring home for you and your family.
Cheers,

Photo Credits: MyPhotography.com


- Meringue Cookies Recipe - March 20, 2026
- Bathroom Accessories from Amazon - March 18, 2026
- Fluffy Japanese Pancake Recipe (Souffle) - March 16, 2026
")


Leave a Reply