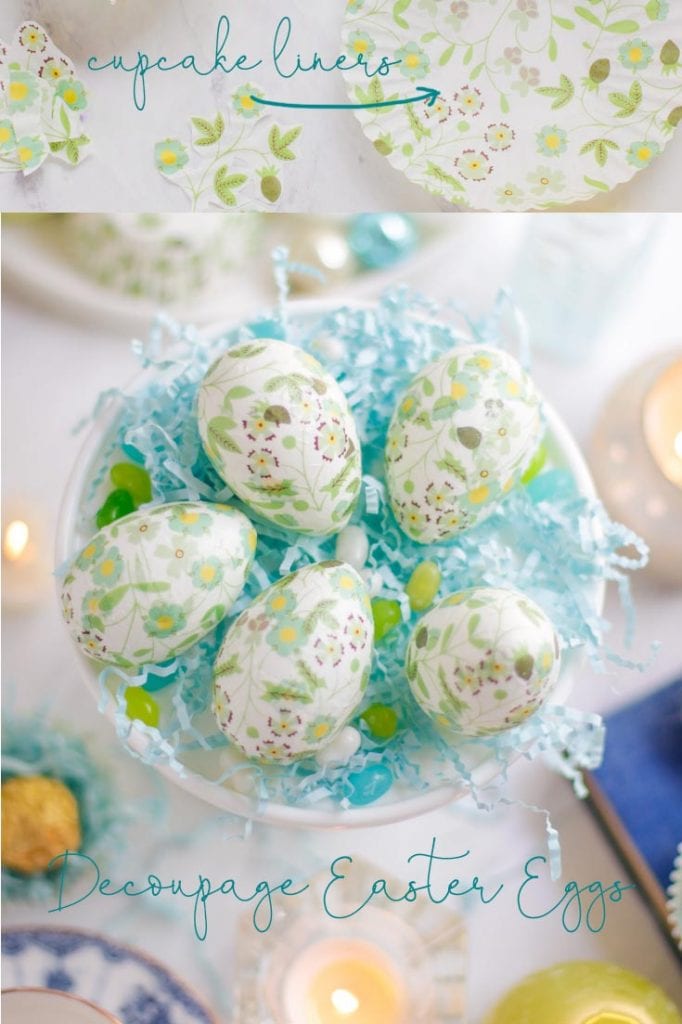
Did you know that you can Decoupage Easter Eggs with Cupcake Liners? If you don’t have any paper napkins, then buy some cute Easter cupcake liners and have fun decorating and modge podging your eggs.
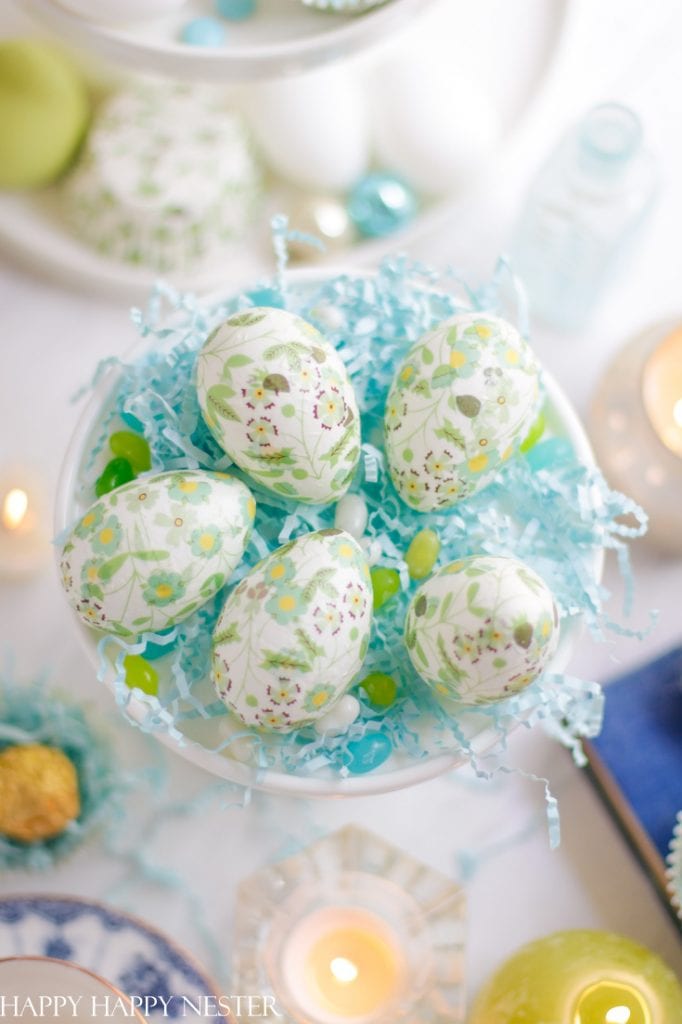
I love how my decorated eggs came out, and the cupcake liners were quite strong and didn’t tear with the glue. I love the design of these Liberty of London paper liners!
If you’re interested in Spring and Easter projects, I have a few over here on the blog:
I can’t recall how long I’ve been dying to try decoupaging Easter eggs with paper napkins. I even placed some pretty napkins in my shopping cart over on Amazon.

But, I got distracted, and I never placed the order. So, then I thought I would try some cute cupcake liners. They are waterproof like the napkins, and in fact, their paper is stronger. And most of all, I happened to have this set of liners which is so convenient. So, a total win-win scenario.

I also feel that since cupcake liners are smaller, their designs are smaller, which works better for covering eggs.
I happened to have these beautiful Liberty of London paper cupcakes liners, and I used the green ones to decoupage these eggs. Doesn’t this paper design look like Liberty of London’s pretty material? My mom was obsessed with this line of fabric.
Once I got this idea to cover my faux eggs with the liners, I quickly got busy. And I ended up making quite a few. And it turns out that I figured out a few important things about decoupaging Easter eggs.
And I’m happy to share my tips with you. And you can find them further down in this post.
How to Decoupage Easter Eggs with Modge Podge
*The following post contains affiliate links
Supplies:
Modge Podge I used the Gloss Lustre Modge Podge
Steps to Decoupaging the Eggs
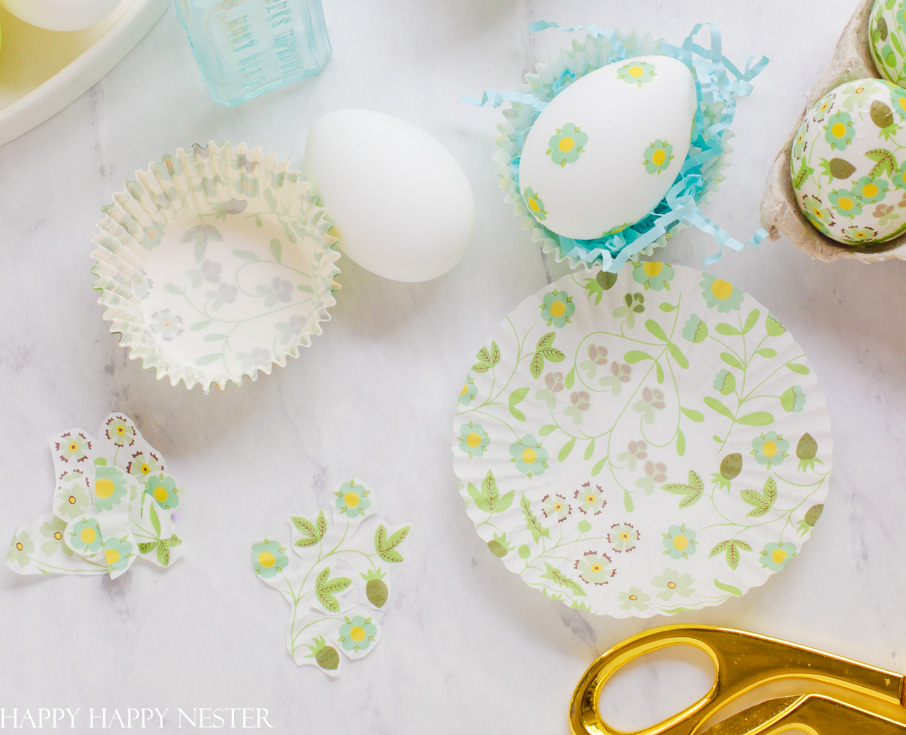
Step 1 – Flatten Out Your Liner
Before I started, I thought maybe I might have to iron out the paper’s wrinkles, but I went ahead and tried modge podging them. It worked out fine. The wetness of the glue flattened out the paper. If you want you can open up your cupcake liners and flatten them a bit to make it easier to cut your pieces.
Step 2 – Cut Paper
Cut out parts of your cupcake liners. You can cut out somewhat large designs, but make sure you place slits into the design. This allows overlapping of the paper instead of having bulging creases.
Step 3 – Modge Podge
Add a little bit of glue to your egg, and then position your paper over it. Modge podge over the paper, flattening the paper and any creases. Repeat this step until you cover the whole egg.
Also, if there is an image you want to stand out, then leave that for the top layer; otherwise, it might get buried.
Helpful Tips About Decoupaging
Tip 1 – Small Designs Work Best
If the designs on the cupcake liners are too large, then there will be lots of wrinkles when you place them on the egg. Eggs are round, so anything flat will have to wrap around it with creases.
When you have a small and busy pattern, it makes it harder to tell that the patterns overlap on the eggs.
Tip 2 – Choose a Paper with a White Background
I quickly figured out that if I missed covering a spot, the white egg blended in with my cupcake liner’s white background. Matching the background to match your egg, makes decoupaging a lot easier.
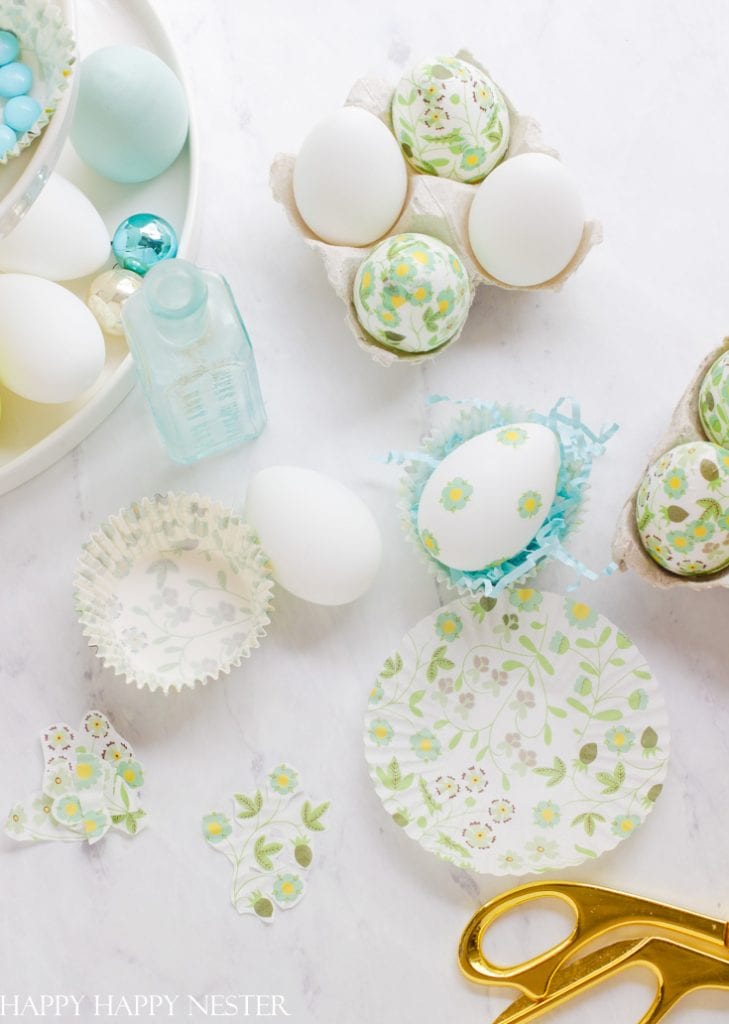
Tip 3 – Flatten the Liners
Open up the cupcake liners and flatten them. Try to get a few of the ruffles out of the paper, but no need to be too fastidious. When the modge podge layer is added to the paper, the wrinkles disappear.
Tip 4 – Cut Out All You Pieces
I originally started off decorating my first egg with cutting the paper and placing it on the egg as I glued. But, it is best to get all your paper cut and ready so that your scissors don’t get a layer of modge podge on them.
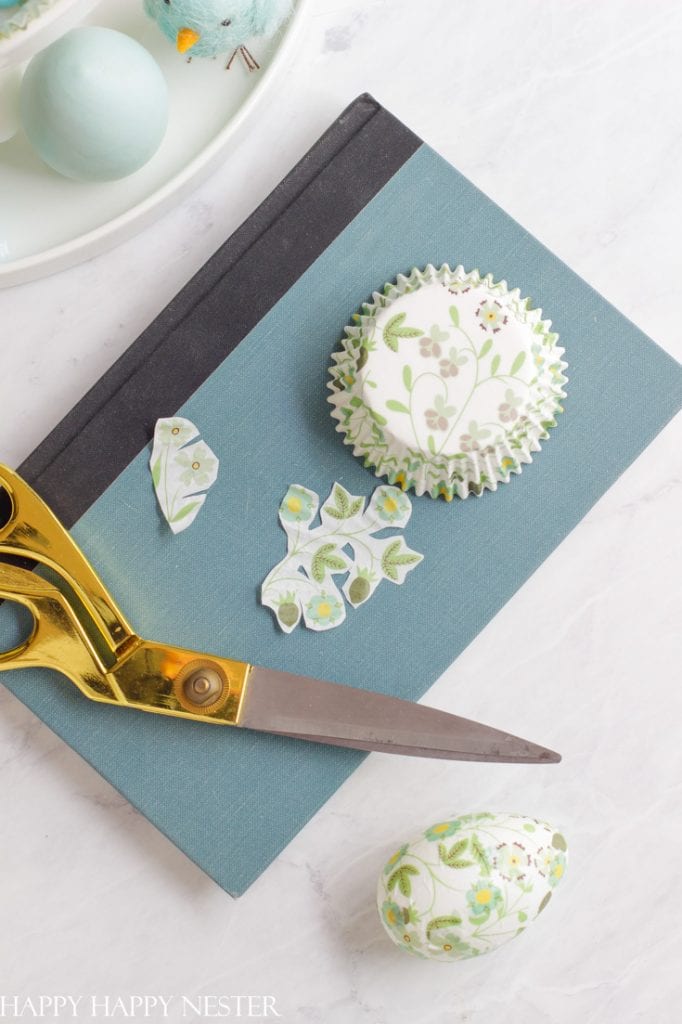
Tip 5 – Cut Slits in the Cutouts
When you cut your paper, place slits in cutouts, you can see from the above photo that I cut away some of the areas with big blocks of paper. That way, when you glue them to your egg, you can easily move and overlap areas. So think of it this way, if you need to place a crease in the paper, instead make a slit.
Tip 6 – Gluing the Paper
Use one hand to hold and smooth the modge podge and paper. This will be the sticky hand. And use the other hand to grab the paper. Basically, you have one clean hand and one covered in glue.
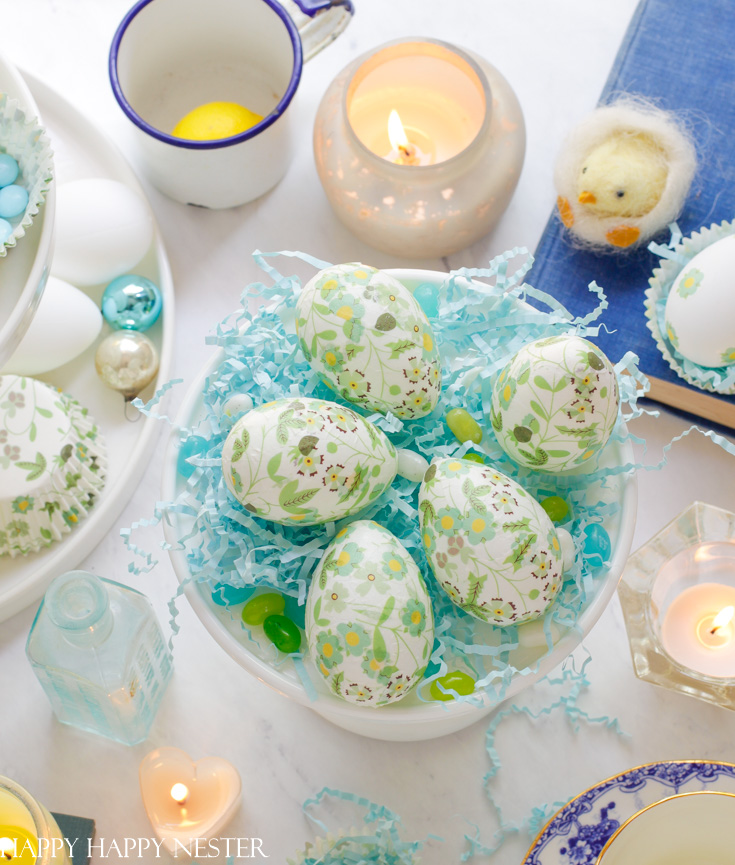
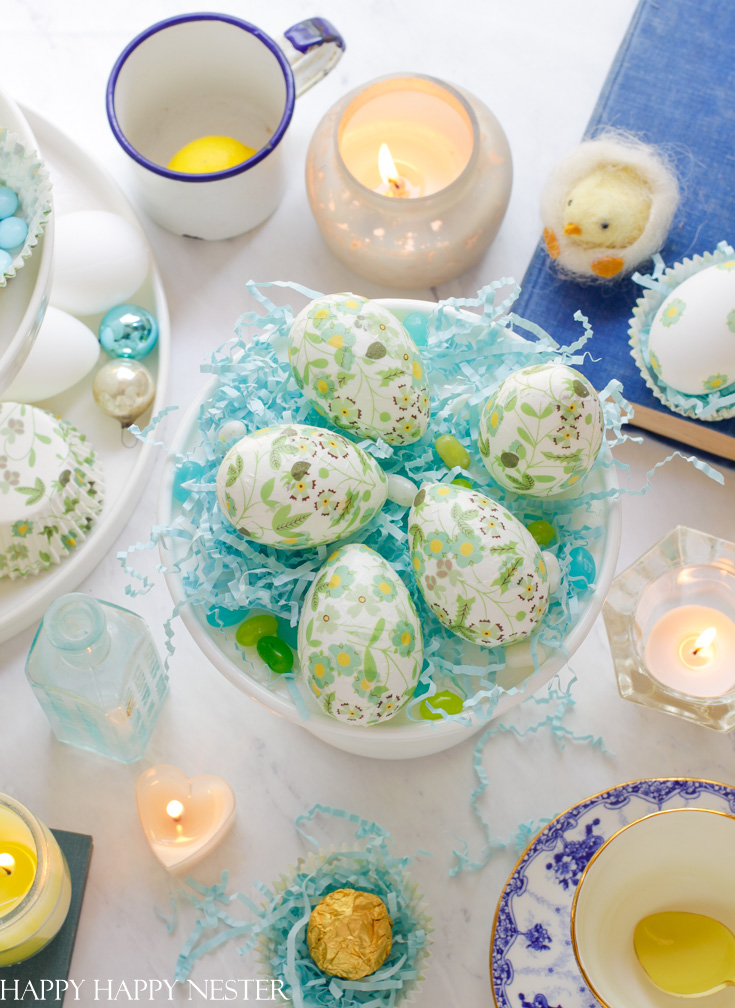
I know that this is just a decoupage project but I had so much fun crafting this Easter eggs! They totally make me smile and I love their fresh spring colors.
Happy Crafting!

PS: I’ll share a video on how to make them over in my private craft membership. To find out more, here is the link to more information.
Here are My Friend’s Easter Crafts!
The DIY Mommy | Fuzzy Crochet Chain DIY Easter Eggs
Happy Happy Nester | Decoupage Easter Eggs
Finding Lovely | Wooden Easter Egg Bunnies DIY
Zevy Joy | Vintage Inspired DIY Painted Easter Eggs
Craftberry Bush | Hand Painted Easter Eggs
Modern Glam | Living Centerpiece for Your Easter Table
Twelve on Main | Easy Bunny Art Using Scrap Fabric
Tatertots and Jello | Easter Basket Living Floral Centerpiece
My 100 Year Old Home | How to Make Easy Paper Flower Daffodils


- Easy Homemade Breadsticks Without Yeast (25-Minute Recipe!) - July 24, 2026
- Lazy Saturday Morning Breakfast Ideas - July 18, 2026
- Lemon Blueberry Crumble (With Creamy Mascarpone) - July 16, 2026


Sharon
Janine, these are the prettiest Easter eggs I’ve seen in a long time! How creative! I would never have thought cupcake liners would work but they look beautiful. Thank you for sharing and putting a little excitement in my day. I’m definitely going to try this. You are so creative!
happyhappynester
Hi Sharon,
I’m so happy you love the eggs! When I read your comment, you totally made my day so happy! Thanks for a visit and for taking the time to write a lovely comment!
Ivory
Wow, amazing. You blew my mind with these fabulous Decoupaged Eggs. I would have never thought to use paper cupcakes holders, but you should me that when we think outside the box, skies the limit. Thank you for giving me this courage.
happyhappynester
Hi Ivory!
I hope you have a chance to make them. They are so cute and not that difficult to make! You’re so sweet to leave such a wonderful comment!