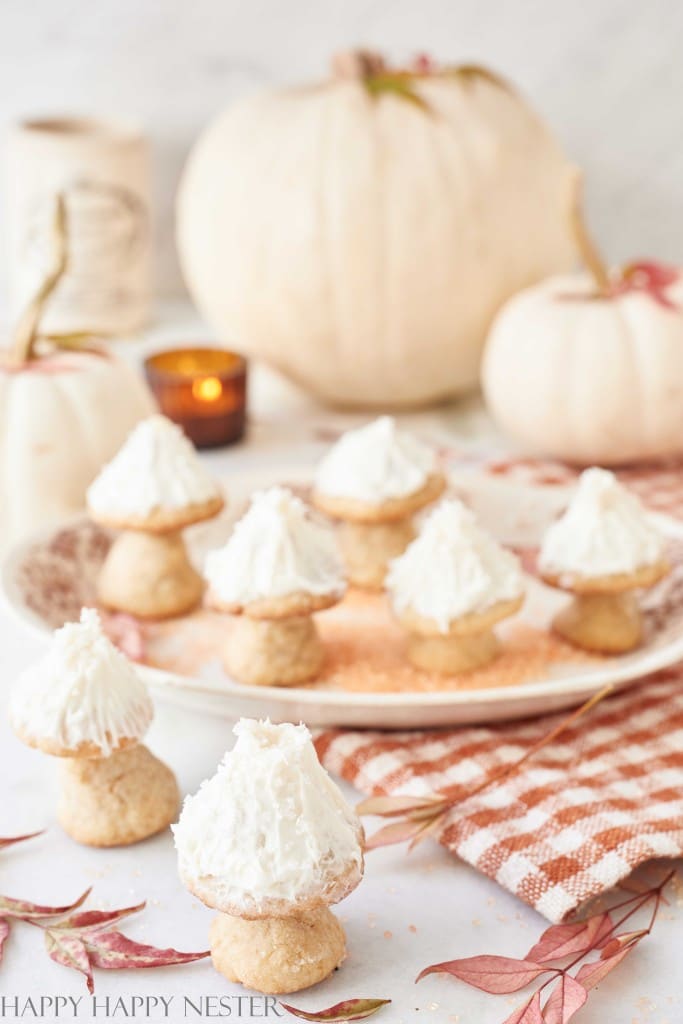
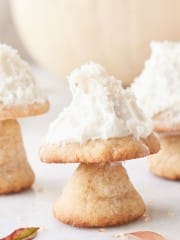
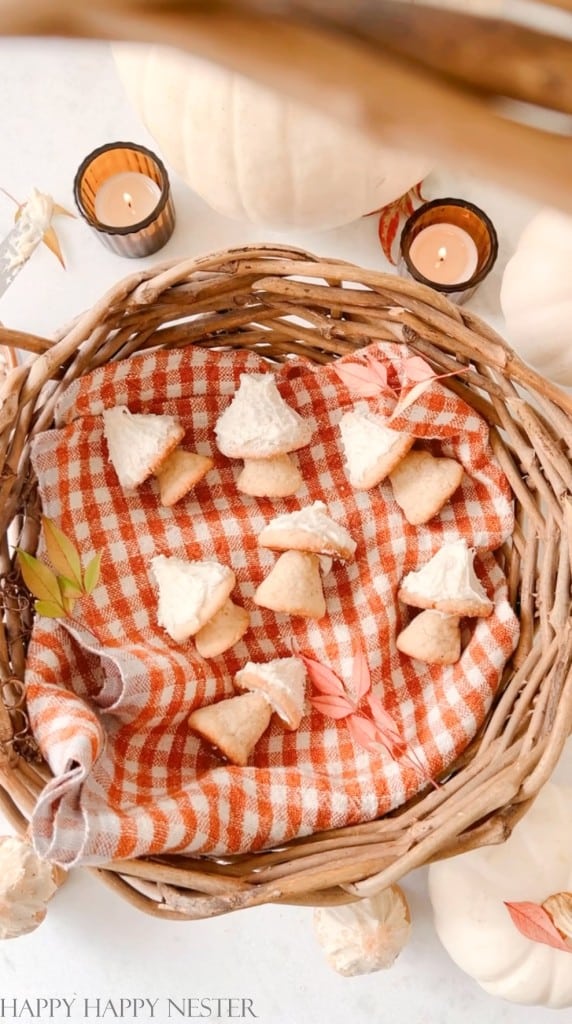
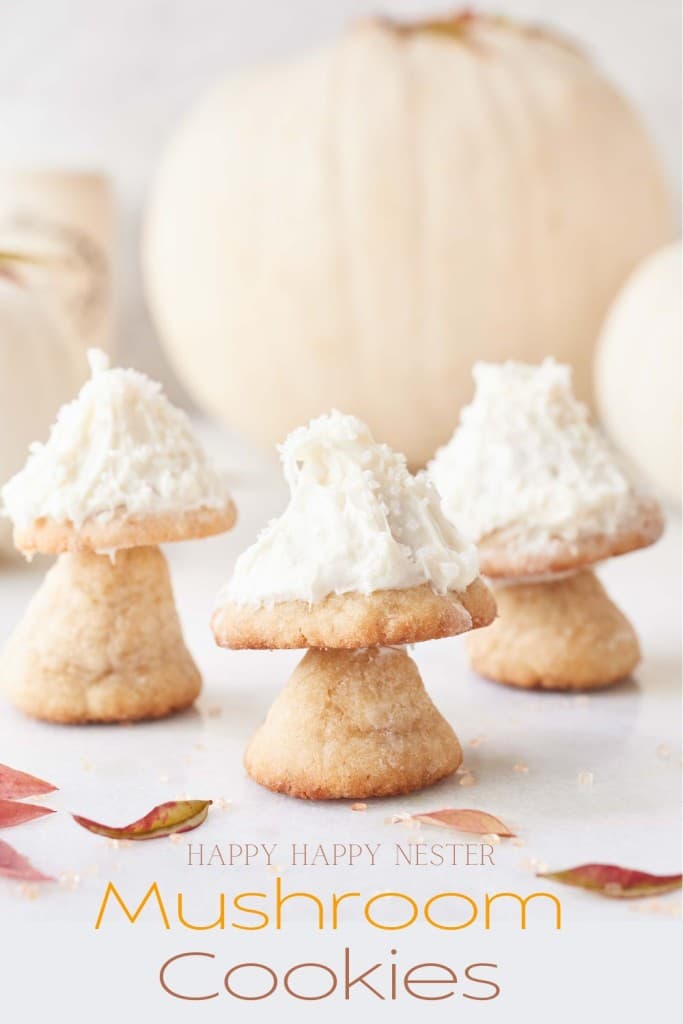
These Mushroom Cookies are crafted using a simple sugar cookie recipe that allows for easy shaping. Not only are these petite cookies adorable, but they have a delightful flavor. Whip up a batch for a special birthday celebration or use them to decorate a woodland-themed cake.
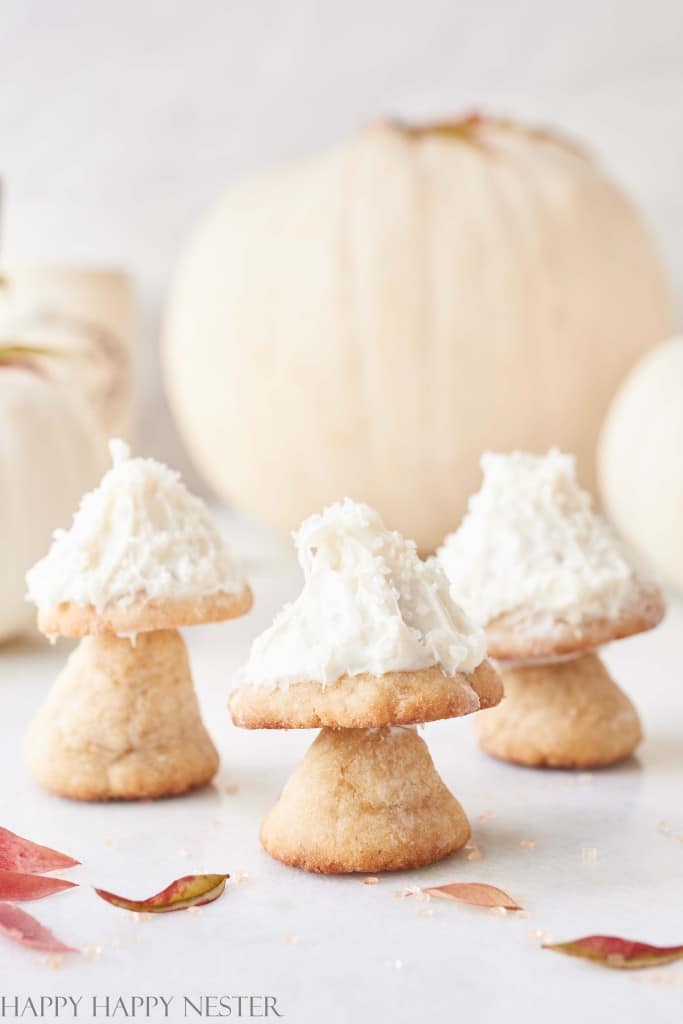
I’m not sure how the mushroom craze began, but I’m fascinated by all the crafts that have popped up around them. Then, when I thought about making these fun mushroom-shaped cookies, I had to try them!
I’m constantly on the lookout for adorable baking projects, and with the holiday season approaching, I can’t resist the urge to create these fun little mushrooms. I have a few other cute recipes that are perfect for the holidays!
WHAT ARE MUSHROOM COOKIES?
WHAT STARTED THE MUSHROOM CRAZE?
The “mushroom decor craze” is a trend that has gained popularity in interior design and home decor. While it’s difficult to pinpoint a single origin for this trend, several factors have contributed to its rise:
- Nostalgia: Mushroom decor often evokes a sense of nostalgia for the 1960s and 1970s, a period known for its quirky and whimsical design elements. Many people are drawn to these retro styles for the memories or aesthetics.
- Bohemian and Nature-Inspired Themes: The mushroom motif fits well with bohemian and nature-inspired decor themes. Mushrooms are associated with the natural world and can add an earthy and cozy element to interior spaces.
- Sustainability and Eco-Friendly Design: As a natural and sustainable element, the mushroom aligns with the growing interest in eco-friendly and sustainable home decor. People are seeking ways to incorporate nature into their living spaces.
- Social Media and Influencers: Social media platforms like Instagram and Pinterest have significantly popularized mushroom decor. Interior design influencers and bloggers often showcase their mushroom-themed decor, inspiring others to follow suit.
- Artistic Expression: Mushrooms offer a unique and artistic design element. Their whimsical shapes, vibrant colors, and intricate details can be visually captivating and make for eye-catching decor pieces.
- Craft and DIY Culture: The mushroom decor trend has been further fueled by the popularity of crafting and DIY culture. Many enjoy creating mushroom-themed decor items, from paintings to textiles and ceramics.
HOW TO MAKE MUSHROOM COOKIES
When I set off on this baking adventure, I was a little concerned that it might be a big project.
But then I figured out that with the perfect cookie dough, I could easily shape the mushroom stems and caps and bake them without worrying about them spreading too much.
As for my other concern – shaping the mushroom – I soon discovered that all you really need to create is a dome and cone shape!
WHAT YOU’LL NEED TO MAKE THESE MUSHROOM COOKIES
- Crisco: It contributes a tender and flaky texture to the sugar cookie, ensuring a delightful bite.
- Vanilla Extract: This imparts a rich and aromatic flavor, enhancing the overall taste of the cookie.
- Brown Sugar: Brown sugar adds a subtle molasses undertone and contributes to a soft, chewy texture.
- Granulated Sugar: It provides sweetness and helps the cookie hold its shape while baking.
- Egg: Acting as a binding agent, the egg adds moisture and structure to the cookie dough.
- Flour: Forming the base of the dough, flour provides structure and stability to the cookies.
- Salt: This ingredient enhances the flavor of the cookie, balancing the sweetness and adding depth to the taste.
- Butter: Butter forms the creamy foundation of the vanilla frosting, lending a rich and indulgent texture.
- Powdered Sugar: Powdered sugar sweetens and thickens the frosting, creating its signature sweetness and consistency.
- Vanilla Extract: Adding a burst of aromatic flavor, vanilla extract enhances the overall taste of the frosting.
- Heavy Cream: Heavy cream provides a luscious creaminess and helps achieve the desired consistency of the frosting.
STEP-BY-STEP COOKIE DIRECTIONS
COOKIE DOUGH
Step 1 – Preheat Oven
Preheat oven to 375 degrees.
Step 1 – Make Cookie Dough
Combine and mix flour and salt in a bowl. Place the egg in a small bowl and whisk with a fork thoroughly.
Whip shortening for a minute or two with a mixer. Add vanilla to the shortening and mix well.
Add brown and granulated sugar to the shortening and mix for another minute or two until combined.
Add the egg mixture to the shortening and blend well.
Add portions of the flour to the sugar/shortening mixture and beat well after each addition. Once all the flour is added, beat for another minute.
Step 2 – Make Frosting
Cream the Butter: In a mixing bowl, beat the softened butter until it becomes creamy and smooth. You can use a hand or stand mixer with a paddle attachment.
Add Vanilla Extract: Add the vanilla extract to the butter and mix until well combined.
Gradually Add Sugar: Begin adding the confectioners’ sugar, one cup at a time, while mixing on low speed. Scrape down the sides of the bowl as needed to ensure all ingredients are well incorporated. Continue to mix until the frosting becomes thick and fluffy.
Adjust Consistency: Add heavy cream or milk, one tablespoon at a time, until you reach your desired consistency. If you want a thicker frosting, use less liquid; for a smoother and lighter consistency, use more. Be careful not to add too much liquid at once to avoid making the frosting too thin.
Taste and Adjust: Add a pinch of salt if you use unsalted butter, which helps balance the sweetness. Taste the frosting and adjust the flavor or consistency as needed. You can add more vanilla extract for a stronger vanilla flavor.
Beat Until Light and Fluffy: Continue beating the frosting for 2-3 minutes on medium-high speed until it becomes light and airy. This will give your frosting a lovely, creamy texture.
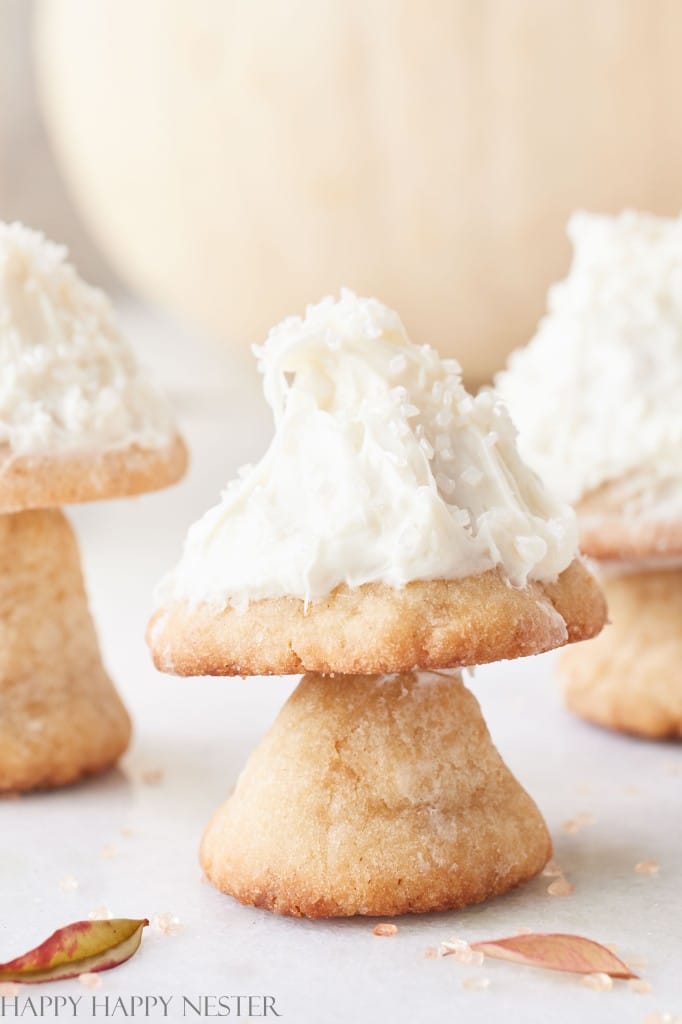
Step 3 – Make Mushroom Cookies
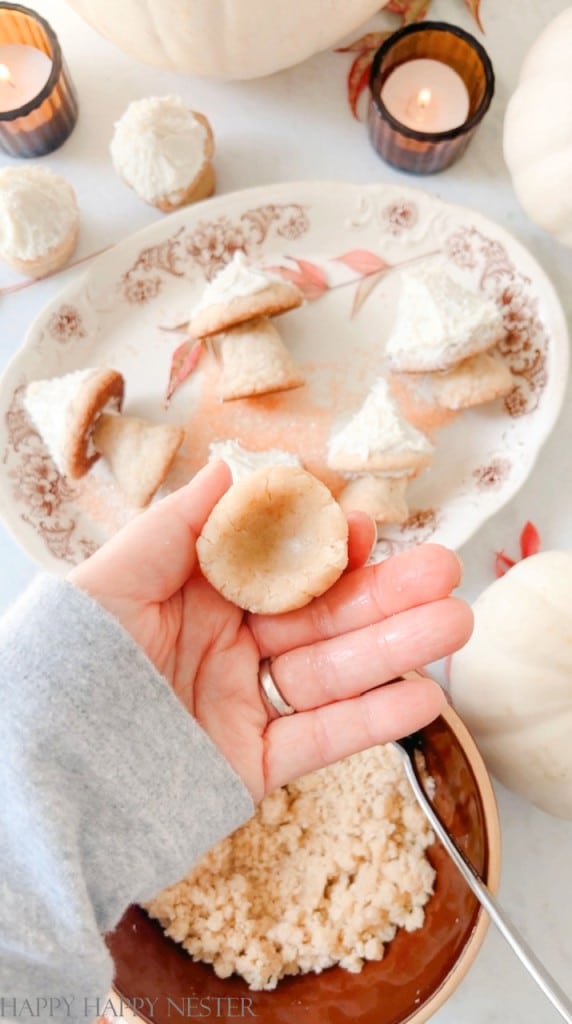
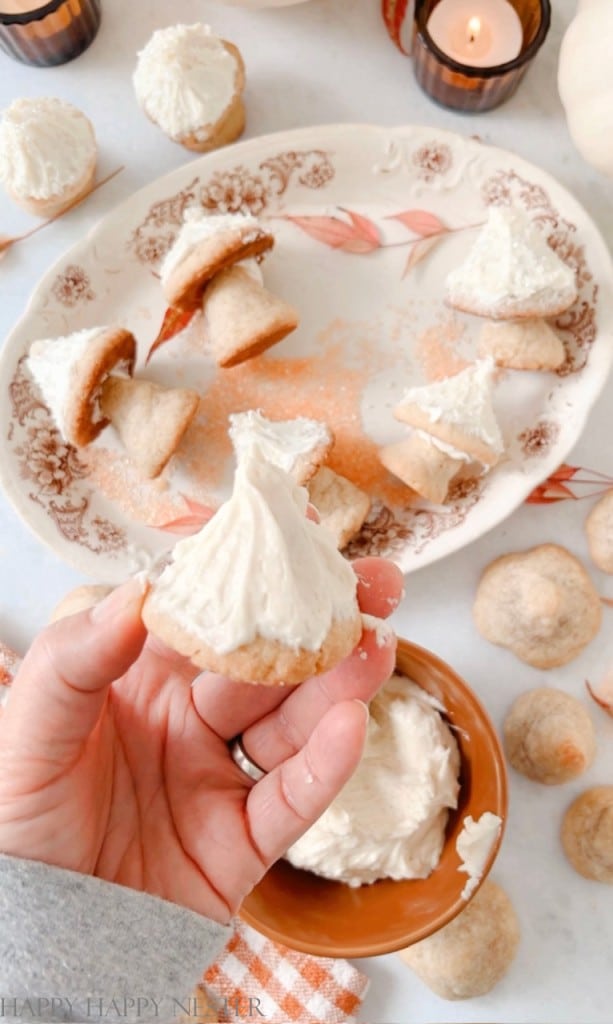
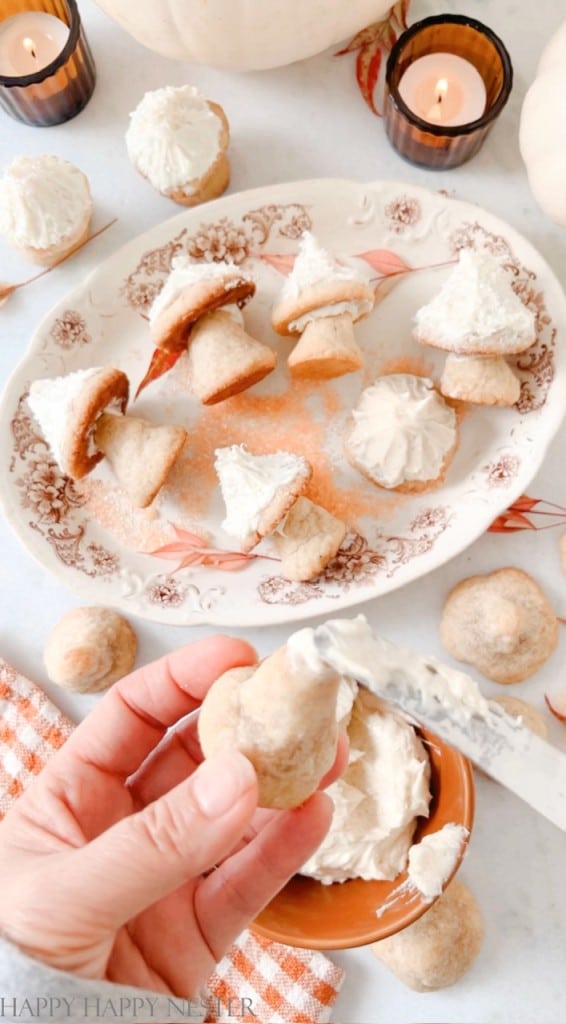
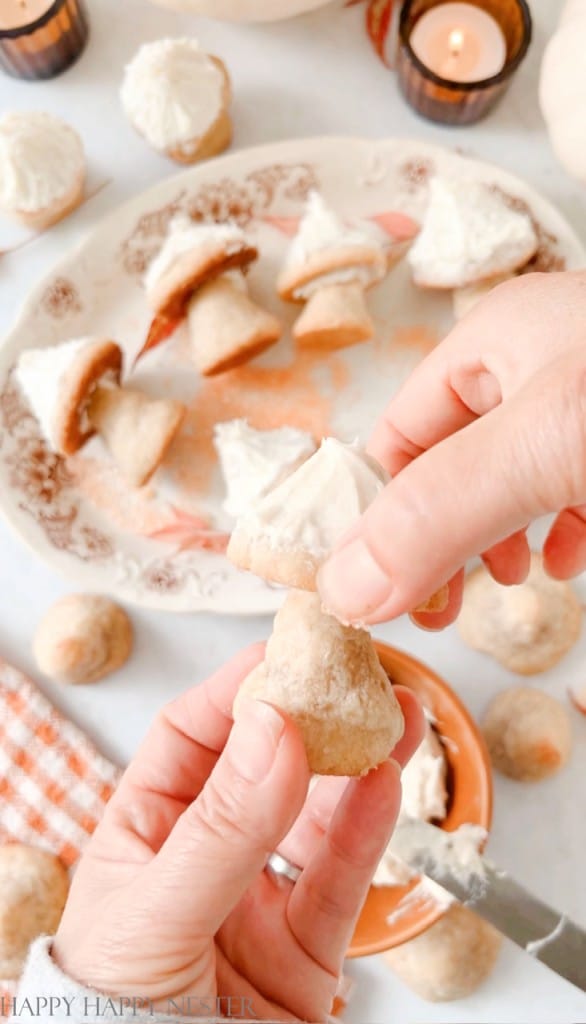
Make Caps: Take about two tablespoons of dough and form a round ball. Then, place a knuckle in the ball to create a cap. Shape the cap around the top of your knuckle to create a little nook that will house the mushroom stem. Place flat side down on a parchment-lined cookie sheet.

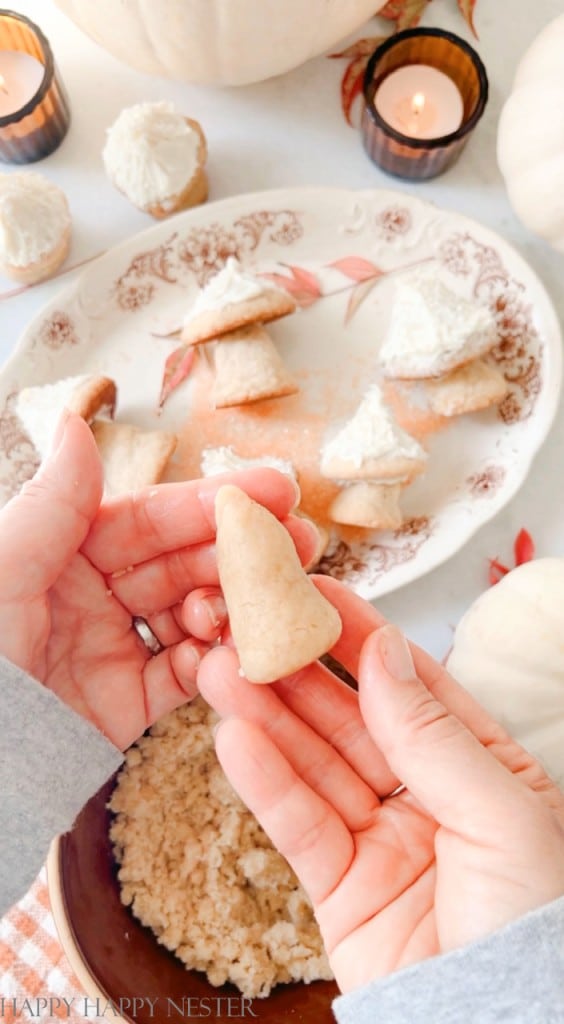
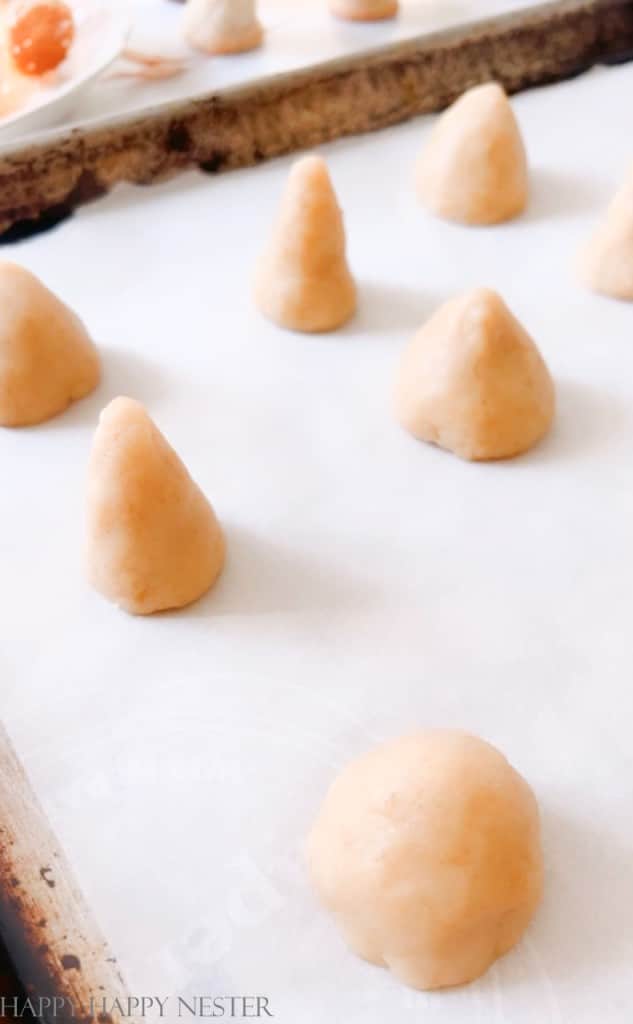
Make Stem: Take another tablespoon of cookie dough and form a cone with it. You’ll have a shape that is large on the bottom and pointy on top. Place the bottom on your cookie sheet and keep forming the stem.
You can chill your shaped cookies in the fridge for 20 minutes. This will help the cookies not spread when baking.
Step 4 – Bake Cookies
Bake at 375 for about 10 minutes.
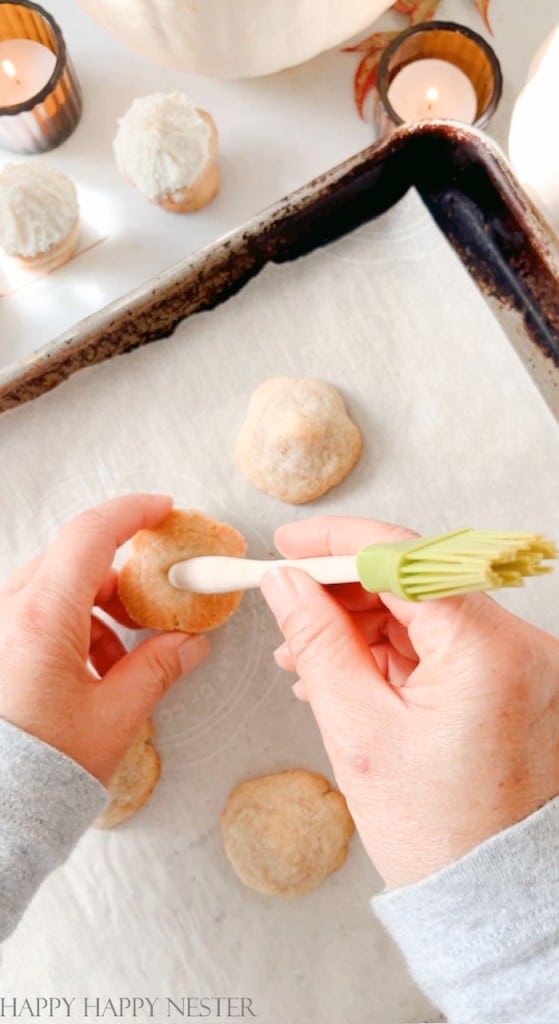
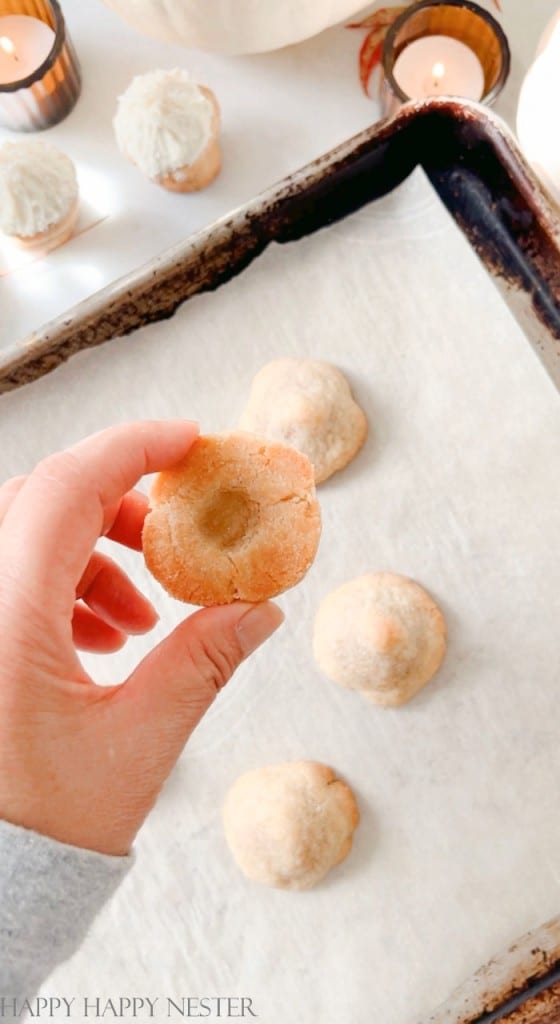
Once out of the oven, recreate the indentation on the bottom part of the mushroom cap.
Step 5 – Frost and Assemble Mushrooms
I applied frosting to my mushroom in a sweeping upward motion, dividing it into segments, but feel free to frost them in your preferred manner.
Place a small dollop of icing on the stem’s top, then place the cap on the icing. Hold the cap and stem in place for a bit. Over time, the icing will harden and hold the two cookies together.
Mushroom Cookie Recipe
Ingredients
Cookie
- ¼ cup shortening plus 1 tablespoon
- ½ tsp vanilla extract
- ⅛ cup brown sugar lightly packed
- ¼ cup granulated sugar
- ½ egg whisk, then measure ⅛ cup of the egg
- ¾ cup flour plus 2 tablespoons
- ¼ tsp salt
Frosting
- ¼ cup unsalted butter softened
- 1 cup powdered sugar
- ½ tsp vanilla extract
- 2-3 tbs heavy cream or milk
- pinch of salt
Instructions
- Preheat Oven to 375°
Cookie Dough
- Combine and mix flour and salt in a bowl. Place the egg in a small bowl and whisk with a fork thoroughly.Whip shortening for a minute or two with a mixer. Add vanilla to the shortening and mix well.Add brown and granulated sugar to the shortening and mix for another minute or two until combined.Add the egg mixture to the shortening and blend well.Add portions of the flour to the sugar/shortening mixture and beat well after each addition. Once all the flour is added, beat for another minute.
Frosting
- Cream the Butter: In a mixing bowl, beat the softened butter until it becomes creamy and smooth. You can use a hand or a stand mixer with a paddle attachment.Add Vanilla Extract: Add the vanilla extract to the butter and mix until well combined.Gradually Add Sugar: Begin adding the confectioners’ sugar, one cup at a time, while mixing on low speed. Scrape down the sides of the bowl as needed to ensure all ingredients are well incorporated. Continue to mix until the frosting becomes thick and fluffy.Adjust Consistency: Add heavy cream or milk, one tablespoon at a time, until you reach your desired consistency. If you want a thicker frosting, use less liquid; use more for a smoother and lighter consistency. Be careful not to add too much liquid at once to avoid making the frosting too thin.Taste and Adjust: Add a pinch of salt if you use unsalted butter, which helps balance the sweetness. Taste the frosting and adjust the flavor or consistency as needed. You can add more vanilla extract for a stronger vanilla flavor.Beat Until Light and Fluffy: Continue beating the frosting for 2-3 minutes on medium-high speed until it becomes light and airy. This will give your frosting a lovely, creamy texture.
Assemble the Cookies
- Make Caps: Take about a tablespoon of dough and form a round ball. Then, place a knuckle in the ball to create a cap. Shape the cap around the top of your knuckle to create a little nook that will house the mushroom stem. Place flat side down on a parchment-lined cookie sheet.Make Stem: Take another tablespoon of cookie dough and form a cone with it. You’ll have a shape that is large on the bottom and pointy on top. Place the bottom on your cookie sheet and keep forming the stem.You can chill your shaped cookies in the fridge for 20 minutes. This will help the cookies not spread when baking.
Bake and Frost Cookies
- Bake at 375° for about 10 minutes.Once out of the oven, recreate the indentation on the bottom part of the mushroom cap.
- I applied frosting to my mushroom in a sweeping upward motion, dividing it into segments, but feel free to frost them in your preferred manner.Place a small dollop of icing on the stem’s top, then place the cap on the icing. Hold the cap and stem in place for a bit. Over time, the icing will harden and hold the two cookies together.
Notes
Nutrition
HOW TO STORE YOUR COOKIES
To store mushroom-shaped cookies, place them in an airtight container with parchment paper or wax paper between layers to prevent sticking. Store the container in a cool, dry place or the refrigerator for a longer shelf life.
A FEW SHORTCUTS
- Instant Frosting: Opt for pre-made frosting or icing that you can easily tint and use for decorating the mushroom caps. This can save time compared to making frosting from scratch.
- Skip Chill-Time: The chilling step keeps the cookies from spreading when baking. But, this cookie dough keeps its shape quite well, so you can skip the chilling stage.
- Speed Up The Cooling Time: You can remove the cookies from the baking sheet in a few minutes, then place them in the fridge to cool down quickly.
- Don’t Frost The Mushrooms: If you’re rushed for time, skip frosting the caps of the mushrooms.
- Color The Cookie Dough: To add a nice touch, color the cookie dough and pass up frosting the mushroom caps.
FREQUENTLY ASKED QUESTIONS
No need for a fancy cookie mold. You’ll create two shapes for these mushrooms: a stem and a cap.
That is a great alternative to frosting the mushrooms!
The store-bought frosting tastes great; you can use it instead of my homemade recipe. If you like, buy the chocolate or vanilla for a little variation.
SOME FUN RECIPE VARIATIONS:
- Color the frosting for a fun look.
- Use store-bought frosting and use vanilla and chocolate for some variations.
- Frost the base of the mushrooms and sprinkle black sugar on it.
- Melt chocolate and dip the caps in it.
- Pipe a fun design on the caps.
I had so much fun creating these charming mushroom cookies! I hope you get the chance to whip up a batch for yourself this autumn.
Thank you for visiting, and enjoy your time in the kitchen!
Cheers,

Photo Credits: MyPhotography.com


- Ai Kitchen Remodel - June 12, 2026
- Lemon Aioli Sauce Recipe - June 5, 2026
- Ginger Beer Mocktail Recipe - May 28, 2026


")

Renae
These are darling! You are so creative. Happy Fall.