• Skip to main content
  • Skip to header right navigation
  • Skip to site footer
  • About
  • Contact
  • Boutique of the Week
    • Facebook
    • Instagram
    • Pinterest
    • Twitter

Happy Happy Nester

Weekly Inspiration for Your Nest

  • Recipes
    • Appetizers
    • Breakfast/Brunch
    • Desserts
    • Dinners
    • Drinks
  • Crafts
  • Decor
  • Shop
    • Fall Decor
    • Kitchen
    • Pillows
    • Holiday Decor
  • Amazon Store
  • Recipes
    • Appetizers
    • Breakfast/Brunch
    • Desserts
    • Dinners
    • Drinks
    • Snacks
  • Crafts
  • Decor
  • Shop
    • Fall Decor
    • Kitchen Favorites
    • Pillows
    • Holiday Decor
  • Saturday Chitchat
  • Boutique of the Week
  • About
  • Contact
  • Facebook
  • Instagram
  • Pinterest
  • Twitter

See What’s Trending…

Cakes

Cookies

Dinners

Wreaths

Drinks

Two decorative Christmas trees crafted with a Paper Christmas Tree DIY technique using stacked white paper cupcake liners are displayed on a white cake stand. The background features a soft focus with subtle festive elements.

Home › Crafts › Paper Christmas Tree DIY

Paper Christmas Tree DIY

Crafts Decor Decorate Holiday
By Janine Waite · Published on Nov 21, 2024
Affiliate Disclosure: This Post May Contain Affiliate Links.

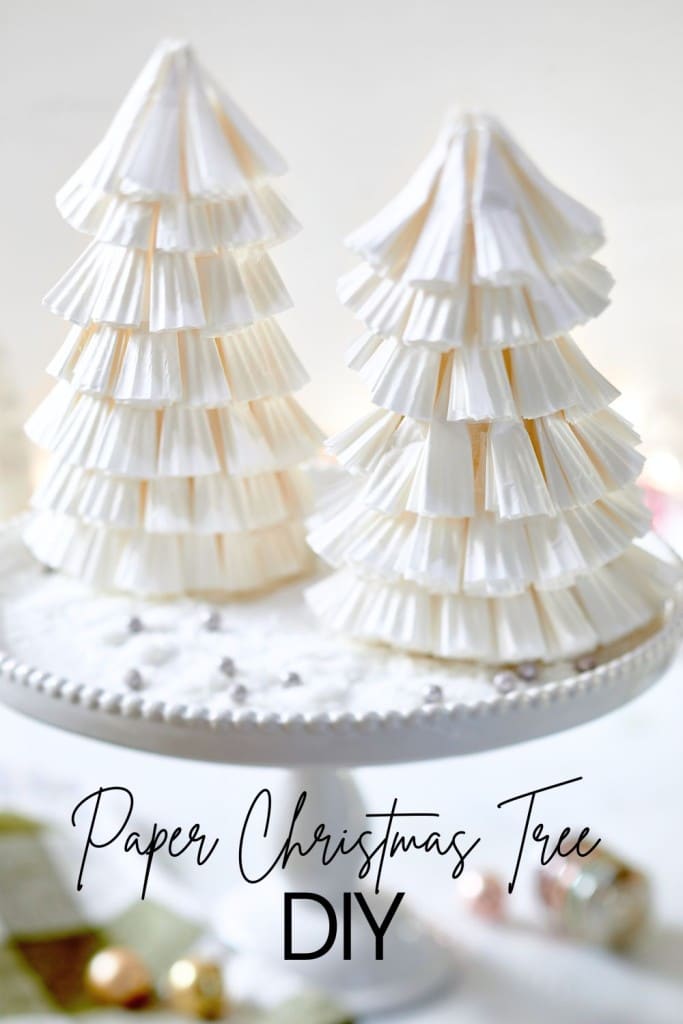
This Paper Christmas Tree DIY is an easy and festive craft perfect for adding a handmade touch to your holiday décor. Made from simple cupcake paper liners, this budget-friendly project is fun for all ages and ideal for creating charming Christmas tree decorations.

Two decorative Christmas trees crafted with a Paper Christmas Tree DIY technique using stacked white paper cupcake liners are displayed on a white cake stand. The background features a soft focus with subtle festive elements.

Whether displayed on a mantel, as part of a holiday centerpiece, or as a whimsical addition to your table, these DIY Christmas decorations bring a personalized, creative flair to your home. Follow these step-by-step instructions to make your holiday season even more magical with this quick and creative folded paper Christmas tree.

A festive paper Christmas tree DIY, crafted from stacked white cupcake liners, exhibits a tiered, layered appearance. Set against a neutral background, this decorative piece adds a unique charm to any holiday setting.

Coming up with this project was a bit of a challenge. While the process of making the paper tree is incredibly simple, the brainstorming phase took some effort.

Initially, I had another craft planned and photographed, but sharing didn’t feel right. It turned out to be too complicated, and I always wanted my crafts to be enjoyable and approachable for everyone. That’s why I’m so excited about this cupcake liner Christmas tree—it’s straightforward, fun to make, and completely customizable.

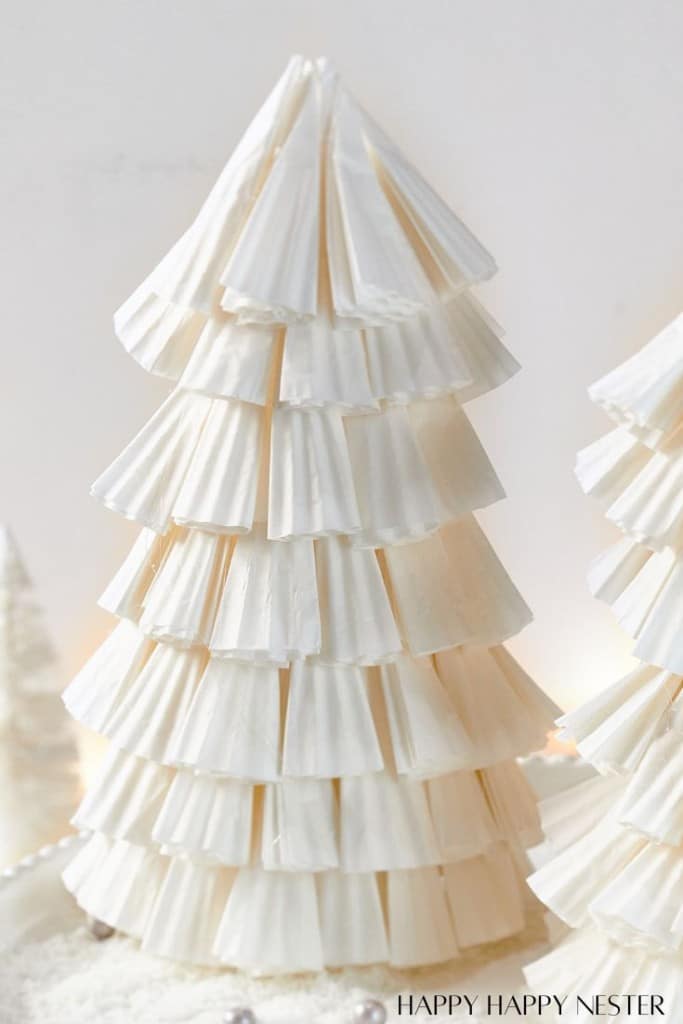
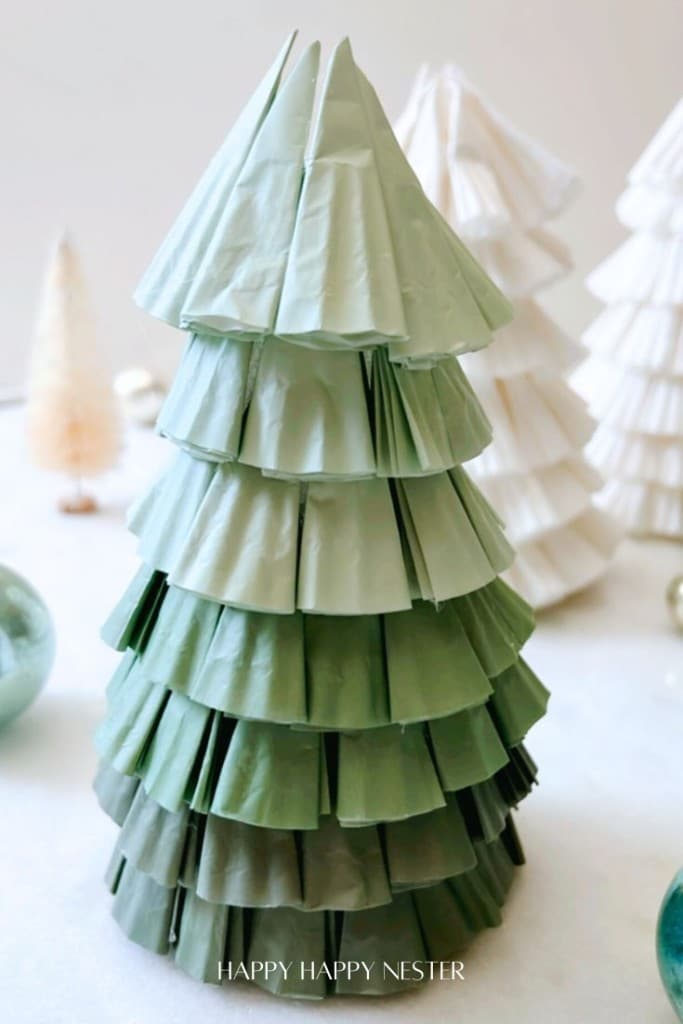
The beauty of this project lies in its flexibility. My first tree was made with plain white cupcake liners and turned out beautifully. Later, I ordered green liners and created an ombré version that added a festive pop of color. Both versions look fantastic, and the possibilities are endless, with different colors and patterns. I can’t wait to get more photos of the green version to share, but I’m thrilled with how this project turned out for now. It’s such a joy to create something simple yet so festive!

Now that the paper trees are finished, I absolutely love how they turned out—it makes the long creative journey totally worth it!

And if you’re as into tabletop trees as I am, you’re in for a treat! My blogging friends have designed some stunning creations, so check out their projects below for even more inspiration!

Why You’ll Love This DIY Paper Tree

The beauty of this project lies in its simplicity—you only need four materials to bring it to life. From there, it’s all about folding the paper liners and gluing them onto the cone shape.

It’s Budget-Friendly
This project uses inexpensive materials like cupcake liners and a Styrofoam cone, making it an affordable way to create stunning holiday décor.

Simple to Make
With just a few steps and basic supplies, this craft is perfect for beginners or anyone looking for a quick and easy holiday project.

Fully Customizable
You can use any color or pattern of cupcake liners to match your holiday theme, making each tree uniquely yours.

Kid-Friendly Craft
This project is easy enough for kids to join in, making it a fun family activity during the holiday season.

Versatile Décor
These trees are the perfect size for tabletops, mantels, or centerpieces, adding a festive touch to any space in your home.

4

How to Make a 3D Christmas Tree

d

Tree Supplies

C

Cupcake Liners (white, green) I used roughly about 77 cupcake liners for my tree)

C

Styrofoam Cone (I used a 6-inch size cone )

Cordless Glue Gun

O

Wooden Block (optional stand)

Step-by-Step Paper Christmas Tree

Various crafting materials, including a white foam cone, green cupcake liners, and a pine cone, are arranged on a light surface with the text "Happy Happy Nester" at the bottom.
Craft materials are arranged on a surface, including green cupcake liners in various states of folding, a white foam cone, and a pine cone. The text "HAPPY HAPPY NESTER" is at the bottom.
DIY craft materials on a white surface, including green paper circles and a styrofoam cone.
A collection of olive green, folded paper cones resembling a DIY Christmas tree are neatly arranged on a light background. Nearby, a stack of matching pleated paper forms is partially visible.

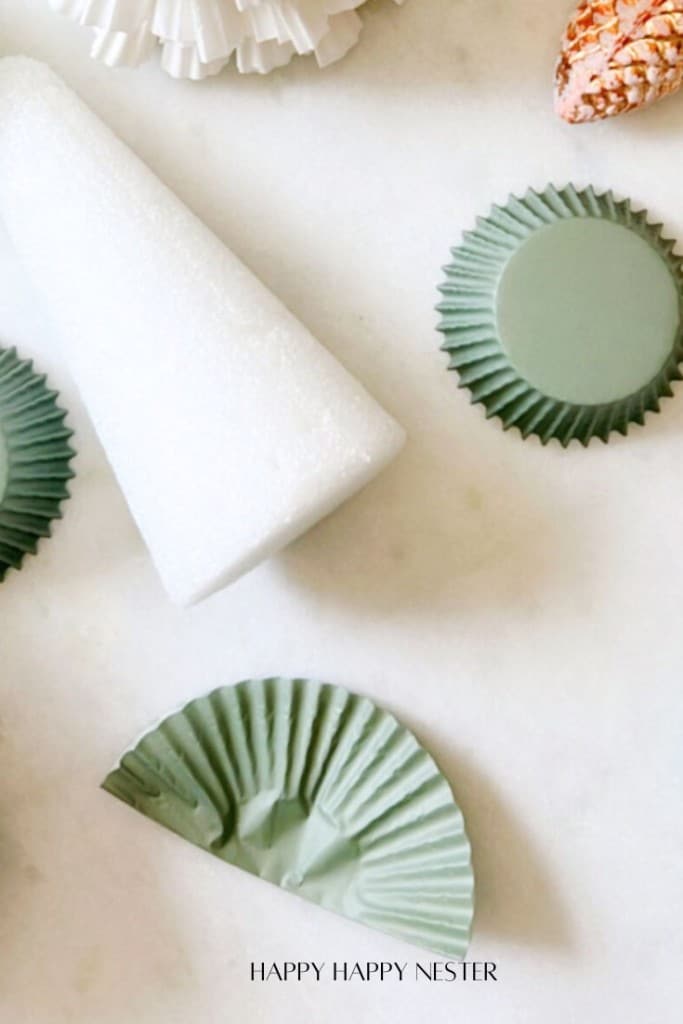
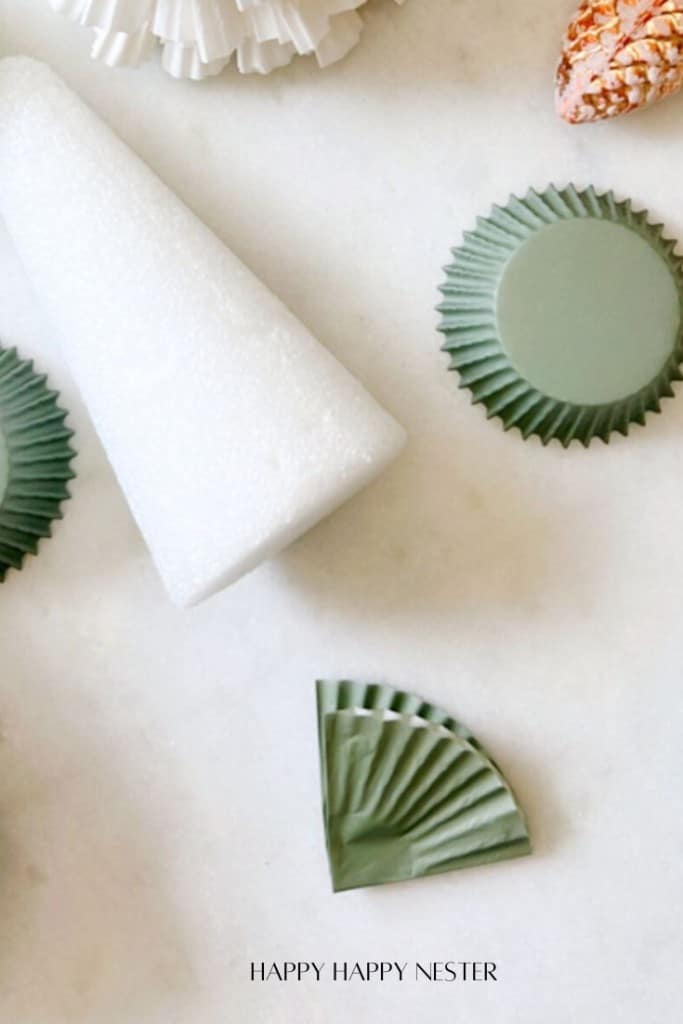
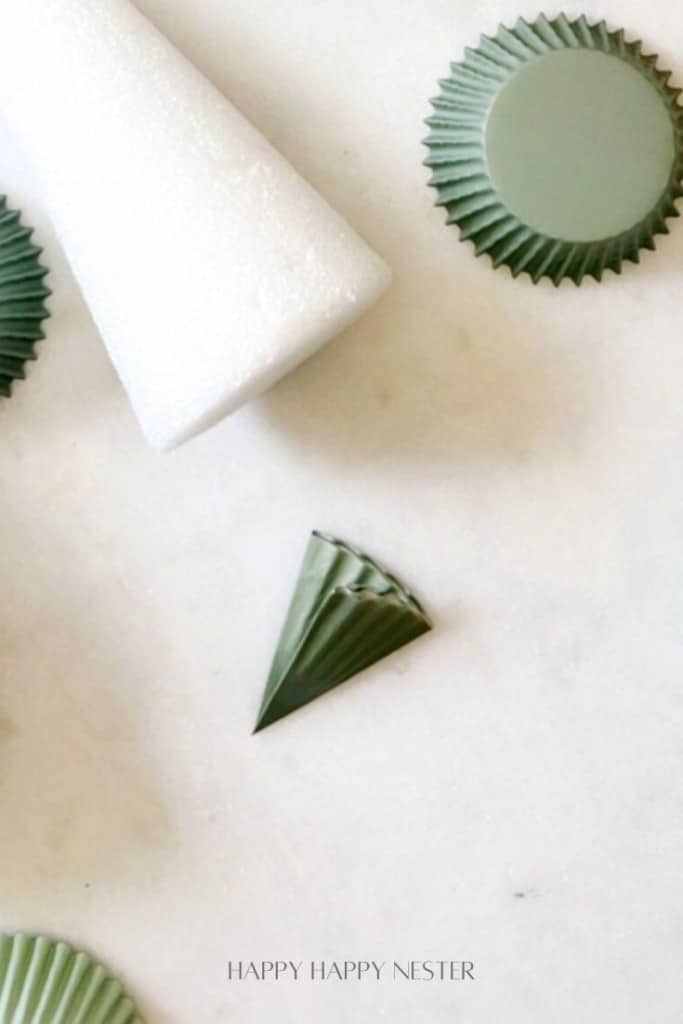
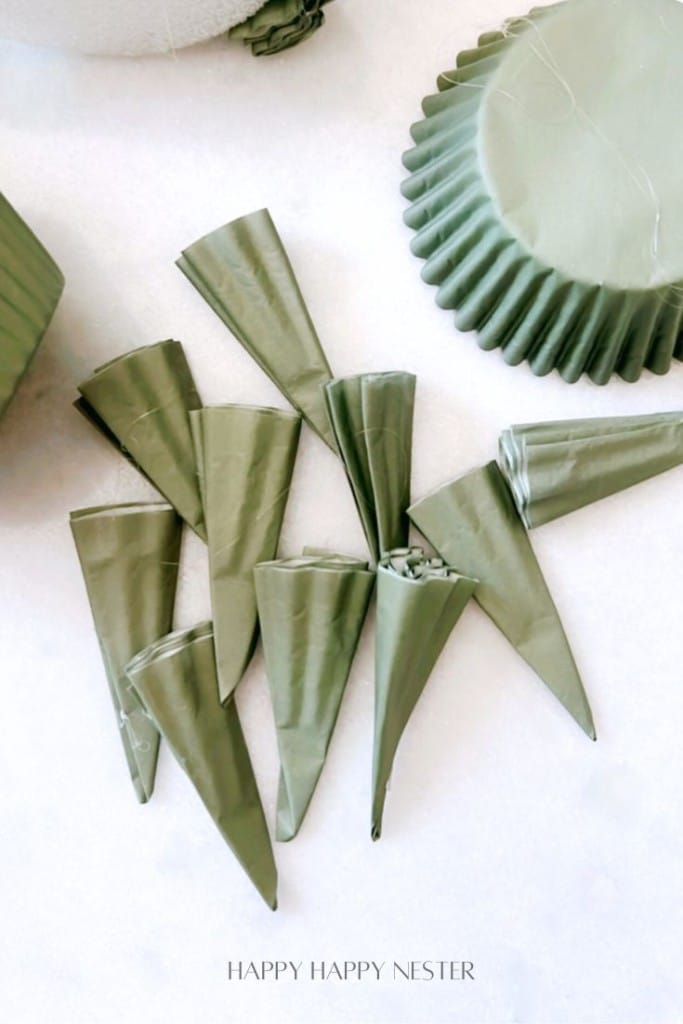
Step 1 – Fold Cupcake Liners
Start by folding each cupcake liner in half, and then fold it three more times until you create a small triangle shape. Repeat this process until you have a pile of folded liners ready.

A hand holding a small green paper craft in front of a white textured cone resembling a tree. Surrounding are decorative items, including green ornaments, a pinecone ornament, and candy canes on a marble surface. Text reads "Happy Happy Nester.
A hand holding a piece of paper next to green cupcake liners, with white paper trees, Christmas ornaments, candy canes, and pine cone ornaments scattered on a light background.

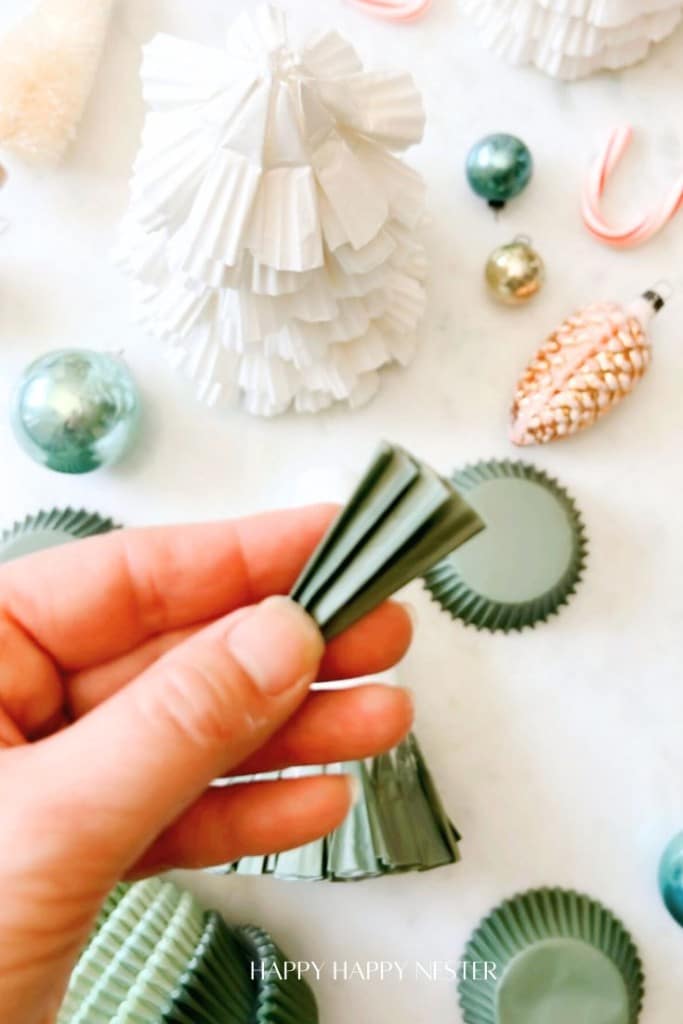
Step 2 – Secure the Folds
Before attaching the folded cupcake liners to the Styrofoam cone, place a small dot of glue between each fold near the center to keep the paper securely in place. Allow the glue to cool and set before moving on to the next step.

A group of charming Christmas decorations, including a delightful paper Christmas tree DIY project.

Step 3 – Attach the First Row
Using a hot glue gun, attach the secured folded cupcake liners to the base of the Styrofoam cone. Place them side by side to form the first row, ensuring the edges align neatly around the bottom of the cone.

The table is a festive scene with craft materials, featuring a Paper Christmas Tree DIY project. A green paper cone takes center stage, resembling a Christmas tree, surrounded by white and green cupcake liners, small ornaments, and whimsical candy canes.

Step 4 – Build the Second Row
Attach the second row of folded liners just above the first row. Overlap the second row slightly so that about half of the first row is still visible. Make sure to stagger the placement, positioning each folded liner between two liners from the row below.

A festive flat lay featuring DIY Christmas trees made from green and white cupcake liners, surrounded by candy canes, shiny ornaments, and a pinecone decoration on a marble surface.
Festive scene with small paper tree decorations, green cupcake liners, a candy cane, and ornaments on a white surface.
Crafted Christmas trees made from stacked cupcake liners in shades of green and white are surrounded by ornaments and a candy cane on a white surface.

Step 5 – Continue Adding Rows
Keep adding rows in the same manner, overlapping slightly and staggering the placement for a layered effect. Work your way up the cone, row by row, until you reach the top. Depending on the size of your cone, this process usually takes about six to eight rows.

Step 6 – Finish the Top
To complete the tree, carefully glue a final folded liner or a small embellishment, such as a star or pom-pom, at the very top of the cone.

You can glue the bottom of the tree to a wooden block or a thread spool. But a stand isn’t required, and you can place it right on your tabletop.

Step 7 – Customize Your Christmas Tree Made of Paper
Once your tree is fully assembled, fluff and adjust the liners if needed. For a festive touch, add extra decorations like glitter, mini ornaments, or ribbon.


Each year, I love creating my version of tabletop Christmas trees—it’s become a bit of a holiday tradition. These little trees are such a fun way to add a handmade touch to seasonal décor, and they’re incredibly versatile. Over the years, I’ve experimented with different materials, colors, and styles to match various themes or moods for the season.

Here are a few of my favorites from past holidays!

  • DIY Tabletop Christmas Tree
  • Vintage Tinsel Tree DIY
  • How to Make a Fleece Cone Christmas Tree
  • Feather Tree DIY: An Easy Project

4

Two handmade Christmas trees crafted from paper cupcake liners, one green and one white, are displayed on a light surface. They are surrounded by decorative ornaments, such as round teal and gold baubles, and a pinecone-shaped ornament.
A green paper Christmas tree decoration, reminiscent of a DIY project, features layered, fan-shaped sections. It stands on a white surface with blurred white and cream trees in the background, exuding a festive holiday vibe.

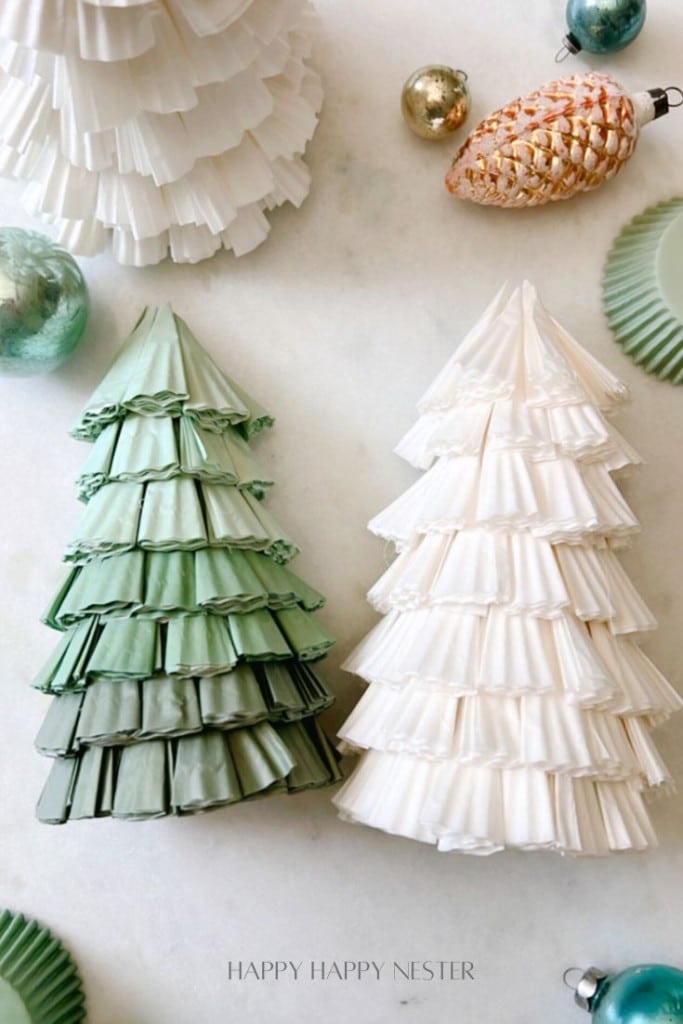
Making paper Christmas trees is a fun and simple way to add holiday magic to your home. You can create a unique and homemade decoration with just a bit of paper folding and a few basic supplies. It’s so easy to customize, too—whether you stick with classic white, go for a bold green, or try something different, the possibilities are endless.

This project is a great way to add a personal, handmade touch to your holiday décor. These paper Christmas trees are perfect for mantels, tabletops, or even as part of a centerpiece. I hope you feel inspired to get creative and enjoy making them as much as I did!

Cheers and Happy Holidays!

signature

Photo Credits: MyPhotography.com

N

Blogger’s Best DIY Holiday Table Top Trees

A decorative driftwood tree stands on a white table beside a paper Christmas tree and a white jar with a lid. Two small bowls hold white stones and seashells, while the background showcases beige cushions and a framed landscape photo.

How to Make a Driftwood Christmas Tree | Most Lovely Things

Inspired by nature and walks on the beach in Montauk, we made a Christmas tree made out of collected driftwood.

A festive scene with two white decorative Christmas trees in vases on a table, surrounded by green and silver ornaments. A subtle touch of whimsy is added with a paper Christmas tree centerpiece. Two green glass bottles stand in the background, illuminated by light streaming through a window.

DIY White Christmas Fern Tabletop Tree | My 100 Year Old Home

I wanted to create something elegant and unique for my home décor this holiday season, so I made beautiful DIY White Christmas Fern Tabletop Trees.

A decorative, gold-colored tree sculpture stands on a Tom Ford book, echoing the form of a paper Christmas tree. In the softly blurred background, a lit Christmas tree adds warmth. The sculpture's slender shape resembles a stylized tree formed from layered metal leaves.

Metal Tabletop Christmas Tree | Craftberry Bush

This ‘metal’ DIY tabletop Christmas tree is easy to make and makes a beautiful statement whether displayed on a table, sideboard etc.

A wooden nutcracker figurine in a green hat and apron stands next to a small pinecone tree in a brown pot with white snowflake designs. Beside it, a charming paper Christmas tree adds holiday cheer, while a vase with greenery graces the background, all set on a rustic wooden table.

Gingerbread Christmas Tabletop Tree: A DIY Makeover | My Sweet Savannah

The holiday season is the perfect time to add some festive charm to your home. But decorating doesn’t have to mean breaking the bank—especially when you can transform thrift store finds into beautiful, personalized pieces that fit your style perfectly. Today, I’m going to show you how I took a simple thrifted cone-shaped tree and turned it into a gingerbread-inspired Christmas tabletop tree that fits right into my holiday décor!

pin it button
Two paper Christmas trees crafted from white cupcake liners grace a cake stand with faux snow, capturing the essence of a cozy Paper Christmas Tree DIY. Holiday decorations softly blur in the background, adding to the festive allure.

  • Author
  • Recent Posts
Janine Waite
Follow me
Janine Waite
I named my blog Happy Happy Nester because I love everything related to the home. I’ve always enjoyed decorating my surroundings. Get cozy and stay for a bit, thanks for visiting!
Janine Waite
Follow me
Latest posts by Janine Waite (see all)
  • My Favorite Flower Inspiration - May 24, 2025
  • Outdoor Oval Rugs and More - May 21, 2025
  • My Favorite Chocolate Recipes - May 17, 2025

You May Also Like

  • make your own ornament with a mini cloche 2
    Make Your Own Ornament With a Cloche
  • pillow craft project
    Christmas Pillow Craft Project
  • A collage of four festive images: a paper star decoration, two small Christmas trees under glass domes, paper trees on a table, and a white wreath on a window pane. Perfect holiday craft ideas for creating a cozy and elegant setting surrounded by candles and light.
    Holiday Craft Ideas
  • diy fabric ornament balls
    DIY Fabric Ornament Balls (Christmas)

Sharing This!

  • Facebook
  • Twitter
  • Email

Reader Interactions

Leave a Reply Cancel reply

Your email address will not be published. Required fields are marked *

Recipe Rating


Sidebar

Janine the Nester

Hello from the Nester

We love everything related to home, so get cozy and stay for a bit. Thanks for visiting our blog. Learn More...

Reader Favorites

The Best Crunchy Crispy Chocolate Chip Cookie

This Italian Cream Cake has a pumpkin cream cheese frosting that makes this a winning combination. This dessert is perfect for the holidays.

Italian Cream Cake with a Twist of Pumpkin

French Apple Custard Tart with Puff Pastry

DIY Paper Flowers Tutorial (Tissue Paper)

Upcycling Tin Cans with Scrapbooking Paper

How to Make a Paper Flower Wreath DIY

Popular Categories

  • Cakes
  • Cookies
  • Dinners
  • Wreaths
  • Organizing

Join Our Newsletter

Join our mailing list to receive the latest news and updates from our team.

You have Successfully Subscribed!

AFFILIATE DISCLOSURE:
I am grateful to be of service and bring you content free of charge. In order to do this, please note that when you click links and purchase items, in most (not all) cases, I will receive a referral commission. Your support in purchasing through these links enables me to keep my design and customization prices ridiculously low and empower more people worldwide to blog with less worry and less hassle.
Happy Happy Nester is a participant in the Amazon Services LLC Associates Program, an affiliate advertising program designed to provide a means for sites to earn advertising fees by advertising and linking to amazon.com.
Thank you! :)
-Happy Happy Nester

Our Guide

Join Our Newsletter

Join our mailing list to receive the latest news and updates from our team.

You have Successfully Subscribed!

  • Facebook
  • Instagram
  • Pinterest
  • Twitter

Recipes

Appetizers
Breakfast/Brunch
Desserts
Dinners
Drinks

Crafts & Decor

DIY
Gardening
Holiday
Wreaths

About

About The Nester
Contact
Privacy Policy

Copyright © 2025 · Happy Happy Nester by Janine Waite · Privacy Policy

↑ BACK TO TOP