
Making sushi at home just got a whole lot easier with the Sushi Bazooka! This innovative kitchen gadget streamlines the process, letting you craft perfectly rolled sushi every time, even if you’re a beginner. Whether you’re hosting a sushi night or craving fresh homemade rolls, the Sushi Bazooka is your new must-have tool for fun, delicious, and hassle-free sushi-making.
Its easy-to-use design ensures consistent results while reducing the mess and effort of traditional sushi-making methods. With the Sushi Bazooka, you can explore endless flavor combinations and impress your friends and family with restaurant-quality sushi from your kitchen.
I grew up with my aunties making sushi for all our New Year’s celebrations—it was such a special tradition! My mom always made the mochi and other traditional dishes, while my Auntie Emy and Grandma were the sushi experts. Watching them work together at the table, expertly rolling perfect sushi, gave me a general idea of how it was done. But, honestly, I never got much hands-on experience.
Now that most of my relatives have passed away, the responsibility of making sushi has fallen on me. Let me tell you, it’s a bit daunting! The filling and rolling sushi process can feel overwhelming, especially when your middle ingredients don’t quite line up and the rolls look a little creative. My rolls tend to come out uneven, and sometimes they’re so wonky I hesitate to put them on the serving platter.
That’s why I was so excited to discover this fantastic sushi gadget—it’s a game-changer! It creates perfect sushi rolls every single time with just a few easy steps. I love how consistent and professional the sushi looks, no matter how many I make. It’s taken the stress out of the process and made me actually enjoy rolling sushi again.
What is the Sushi Bazooka?
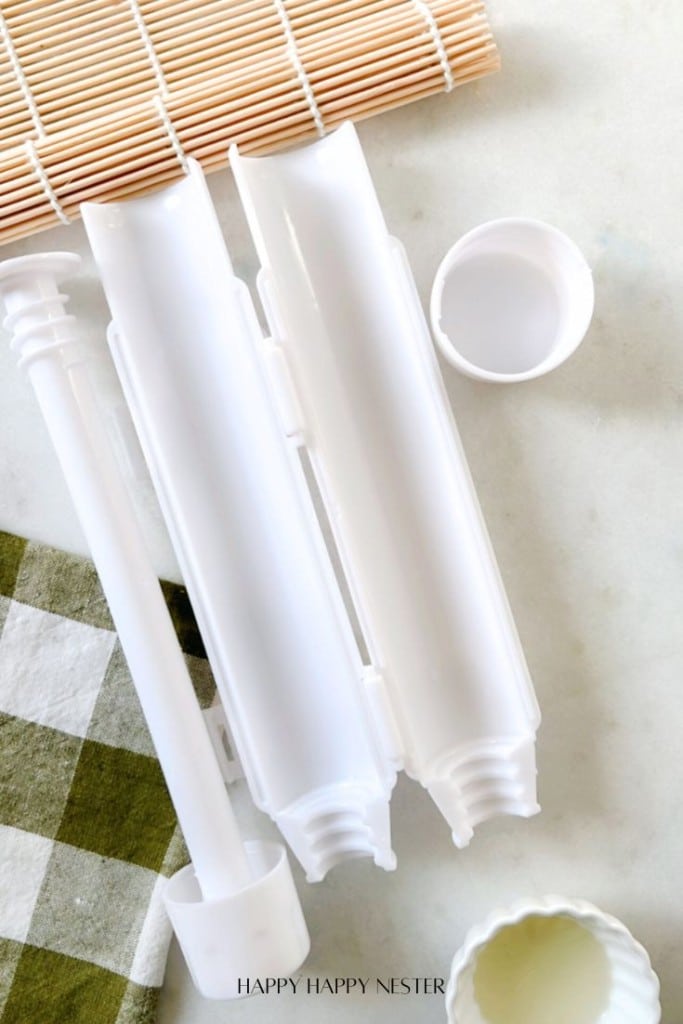
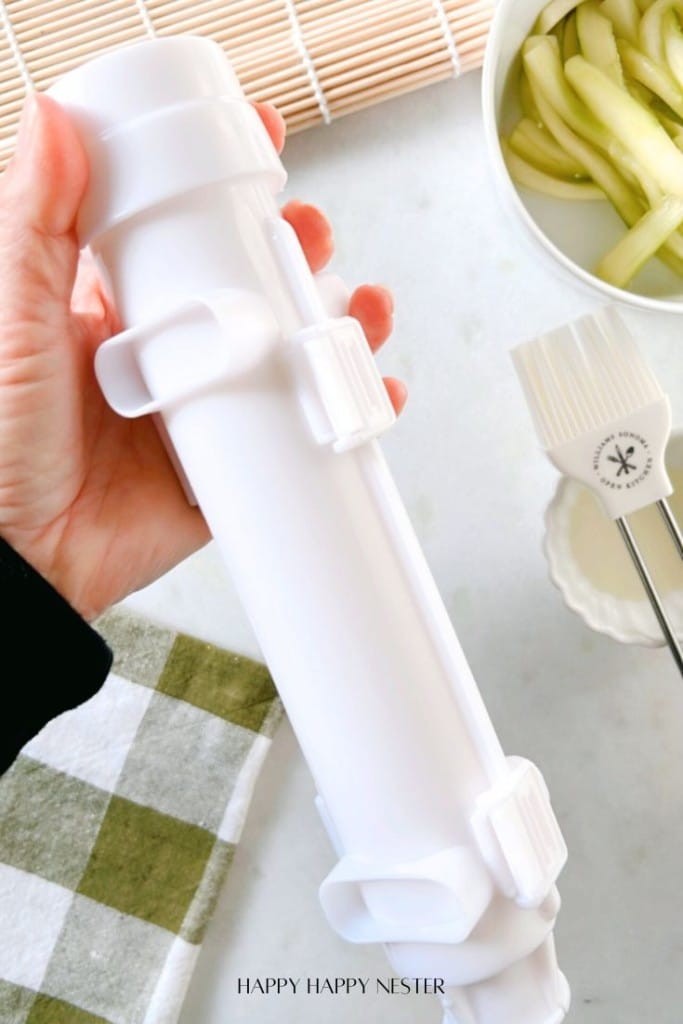
The Sushi Bazooka is a cleverly designed kitchen tool that simplifies the art of sushi rolling. Made from food-safe materials, this gadget resembles a cylindrical tube with a plunger mechanism that compresses and shapes the sushi ingredients into a perfect roll. Its compact size makes it easy to store, and its straightforward design means anyone can use it, from novices to experienced sushi enthusiasts.
Key Features of the Sushi Bazooka
- Ease of Use: The Sushi Bazooka eliminates the need for a traditional bamboo mat and expert rolling skills.
- Durable Construction: Built with high-quality, food-safe plastic that’s easy to clean and long-lasting.
- Consistent Results: Ensures uniform rolls every time, making your sushi look as good as it tastes.
- Versatility: Ideal for crafting various sushi rolls, from classic maki to creative combinations.
How to Use the Sushi Bazooka
Using the Sushi Bazooka is simple and efficient. Here are the basic steps:
- Prepare Ingredients: Have your sushi rice, nori (seaweed sheets), and desired fillings ready.
- Load the Bazooka: Open the Sushi Bazooka and add a layer of sushi rice inside, followed by your favorite fillings.
- Close and Compress: Close the lid and compress the ingredients into a tight roll using the plunger.
- Wrap and Slice: Place the compressed roll onto a nori sheet, wrap it up, and slice it into pieces.
With just a few steps, you’ll have perfect sushi rolls ready to enjoy!
Tips for Perfect Sushi Using the Sushi Bazooka
Use Wet Hands for Rice Handling: Always wet your hands before handling sushi rice to prevent it from sticking. This makes it much easier to distribute the rice evenly in the Bazooka.
Avoid Overfilling or Underfilling: Avoid both overloading and underloading the Bazooka. Too much filling can cause the roll to break, while too little filling leaves gaps that compromise the roll’s structure. If needed, add more rice to each side of the tube to achieve balance.
Distribute Rice Evenly: Press the rice down firmly and evenly on both sides of the tube, creating a uniform valley for the fillings. This ensures your roll stays intact and looks professional.
Cut Ingredients to Size: Make sure fillings like vegetables or seafood are julienned or cut into thin strips that fit comfortably inside the Bazooka. Oversized ingredients can cause uneven rolls or bulging.
Clean Between Rolls: Rinse the Bazooka thoroughly between rolls to prevent leftover rice or fillings from affecting the consistency of your next roll. A clean tool ensures perfect results every time.
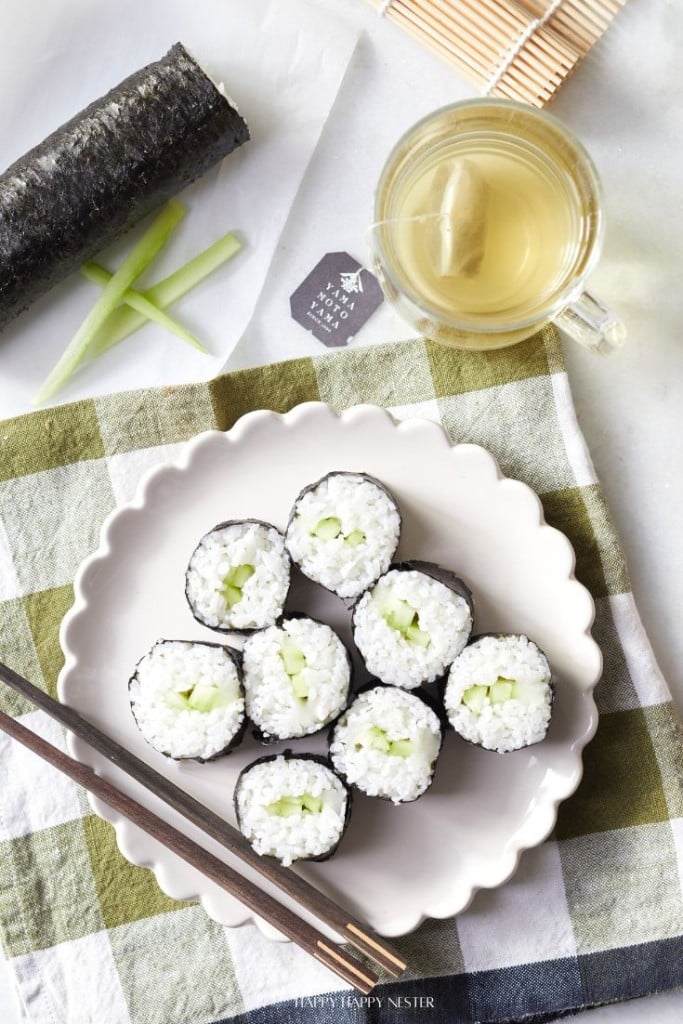
What is Kappa Maki Sushi?
Kappa Maki is a classic Japanese sushi roll featuring thinly sliced cucumber wrapped in seasoned sushi rice and a sheet of nori (seaweed). Known for its simplicity and refreshing taste. It is popular for vegetarians or anyone seeking a light, healthy sushi option. The cucumber’s crisp texture pairs perfectly with the slightly tangy and sticky sushi rice, creating a delightful balance of flavors. It’s named after the mythical Japanese water creature, the kappa, often associated with cucumbers in folklore.
How to Make a Kappa Maki Roll with the Sushi Bazooka
Easy Kappa Maki Roll Recipe
Kappa Maki, or cucumber roll, is one of the simplest and most refreshing sushi rolls. Here’s how you can create it using the Sushi Bazooka:
Ingredients:
- Cooked Sushi Rice: This seasoned rice is the base of the sushi roll. It is prepared with white vinegar, salt, and sugar for a tangy and slightly sweet flavor.
- Sheets of Nori: These thin seaweed sheets hold the sushi roll together and provide a savory, umami-rich taste.
- Cucumber: Fresh cucumber adds a refreshing crunch and light flavor, perfectly balancing the rice and nori.
Instructions:
Step 1 – Measure the Rice: Start with 1 cup of Japanese short-grain rice.
Step 2 – Wash the Rice: Place the rice in a large bowl and fill it with water. Gently stir and swirl the rice with your hand, then drain the cloudy water. Repeat this process several times until the water runs clear. This removes excess starch and ensures a fluffier texture.
Step 3 – Add Water: Transfer the washed rice to a pot or rice cooker. Add 1 1/2 cups of water for every cup of rice. This ratio is key for achieving the right consistency.
Step 4 – Cook the Rice: Follow the manufacturer’s instructions if using a rice cooker. For stovetop cooking, bring the water to a boil over medium heat, then reduce to low and cover the pot with a tight-fitting lid. Cook for 15-20 minutes or until the water is fully absorbed.
Step 5 – Rest the Rice: Remove the pot from heat and let it sit, covered, for 10 minutes. This resting period allows the moisture to evenly distribute throughout the rice.
Step 6 – Fluff the Rice: Gently fluff the rice with a wooden or silicone spatula to avoid breaking the grains. Your rice is now ready for sushi or other dishes.
Step 7 – Prepare the Vinegar Sauce: In a small saucepan, combine white vinegar, sugar, and salt. Heat the mixture over low heat, stirring constantly, until the sugar and salt completely dissolve. Remove from heat and set aside.
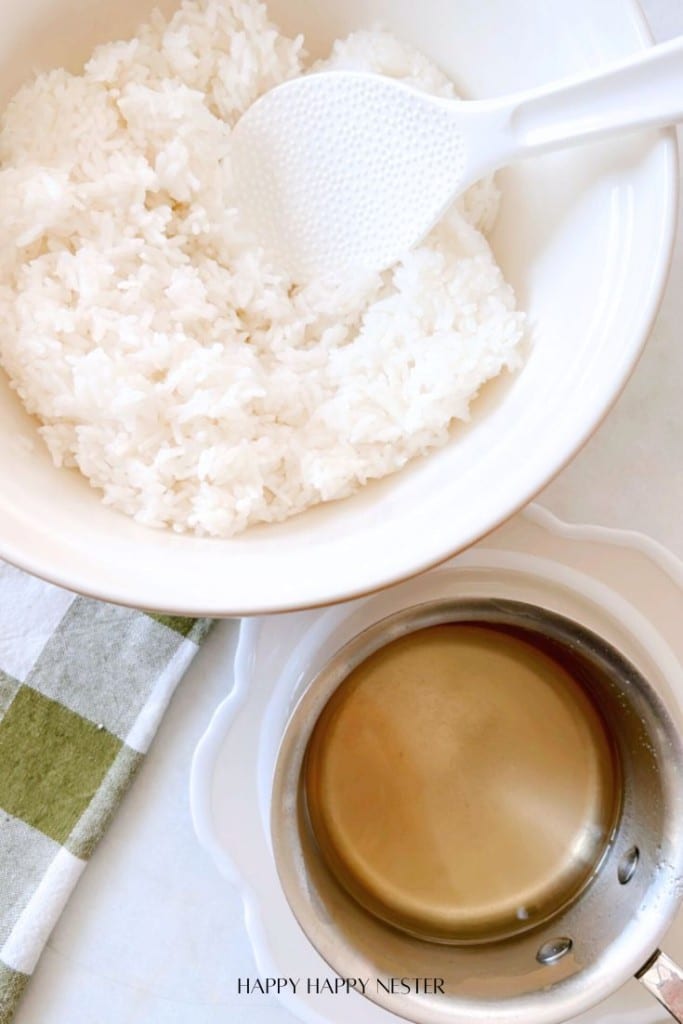
Step 8 – Season the Rice: Transfer the hot cooked rice to a large mixing bowl. Gradually pour the vinegar sauce over the rice in portions. Use a wooden spatula or spoon to gently fold the vinegar sauce into the rice, being careful not to smash the grains. Repeat until the sauce is evenly distributed.
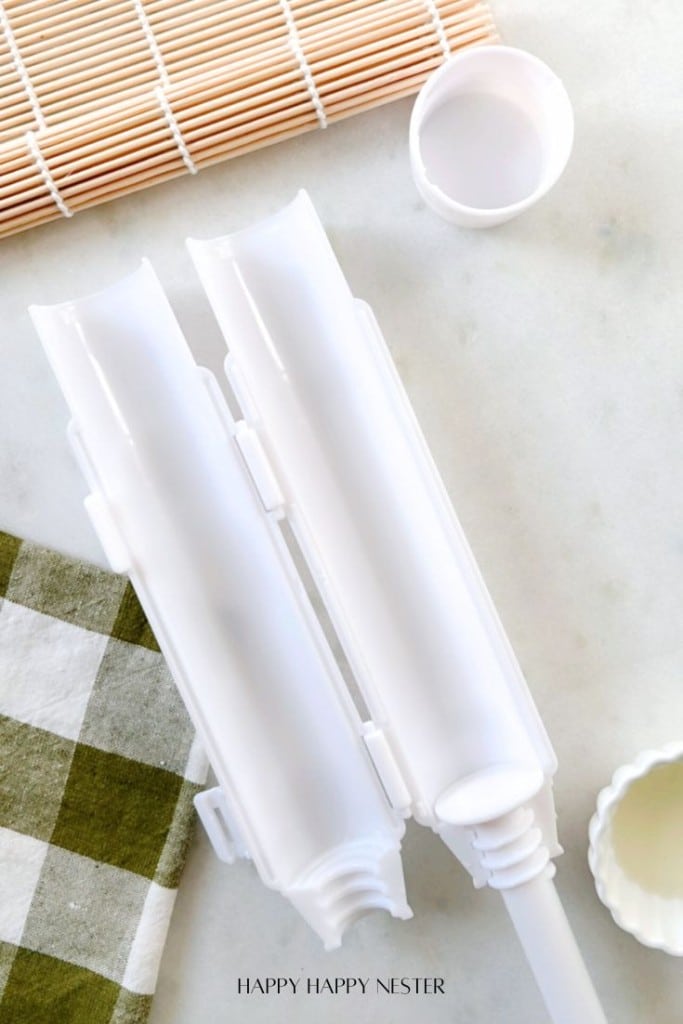
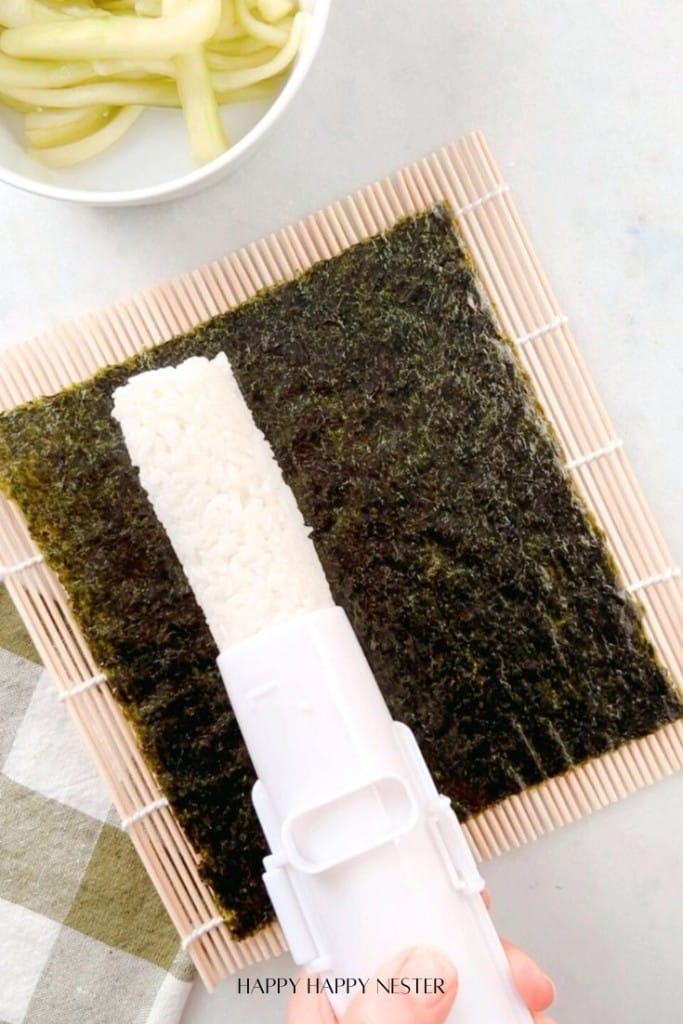
Step 9 – Prepare the Tube: Open the Sushi Bazooka, place the plunger top inside, and coat the inside of the tube with a thin layer of cooking oil.
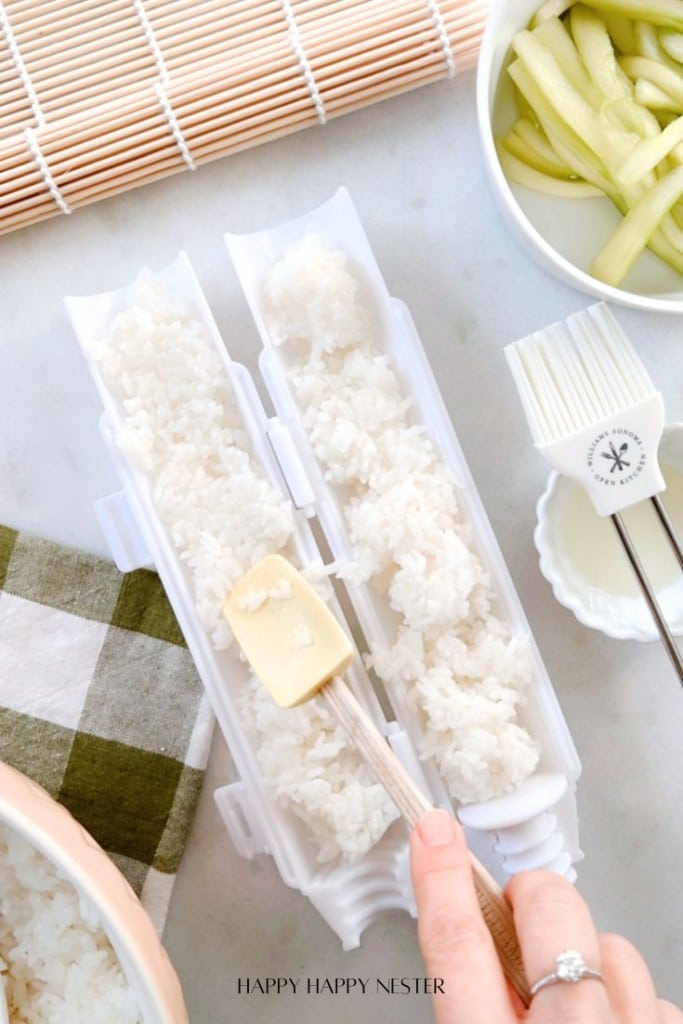
Step 10 – Load the Rice: Add 1/2 cup of rice to each side of the opened tube. Press the rice down and create a valley in the middle of the tube. Wet your hands to prevent sticking.
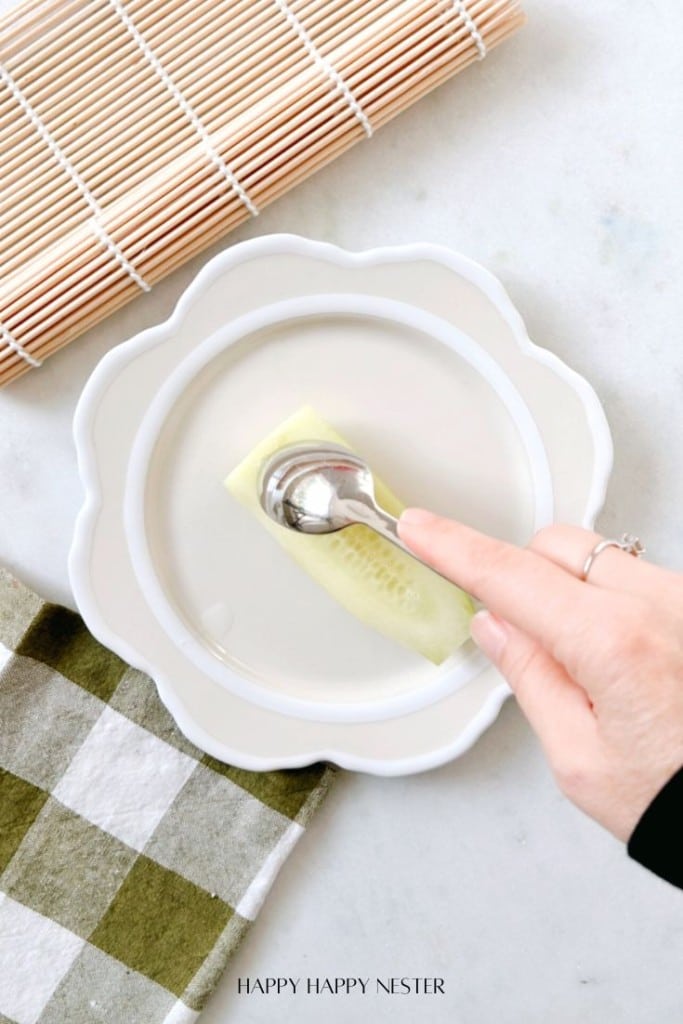
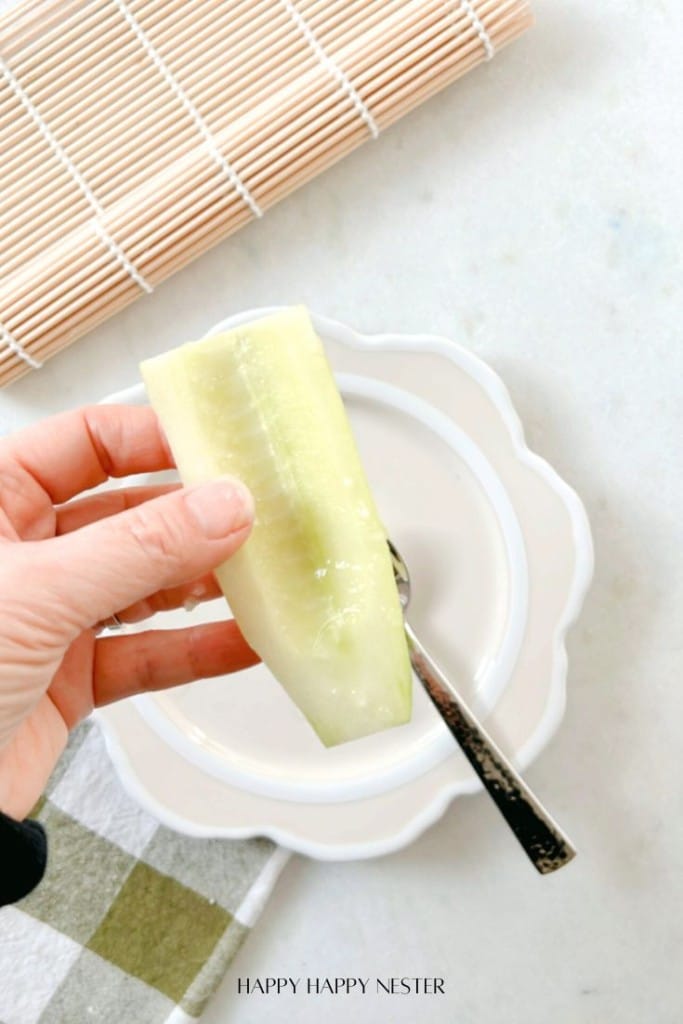
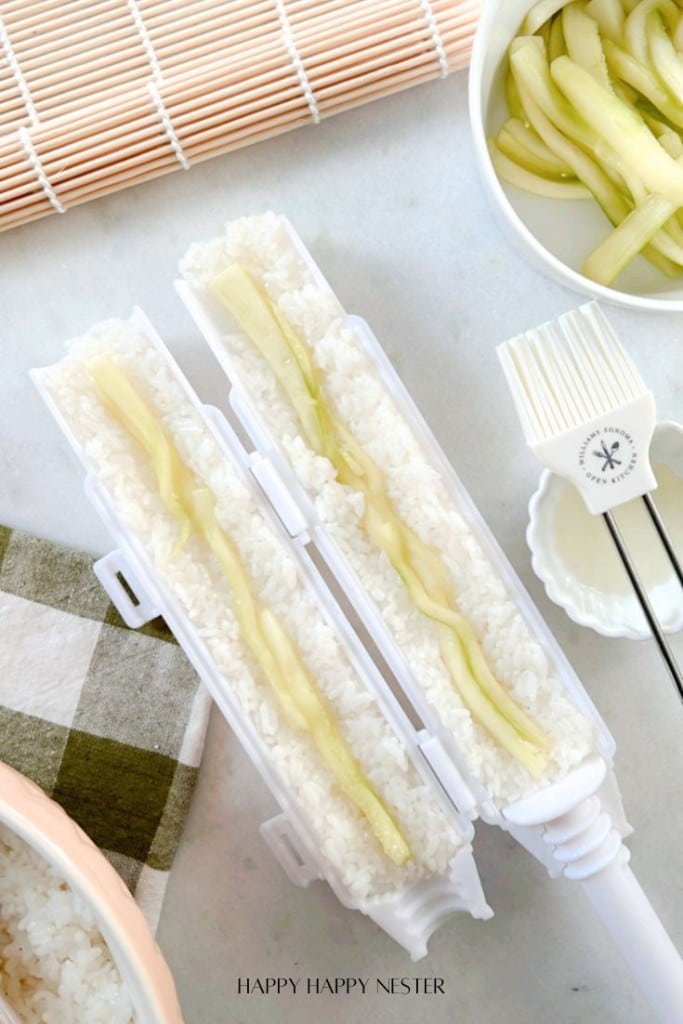
Step 11 – Prep and Add Cucumbers: Peel the cucumbers and slice them lengthwise to create manageable halves. Using a spoon, carefully scoop out the seeds from the center of each half to remove excess moisture and create a cleaner texture. Once the seeds are removed, cut the cucumber halves into thin, uniform julienne strips for consistent bites in your sushi roll. Lay the julienned cucumber strips neatly in the valley of rice.
Step 12 – Close and Compress: Close the Bazooka and compress the roll using the plunger.
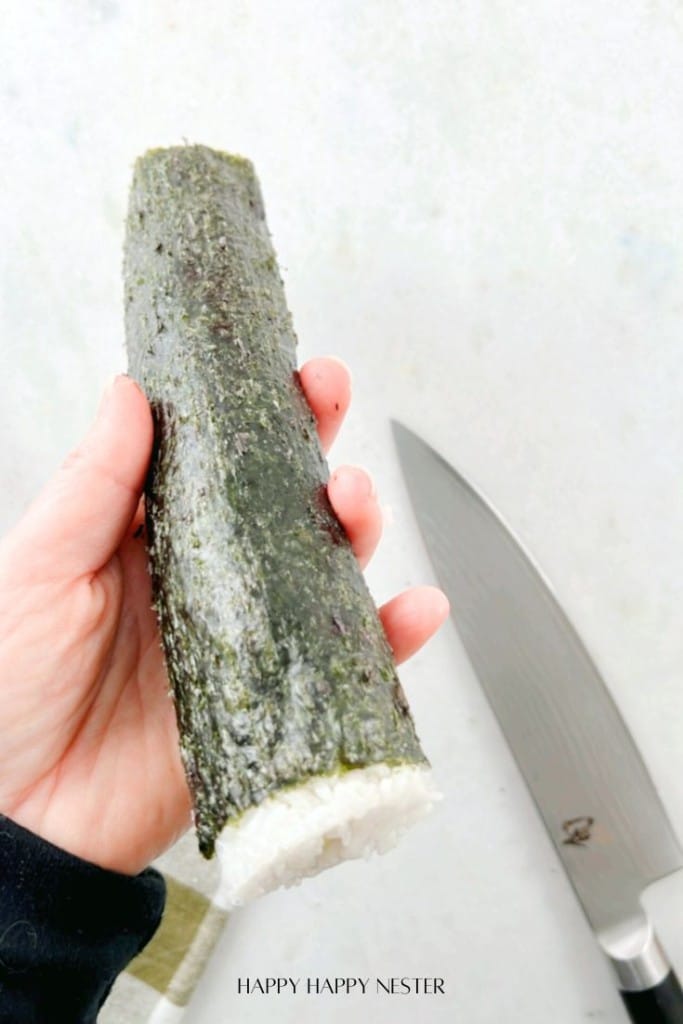
Step 13 – Wrap and Slice Sushi: Lay your sheet of nori shiny side down on a bamboo mat, aligning the edge of the nori with the edge of the mat closest to you.
Carefully transfer the compressed roll onto the edge of the nori sheet. Begin rolling by lifting the bamboo mat with your thumbs while holding the filling in place with your fingers.
Gently press and roll the bamboo mat forward, ensuring the nori wraps tightly around the roll. After completing the first roll, pull back the mat slightly over the roll, and continue rolling until the sushi is fully wrapped. Run a thin line of water along the edge of the nori to seal it securely. Once sealed, use the bamboo mat to firmly press and mold the sushi into a uniform, even shape.
Finally, use a sharp, wet knife to slice the roll into bite-sized pieces, wiping the blade clean between cuts for a professional finish.

Kappa Maki
Ingredients
- 1 cucumber
Sushi Rice
- 1 cup Japanese rice short grain rice
- 1½ cups water
- 2½ tbsp white vinegar
- 2½ tbsp sugar
- 1½ tbsp salt
Instructions
Cucumbers
- Wash and peel the cucumbers and slice them lengthwise to create manageable halves. Using a spoon, carefully scoop out the seeds from the center of each half to remove excess moisture and create a cleaner texture. Once the seeds are removed, cut the cucumber halves into thin, uniform julienne strips for consistent bites in your sushi roll. Lay the julienned cucumber strips neatly in the valley of rice.
Sushi Rice
- Measure the Rice: Start with 1 cup of Japanese short-grain rice.
- Wash the Rice: Place the rice in a large bowl and fill it with water. Gently stir and swirl the rice with your hand, then drain the cloudy water. Repeat this process several times until the water runs clear. This removes excess starch and ensures a fluffier texture.
- Add Water: Transfer the washed rice to a pot or rice cooker. Add 1½ cups of water for every cup of rice. This ratio is key for achieving the right consistency.
- Cook the Rice: If using a rice cooker, follow the manufacturer's instructions. For stovetop cooking, bring the water to a boil over medium heat, then reduce to low and cover the pot with a tight-fitting lid. Cook for 15-20 minutes or until the water is fully absorbed.
- Rest the Rice: Remove the pot from heat and let it sit, covered, for 10 minutes. This resting period allows the moisture to evenly distribute throughout the rice.
- Fluff the Rice: Gently fluff the rice with a wooden or silicone spatula to avoid breaking the grains. Your rice is now ready for sushi or other dishes.
Sweet Vinegar Sauce for Sushi Rice
- Prepare the Vinegar Sauce: In a small saucepan, combine white vinegar, sugar, and salt. Heat the mixture over low heat, stirring constantly, until the sugar and salt completely dissolved. Remove from heat and set aside.
- Season the Rice: Transfer the hot cooked rice to a large mixing bowl. Gradually pour the vinegar sauce over the rice in portions. Use a wooden spatula or spoon to gently fold the vinegar sauce into the rice, being careful not to smash the grains. Repeat until the sauce is evenly distributed.
- Cool the Rice: Allow the seasoned rice to cool to room temperature before using it for sushi. Cover the bowl with a damp cloth to prevent the rice from drying out.
Building Sushi
- Prepare the Tube: Open the Sushi Bazooka, place the plunger top inside, and coat the inside of the tube with a thin layer of cooking oil.
- Load the Rice: Add 1/2 cup of rice to each side of the opened tube. Press the rice down and create a valley in the middle of the tube. Wet your hands to prevent sticking.
- Add Cucumbers: Place julienned cucumber as the filling in the valley.
- Close and Compress: Close the Bazooka and compress the roll using the plunger.
- Wrap and Slice: Lay your sheet of nori shiny side down on a bamboo mat, aligning the edge of the nori with the edge of the mat closest to you. Carefully transfer the compressed roll onto the edge of the nori sheet. Begin rolling by lifting the bamboo mat with your thumbs while holding the filling in place with your fingers. Gently press and roll the bamboo mat forward, ensuring the nori wraps tightly around the roll. After completing the first roll, pull back the mat slightly over the roll, and continue rolling until the sushi is fully wrapped. Run a thin line of water along the edge of the nori to seal it securely. Once sealed, use the bamboo mat to firmly press and mold the sushi into a uniform, even shape.
- Finally, use a sharp, wet knife to slice the roll into bite-sized pieces, wiping the blade clean between cuts for a professional finish.
Nutrition
Why You Need the Sushi Bazooka
The Sushi Bazooka is perfect for anyone who loves sushi but doesn’t want to spend hours mastering the art of rolling. It’s a fantastic tool for:
- Families: A fun activity to enjoy with kids or friends.
- Entertaining Guests: Impress your guests with beautifully rolled sushi.
- Quick Meals: Whip up fresh sushi in no time without the mess.
Related Recipes to Try
Spicy Tuna Roll Recipe: A zesty favorite, this roll combines fresh tuna with a spicy mayo kick for sushi that’s full of bold flavor.
Salmon Teriyaki Bento Box: This classic bento features tender, glazed salmon paired with perfectly cooked rice and various traditional sides.
Crispy Rice Sushi Recipe: This dish is a modern twist on sushi. The layers of crispy rice with savory toppings for a unique and flavorful bite.

t
Tea Pot | Rice Cooker | Small Dishes | Nori | Chopsticks | Sushi Bazooka
If you’ve ever wanted to make sushi at home but found the process intimidating, the Sushi Bazooka is the answer to your culinary dreams. Affordable, user-friendly, and efficient, it’s a game-changer for sushi lovers everywhere. Pair it with fresh ingredients and a little creativity, and you’ll be crafting sushi masterpieces in no time.
Happy New Year, and have fun making Kappa Maki sushi!

Photo Credits: MyPhotography.com

- Spring Flower Wreath DIY - March 13, 2026
- Faux Nails from Walmart - March 11, 2026
- Easter Bundt Cake Recipe (Mini Lemon Bundt Cakes with Glaze) - March 6, 2026

")


Leave a Reply