• Skip to main content
  • Skip to header right navigation
  • Skip to site footer
  • About
  • Contact
  • Boutique of the Week
    • Facebook
    • Instagram
    • Pinterest
    • Twitter

Happy Happy Nester

Weekly Inspiration for Your Nest

  • Recipes
    • Appetizers
    • Breakfast/Brunch
    • Desserts
    • Dinners
    • Drinks
  • Crafts
  • Decor
  • Shop
    • Fall Decor
    • Kitchen
    • Pillows
    • Holiday Decor
  • Amazon Store
  • Recipes
    • Appetizers
    • Breakfast/Brunch
    • Desserts
    • Dinners
    • Drinks
    • Snacks
  • Crafts
  • Decor
  • Shop
    • Fall Decor
    • Kitchen Favorites
    • Pillows
    • Holiday Decor
  • Saturday Chitchat
  • Boutique of the Week
  • About
  • Contact
  • Facebook
  • Instagram
  • Pinterest
  • Twitter

See What’s Trending…

Cakes

Cookies

Dinners

Wreaths

Drinks

Home › Uncategorized › Decorated Tin Pot

Decorated Tin Pot

Uncategorized
By Janine Waite · Published on Jan 27, 2013
Affiliate Disclosure: This Post May Contain Affiliate Links.
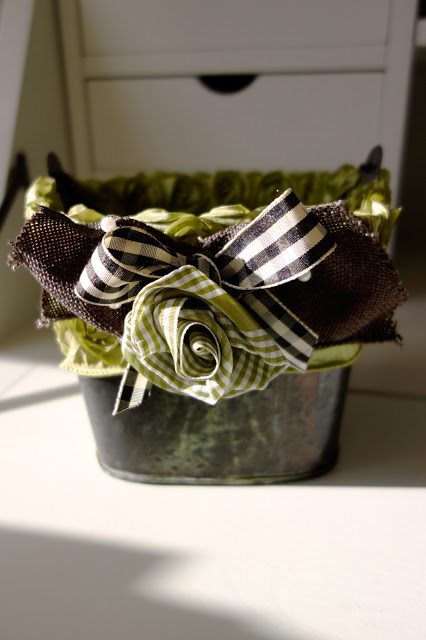
rustic tin pot
my living room has a lot of greens and whites and so i was inspired to make this container.  in my entry from the other day i explain how i have always wanted to make a rose ribbon. so, ta-da… here is the final project. i’m still not sure what i’ll place in the pot, but if my kitchen were these colors, it might make it a napkin holder.  this design has a garden feel, so most likely will end up in my living room.  i hope to post before and after photos next month.  in the meantime here is how you make the project.
here are the supplies you’ll need…
i love this brown burlap!  it comes in some many natural colors.  cut out a piece like this.

i scrunched the ribbon in the middle and then wrapped my daughter’s hair band around the middle of it to hold it in place.

then place the pearl pins into the burlap and glue down a gingham ribbon on top.
as this point you would make your ribbon rose.  please refer to my january 11th entry, https://happyhappynester.com/2013/01/rose-ribbon-ive-always-wanted-to-make/

i bought rose ribbon that has 3 rows of flowers.  since this ribbon would cover too much of the pail, i choose to wrap the top row of roses over into the inside of the pail.  i then glued the ribbon to the pail.  here is the amazon link for the ribbon.  rose ribbon

view from the inside. as you can see the inside is lined with plastic, so i could place a plant in this container.

ok, this is the view of the rose ribbon attached to the pail.  oh gosh, i kind of got this ribbon crooked. :o)
now you’ll glue the bow and ribbon rose combo to the front of the pail. 
enjoy!

  • Author
  • Recent Posts
Janine Waite
Follow me
Janine Waite
I named my blog Happy Happy Nester because I love everything related to the home. I’ve always enjoyed decorating my surroundings. Get cozy and stay for a bit, thanks for visiting!
Janine Waite
Follow me
Latest posts by Janine Waite (see all)
  • My Favorite Chocolate Recipes - May 17, 2025
  • Flower Cookies Recipe - May 16, 2025
  • Chocolate Chip Bars Recipe - May 15, 2025

You May Also Like

  • tin can projects
    Upcycling Tin Cans with Scrapbooking Paper
  • how to make a fall wreath final
    DIY Felt Banner-No Sew Project
  • how to make candles
    How to Make Your Own Personalized Candles
  • fall wreaths
    Easy Fall Wreath Ideas DIY

Sharing This!

  • Facebook
  • Twitter
  • Email

Reader Interactions

Leave a Reply Cancel reply

Your email address will not be published. Required fields are marked *

Recipe Rating


By Janine Waite · Published on Sep 5, 2012
Affiliate Disclosure: This Post May Contain Affiliate Links.


happy happy autumn…

speaking of fall…my neighbor’s apple tree has a ton of yummy apples hanging from its branches.  our neighbor mentioned that we are welcome to pick their apples, so yesterday my husband climbed over the fence and picked a bag of them.  i ended up baking two apple pies…one for my neighbor and one for us.  i tried a new recipe from my america’s test kitchen cookbook.  preparing the dough was time consuming and somewhat difficult for me.  if you look closely at my photos you’ll see the precooked dough is not cooperating.  you definitely need to refrigerate the dough for the full 30 minutes before placing the second layer on top.  i think i took it out too early and it kind of fell apart on me.  despite all my frustration, the pie and its crust were very yummy!


here are the yummy apples, fresh off our neighbor’s tree!
Classic Apple Pie
1 recipe of double-crust pie dough
3/4 cup (5 1/2 ounces) plus 1 tablespoon sugar
2 tablespoons all-purpose flour
1 teaspoon grated lemon zest plus 1 tablespoon juice
1/4 teaspoon salt
1/4 teaspoon ground nutmeg
1/4 teaspoon ground cinnamon
1/8 teaspoon ground allspice
2 pounds McIntosh apples, peeled, cored, and sliced 1/4 inch thick
1 1/2 pounds Granny Smith apples, peeled, cored and sliced 1/4 inch thick
1 large egg white, lightly beaten
1.  Roll 1 disk of dough into 12-inch circle on lightly floured counter.  Loosely rool dough around rolling pin and gently unroll it onto 9-inch pic plate, letting excess dough hang over edge.  Ease dough into plate by gently lifting edge of dough with 1 hand while pressing into plate bottom with other hand.  Leave any dough that overhangs plate in place.  Wrap doughlined pie plate loosely in plastic wrap and refrigerate until dough is firm, about 30 minutes.  Roll other disk of dough into 12-inch circle on lightly floured counter, then transfer to parchment paper-lined baking sheet; cover with plactic and refrigerate for 30 minutes.
2. Adjust over rack to lowest position, place rimmed baking sheet on rack, and heat over to 500 degrees.
3.  Mix 3/4 cup sugar, flour, lemon zest, salt, nutmeg, cinnamon, and allspice together in large bowl.  Add lemon juice and apples and toss until combined.  Spread apples with their juices into dough-lined pie plate, mounding them slightly in middle.  Loosely roll remaining dough round around rolling pin and gently unroll it onto filling.  Trim overhang to 1/2 inch beyond lip of pie plate.  Pinch edges of top and bottom crusts firmly together.  tuck overhang under itself; folded edge should be flush with edge of pie plate.  Crimp dough evenly around edge of pie using your fingers.  Cut flour 2-inch slits in top of dough.  Brush surface with beaten egg white and sprinkle evenly with remaining 1 tablespoon sugar.
4.  Place pie on heated baking sheet, reduce oven temperature to 425 degrees, and bake until crust is light golden brown, about 25 minutes.  Reduce oven temperature to 375 degrees, rotate baking sheet, and continue to bake until juices are bubbling and crust is deep golden,  30 to 35 minutes longer.  Let pie cool on wire rack to room temperature; about 4 hours.  Serve


Classic Double-Crust Pie Dough

Makes enough for one 9-inch pie
2 1/2 cups (12 1/2 ounces) all-purpose flour
2 tablespoons sugar
1 teaspoon salt
8 tablespoons vegetable shortening, cut into 1/2-inch pieces and chilled
12 tablespoons unsalted butter, cut into 1/4-inch pieces and chilled
6-8 tablespoons ice water
1.  Process flour, sugar, and salt together in food processor until combined, about 5 seconds.  Scatter shortening over top and process until mixture resembles coarse cornmeal, about 10 seconds.  Scatter butter over top and pulse mixture until it resembles coarse crumbs, about 10 pulses.
2.  Transfer mixture to large bowl.  Sprinkle 6 tablespoons ice water over mixture. Stir and press dough together, using stiff rubber spatula, until dough sticks together.  If dough does not come together, stir in remaining ice water, 1 tablespoon at time, until does.
3.  Divide dough into 2 even pieces.  Turn each piece of dough onto sheet of plastic wrap and flatten each into 4-inch disk.  Wrap each piece tightly in plastic and refrigerated for 1 hour.  Before rolling dough out, let it sit on counter to soften slightly, about 10 minutes.  (Dough can be wrapped tightly in plastic and refrigerated for up to 2 days or frozen for up to 1 month.  If frozen, let dough thaw completely on counter before rolling it out.) 

oh my…the crust wasn’t cooperating.  somehow i was able to laugh at my not so perfect apple pie. so much for being perfect! thank goodness the end results turned out yummy.


oh my, it is a yummy pie!


  • Author
  • Recent Posts
Janine Waite
Follow me
Janine Waite
I named my blog Happy Happy Nester because I love everything related to the home. I’ve always enjoyed decorating my surroundings. Get cozy and stay for a bit, thanks for visiting!
Janine Waite
Follow me
Latest posts by Janine Waite (see all)
  • My Favorite Chocolate Recipes - May 17, 2025
  • Flower Cookies Recipe - May 16, 2025
  • Chocolate Chip Bars Recipe - May 15, 2025

Sharing This!

  • Facebook
  • Twitter
  • Email

Reader Interactions

Leave a Reply Cancel reply

Your email address will not be published. Required fields are marked *

Recipe Rating


Sidebar

Janine the Nester

Hello from the Nester

We love everything related to home, so get cozy and stay for a bit. Thanks for visiting our blog. Learn More...

Reader Favorites

The Best Crunchy Crispy Chocolate Chip Cookie

This Italian Cream Cake has a pumpkin cream cheese frosting that makes this a winning combination. This dessert is perfect for the holidays.

Italian Cream Cake with a Twist of Pumpkin

French Apple Custard Tart with Puff Pastry

DIY Paper Flowers Tutorial (Tissue Paper)

Upcycling Tin Cans with Scrapbooking Paper

How to Make a Paper Flower Wreath DIY

Popular Categories

  • Cakes
  • Cookies
  • Dinners
  • Wreaths
  • Organizing

Join Our Newsletter

Join our mailing list to receive the latest news and updates from our team.

You have Successfully Subscribed!

AFFILIATE DISCLOSURE:
I am grateful to be of service and bring you content free of charge. In order to do this, please note that when you click links and purchase items, in most (not all) cases, I will receive a referral commission. Your support in purchasing through these links enables me to keep my design and customization prices ridiculously low and empower more people worldwide to blog with less worry and less hassle.
Happy Happy Nester is a participant in the Amazon Services LLC Associates Program, an affiliate advertising program designed to provide a means for sites to earn advertising fees by advertising and linking to amazon.com.
Thank you! :)
-Happy Happy Nester

Our Guide

Join Our Newsletter

Join our mailing list to receive the latest news and updates from our team.

You have Successfully Subscribed!

  • Facebook
  • Instagram
  • Pinterest
  • Twitter

Recipes

Appetizers
Breakfast/Brunch
Desserts
Dinners
Drinks

Crafts & Decor

DIY
Gardening
Holiday
Wreaths

About

About The Nester
Contact
Privacy Policy

Copyright © 2025 · Happy Happy Nester by Janine Waite · Privacy Policy

↑ BACK TO TOP