• Skip to main content
  • Skip to header right navigation
  • Skip to site footer
  • About
  • Contact
  • Boutique of the Week
    • Facebook
    • Instagram
    • Pinterest
    • Twitter

Happy Happy Nester

Weekly Inspiration for Your Nest

  • Recipes
    • Appetizers
    • Breakfast/Brunch
    • Desserts
    • Dinners
    • Drinks
  • Crafts
  • Decor
  • Shop
    • Fall Decor
    • Kitchen
    • Pillows
    • Holiday Decor
  • Amazon Store
  • Recipes
    • Appetizers
    • Breakfast/Brunch
    • Desserts
    • Dinners
    • Drinks
    • Snacks
  • Crafts
  • Decor
  • Shop
    • Fall Decor
    • Kitchen Favorites
    • Pillows
    • Holiday Decor
  • Saturday Chitchat
  • Boutique of the Week
  • About
  • Contact
  • Facebook
  • Instagram
  • Pinterest
  • Twitter

See What’s Trending…

Cakes

Cookies

Dinners

Wreaths

Drinks

Home › Crafts › Punch Needle Crafting DIY

Punch Needle Crafting DIY

Crafts Decor DIY
By Janine Waite · Published on Feb 26, 2026
Affiliate Disclosure: This Post May Contain Affiliate Links.

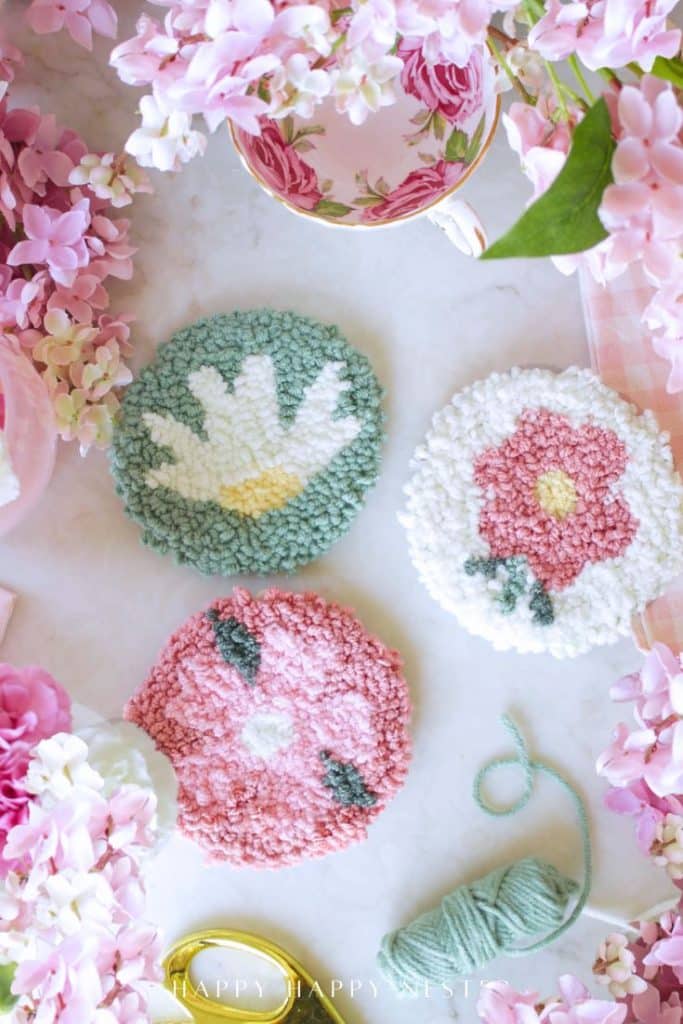
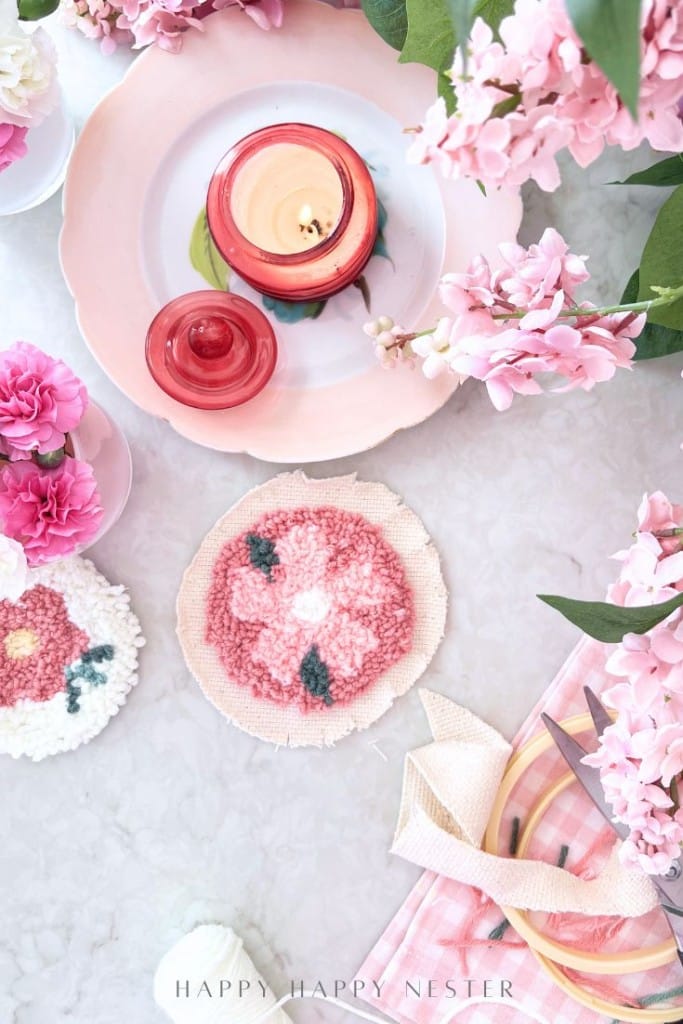
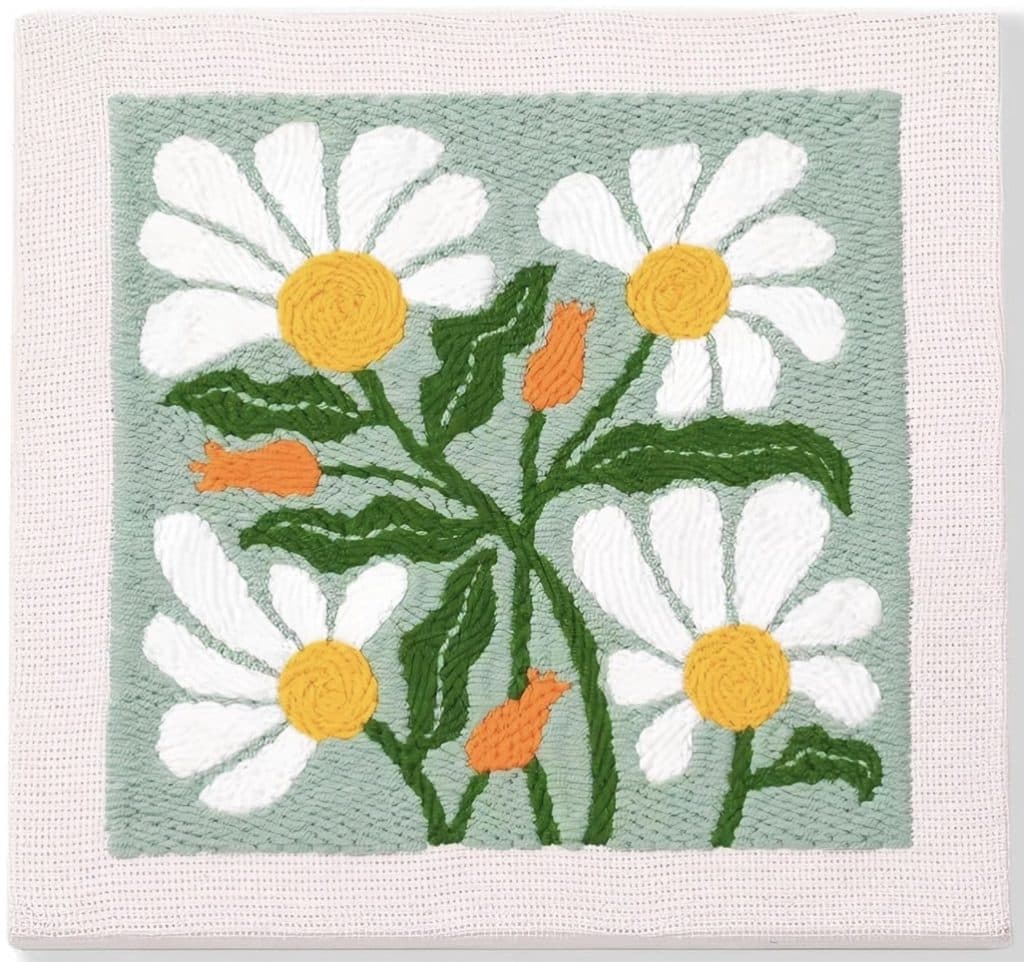
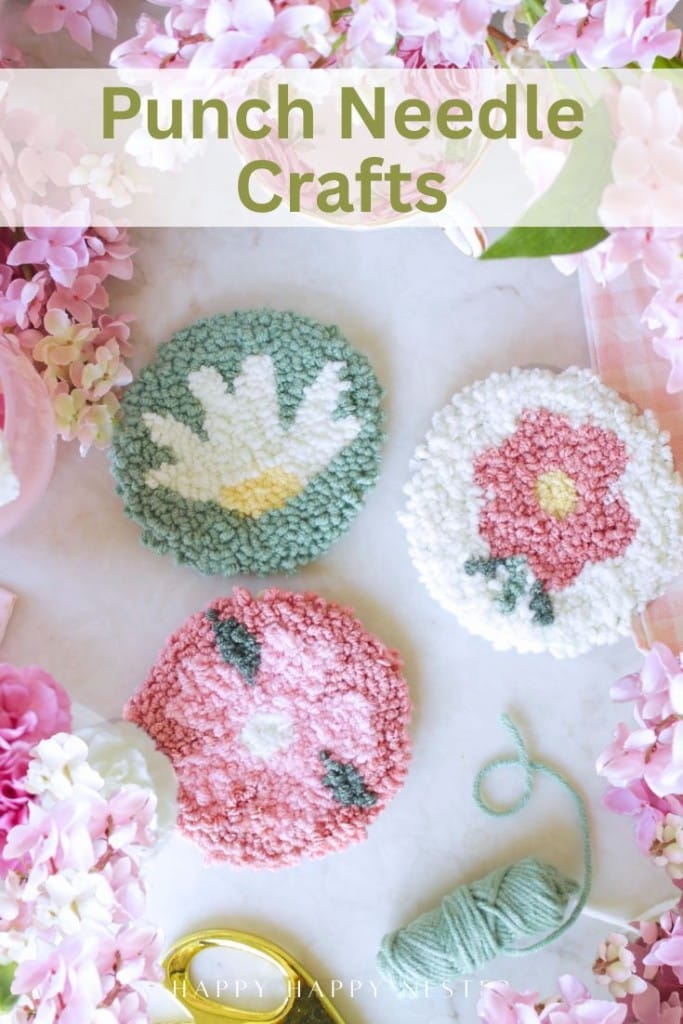
Punch Needle Crafting DIY is a cozy, beginner-friendly craft, and I had the best time making these three adorable coasters from a simple kit. This project comes together quickly and is perfect for adding a handmade touch to your coffee table or gifting to a friend. If you’ve been wanting to try punch needle embroidery, these cute little coasters are a fun and easy place to start.

Three round floral-patterned coasters made of tufted yarn are displayed on a white surface, surrounded by pink flowers, a teacup, green yarn, and a gold embroidery hoop—perfect for punch needle crafting or any cheerful DIY project.


I’ve been seeing punch needle embroidery pop up all over Instagram, and I have to admit, I was totally intrigued by this cozy little craft. When I found these cute Amazon kits, I thought they looked like the perfect, no-pressure way to try punch needle. There’s a tiny learning curve at first, but honestly, that’s part of the fun — and it quickly becomes so relaxing and addictive. I’m sharing my favorite tips and helpful little lessons so you can dive in, avoid a few beginner hiccups, and enjoy every stitch along the way.

I’ve been busy getting settled into our new home, and it feels so nice to finally slip back into my creative routines again. With spring right around the corner, I’m feeling inspired to make all the pretty, cheerful crafts that celebrate the season. If you’re in the mood to create along with me, take a peek at my other craft projects — I have lots of fun ideas to share!

More Floral Craft Projects!

Trader Joe’s Flower Arrangements DIY

White Daisy Wreath DIY

How to Make a Floral Wreath

Decoupage Oyster Shells (Painted)

How to Make a Small Bouquet of Flowers

A soft pink and white table setting with pink flowers, a pink plate holding a red candle, punch needle crafting DIY coasters, and a pink gingham napkin, creating a cheerful, spring-themed arrangement.

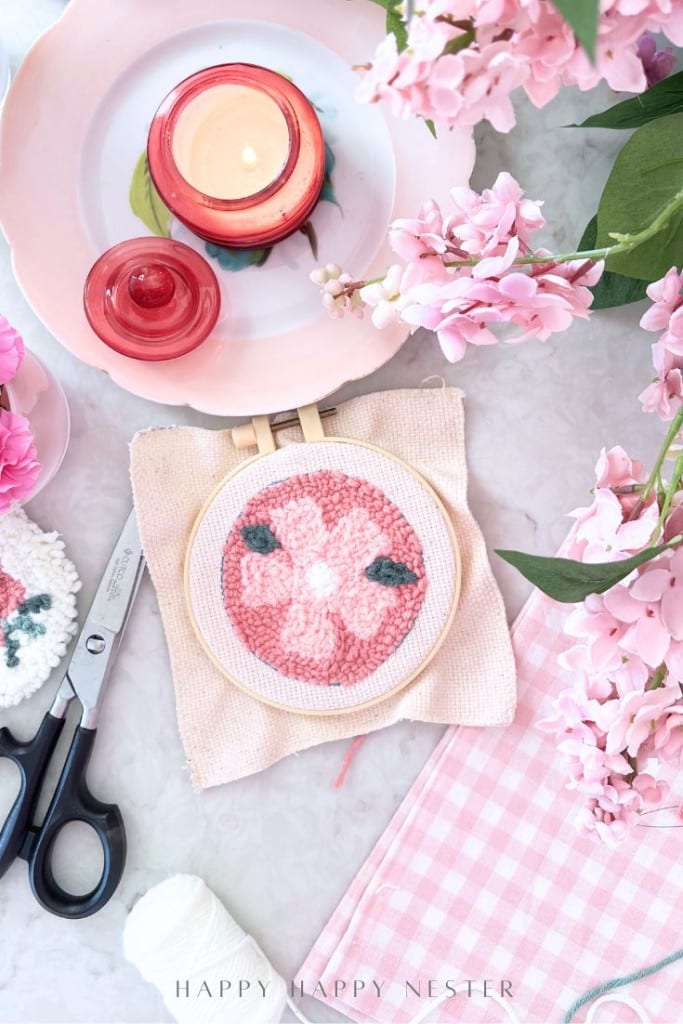
Punch Needle Crafting DIY: How to Make Cute Beginner Coasters

Punch Needle Crafting DIY is a cozy and beginner-friendly craft that makes it easy to create textured, handmade projects like these adorable coasters. Using a simple kit, I made three cute designs that came together quickly and were surprisingly relaxing to stitch. If you’ve been curious about punch needle embroidery, this project is the perfect introduction. These coasters are not only functional but also make sweet handmade gifts or charming decor for your coffee table.


What Is Punch Needle Crafting?

Punch needle crafting is a type of embroidery that uses a hollow needle to create loops of yarn on fabric, resulting in a soft, tufted texture. Unlike traditional embroidery, the stitches are created from the back of the fabric, which forms a plush design on the front.

Why you’ll love it:

  • Beginner friendly
  • Quick results
  • Relaxing and repetitive
  • Great for small projects like coasters, ornaments, and wall art

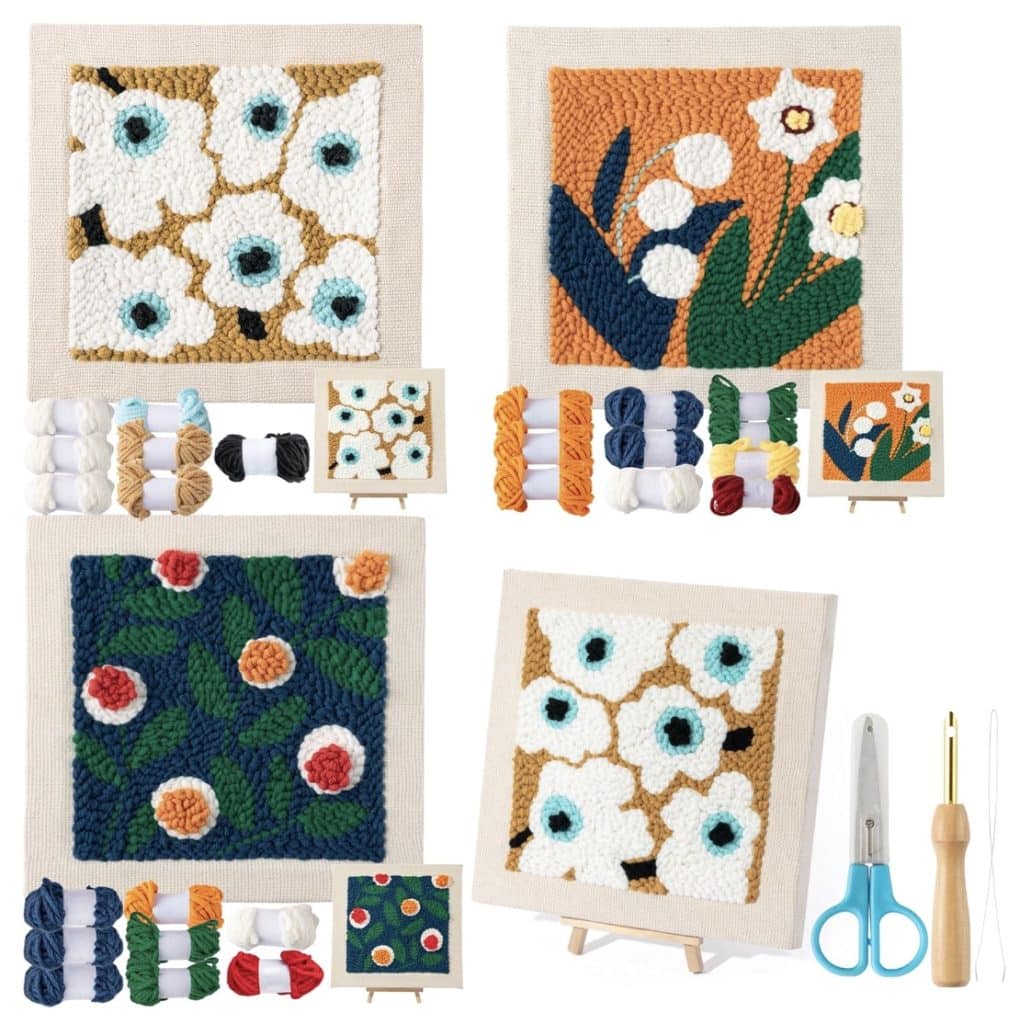
Supplies Needed for Punch Needle Coasters

A set of six round, floral-patterned coasters made with punch needle crafting, yarn in five colors, two DIY tools, and a mug resting on a coaster are displayed on a white background.

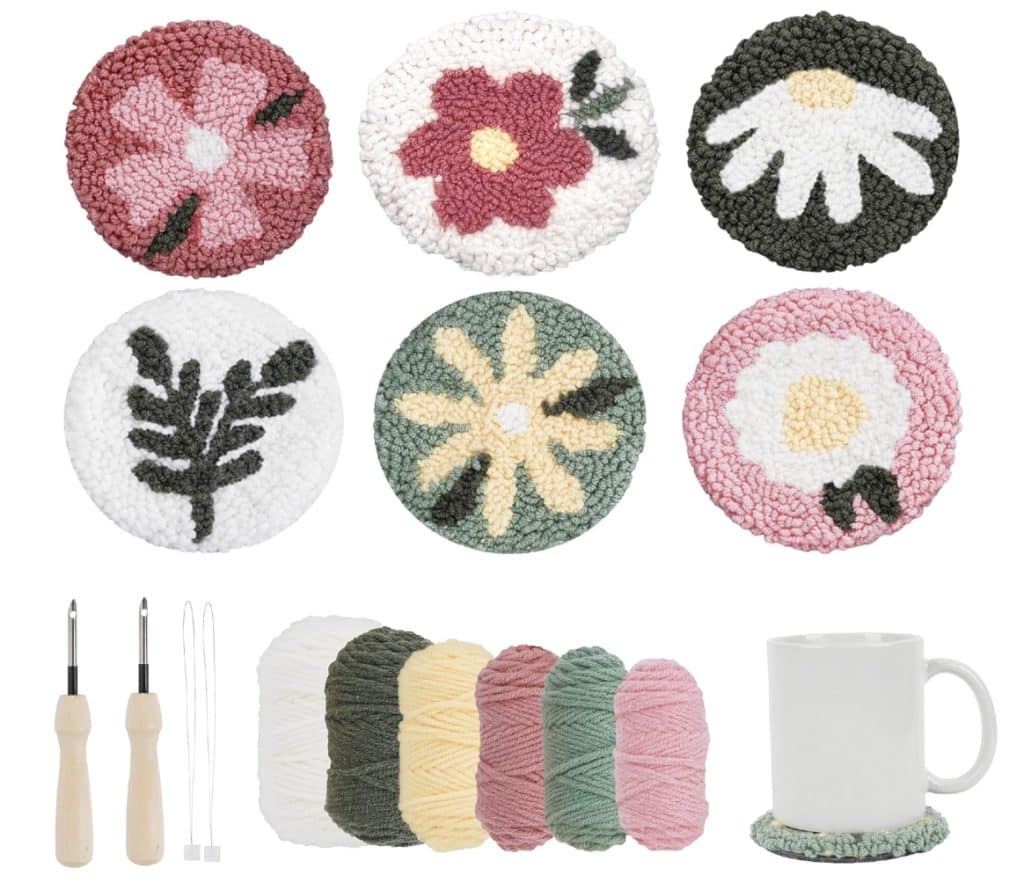
Most kits include everything you need, but here’s a quick list:

  • Punch needle tool
  • Embroidery hoop or frame
  • Punch needle fabric (Monk’s Cloth)
  • Yarn
  • Printed pattern on cloth or template
  • Scissors
  • Fabric glue, hot glue gun, or backing felt (for finishing)

Important Punch Needle Tip (Don’t Skip This!)

A hand with a crochet hook works with pink yarn on a marble surface, surrounded by pink flowers, a pink candle in a glass jar, and a pink gingham pouch. The bright, cozy scene invites you to explore DIY punch needle crafting.

One of the most important things to remember is:

👉 The yarn should trail behind the stitch.
This means the needle opening must face opposite the direction you’re stitching.

Why this matters:

  • Prevents yarn tangling
  • Keeps loops even and secure
  • Helps stitches stay in place
  • Creates smoother lines and shapes

If your stitches are pulling out or skipping, this is usually the reason!


How to Make Punch Needle Coasters (Step-by-Step)

An embroidery hoop with fabric displays a simple blue outline of a flower. Surrounding it are pink flowers, a pink gingham cloth, candles, and a small round floral coaster on a white surface.

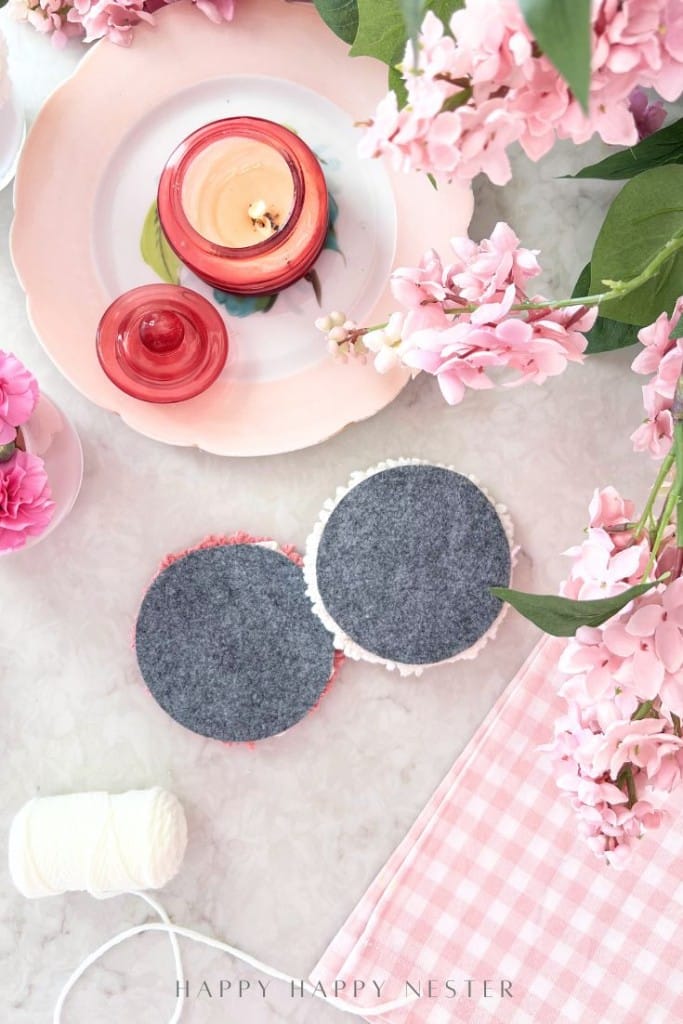
Step 1 — Prepare Your Fabric

How to Place Fabric in an Embroidery Hoop for Punch Needle

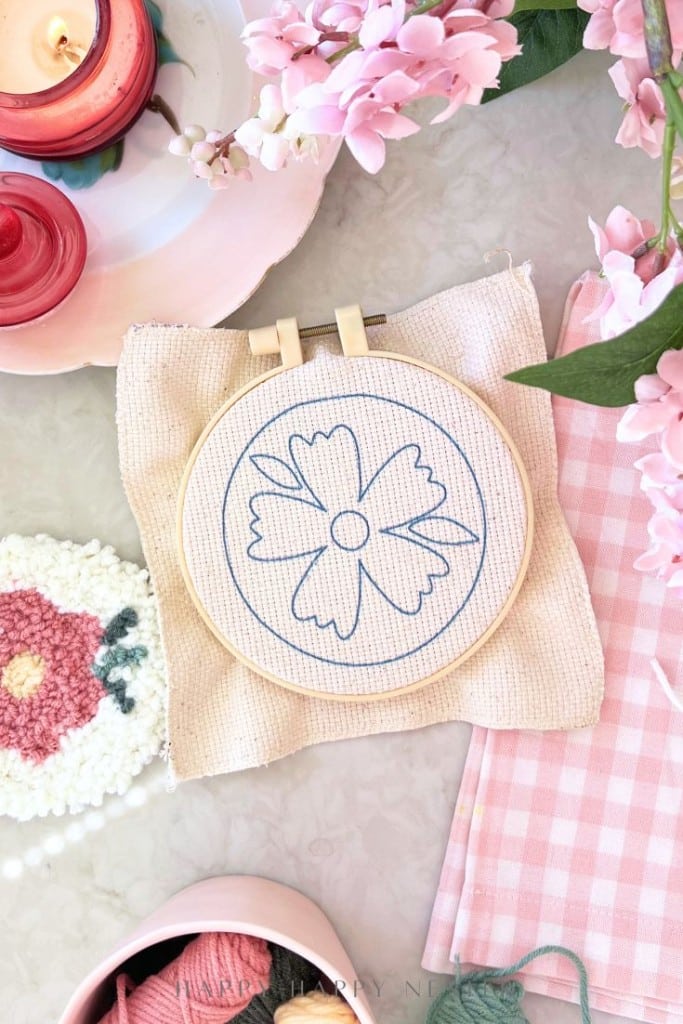
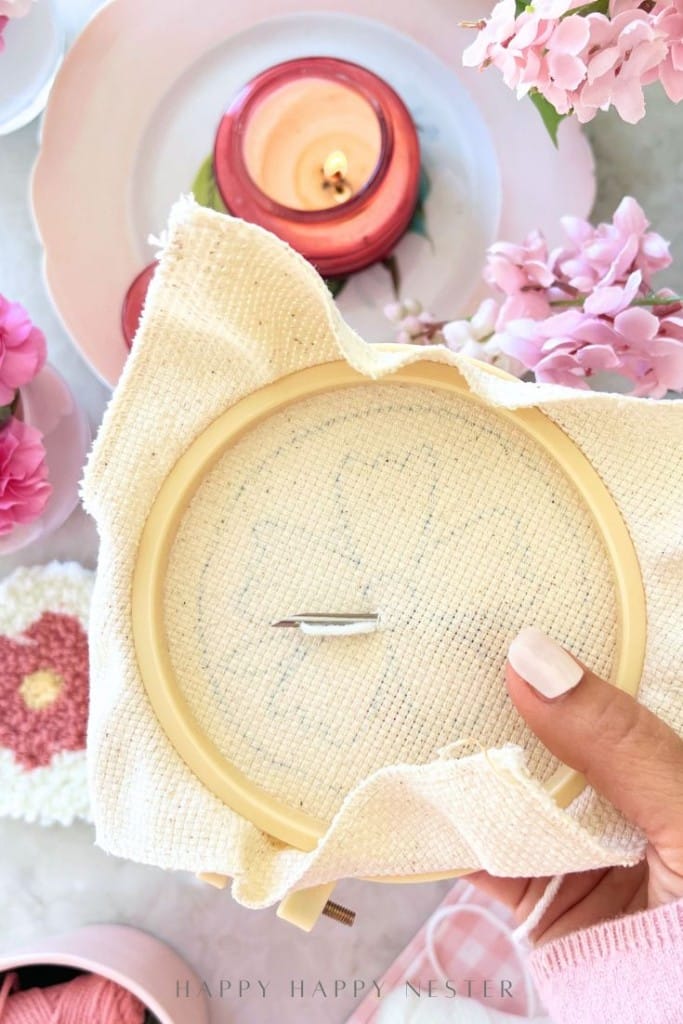
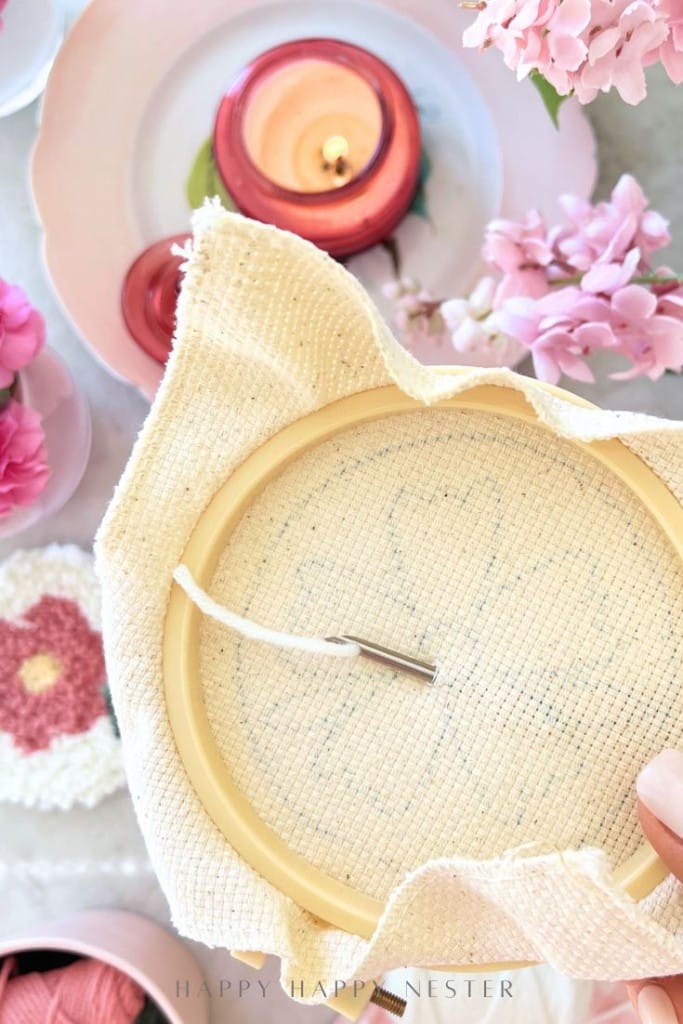
Start by separating the embroidery hoop into the inner and outer rings and loosening the screw on the outer hoop. Lay the inner hoop on a flat surface, then place your punch needle fabric over it with the printed design facing up (this will be the top side of the hoop). Next, press the outer hoop down over the fabric and inner ring, gently pulling the cloth so it sits smooth and wrinkle-free.

Once the fabric is centered, tighten the screw on the outer hoop while continuing to tug lightly on the fabric edges. You want the cloth to feel drum-tight, which helps the needle punch clean stitches and prevents skipped loops. If needed, give the fabric one last gentle pull all the way around after tightening to keep everything nice and taut.

Stretch your cloth tightly in an embroidery hoop. The fabric should feel drum-tight so the needle can punch cleanly.


Step 2 — The Design

The kit comes with the design printed on the cloth. Remember, you’ll be punching from the back side, so your finished design appears on the front.

A close-up of a punch needle with a wooden handle, held above a blurred background with pink flowers, a candle, and an embroidery hoop featuring a floral pattern.
A hand with light pink nail polish holds a quilling or crafting tool with a curved wire. In the background are flowers, a red candle, and crafting materials on a pastel-colored table.
A close-up of a hand with pale pink nails holding white yarn, ready for punch needle crafting in front of a floral embroidery hoop. In the background are pink flowers, a red candle, and decorative plates—perfect for DIY inspiration.
A close-up of a large needle threading white yarn, with pink flowers, a lit pink candle, embroidery hoop, crochet pieces, and pink textile items in the background, creating a cozy crafting scene.

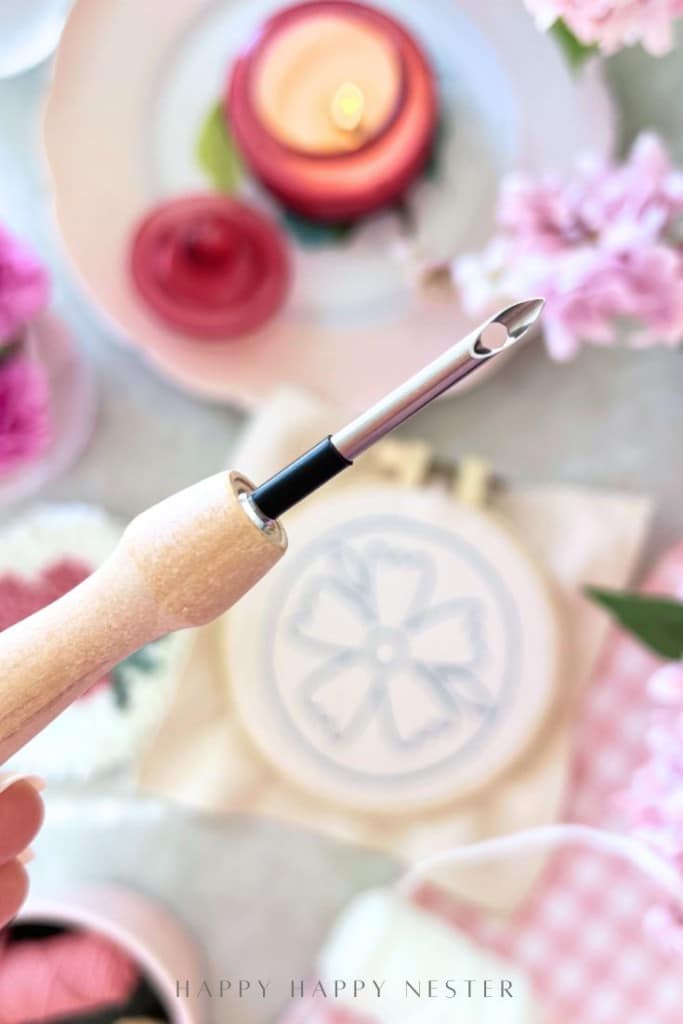
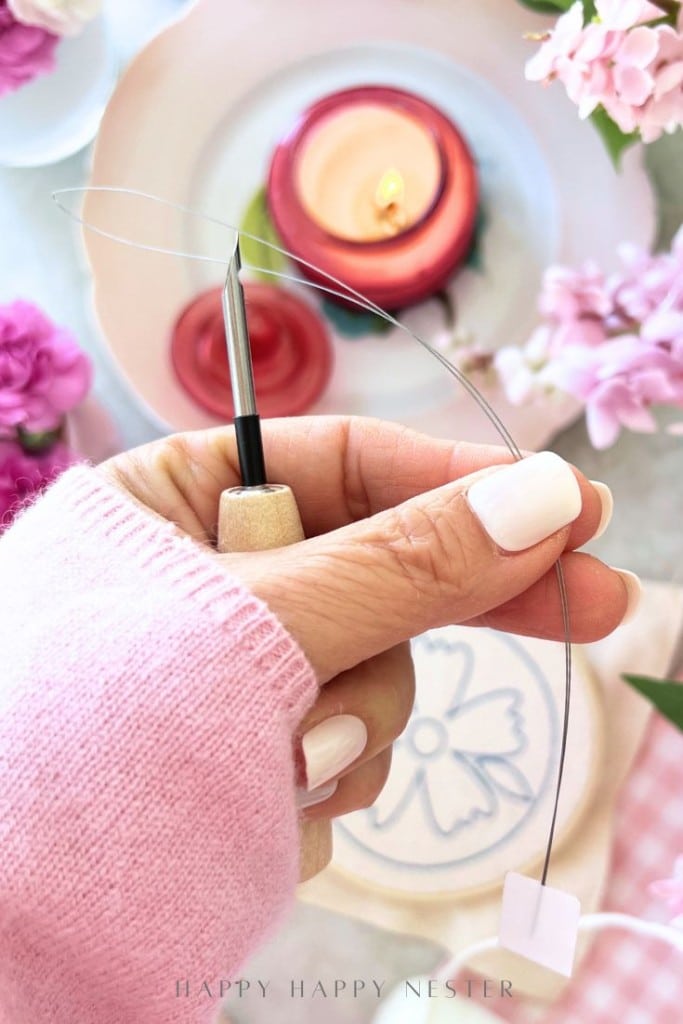
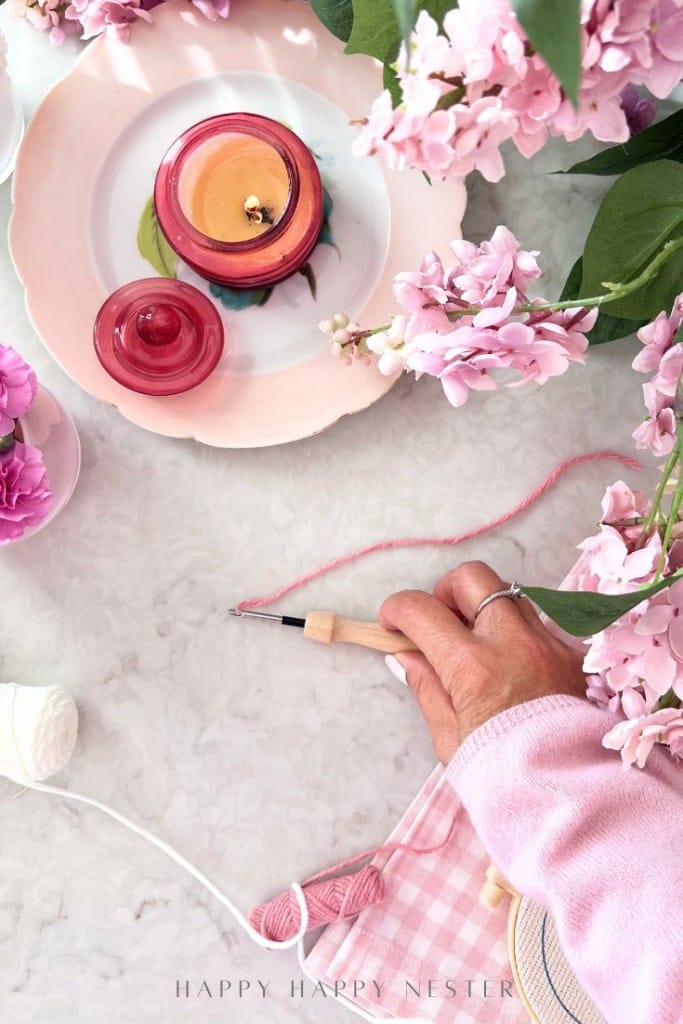
Step 3 — How to Thread a Punch Needle

Threading a punch needle can feel a little tricky the first time, but once you understand the path of the yarn, it becomes much easier. Start by inserting the needle threader loop into the backside of the punch needle tip and gently guide it all the way down through the hollow shaft (my second image is not quite right; the wire hoop should go down into the needle and handle). Continue pushing the threader through until it travels into the wooden handle and the loop appears just outside the small hole at the bottom of the handle.

Next, place your yarn through the threader loop and carefully pull the threader back up through the handle and needle shaft. This motion draws the yarn smoothly through the inside of the punch needle. To finish, insert the threader through the eye at the needle tip, pull the yarn through, and remove the threader — leaving a short yarn tail ready for stitching.

A hand holds an embroidery hoop with fabric, a needle, and a faint heart pattern. Pink flowers, yarn, and a lit candle are arranged in the background, creating a cozy crafting scene.
A hand holds an embroidery hoop with beige fabric, surrounded by pink flowers, a lit candle, and crochet items on a table. The needle and thread for punch needle crafting are visible on the fabric.
Embroidery hoop with a floral outline design on fabric, surrounded by pink flowers, green yarn for punch needle crafting DIY projects, a finished flower embroidery, and a pink gingham cloth on a light surface.

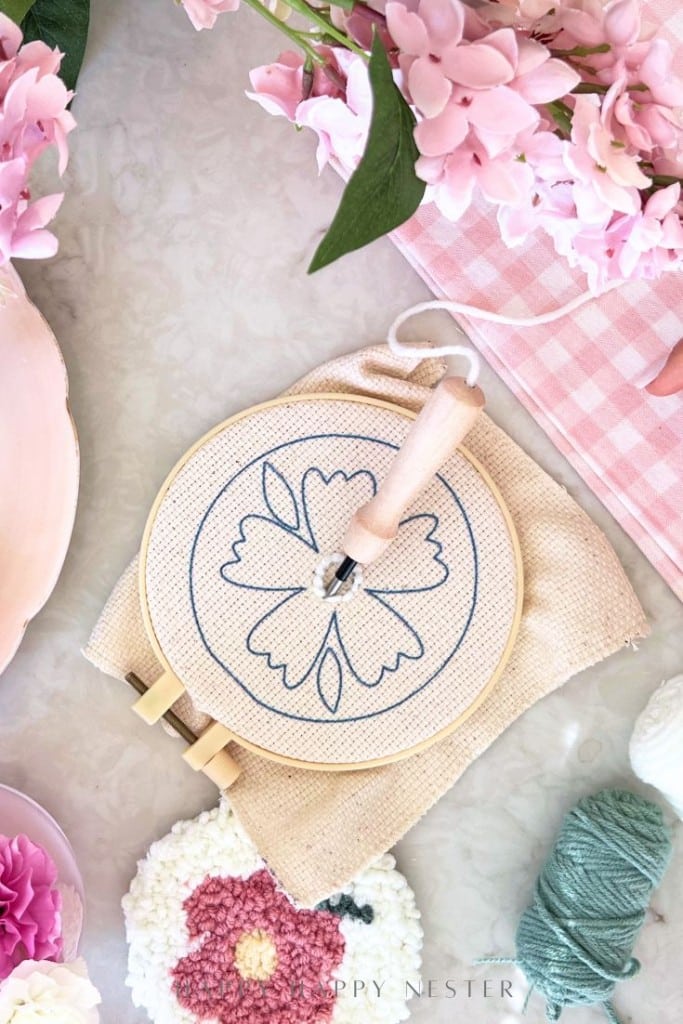
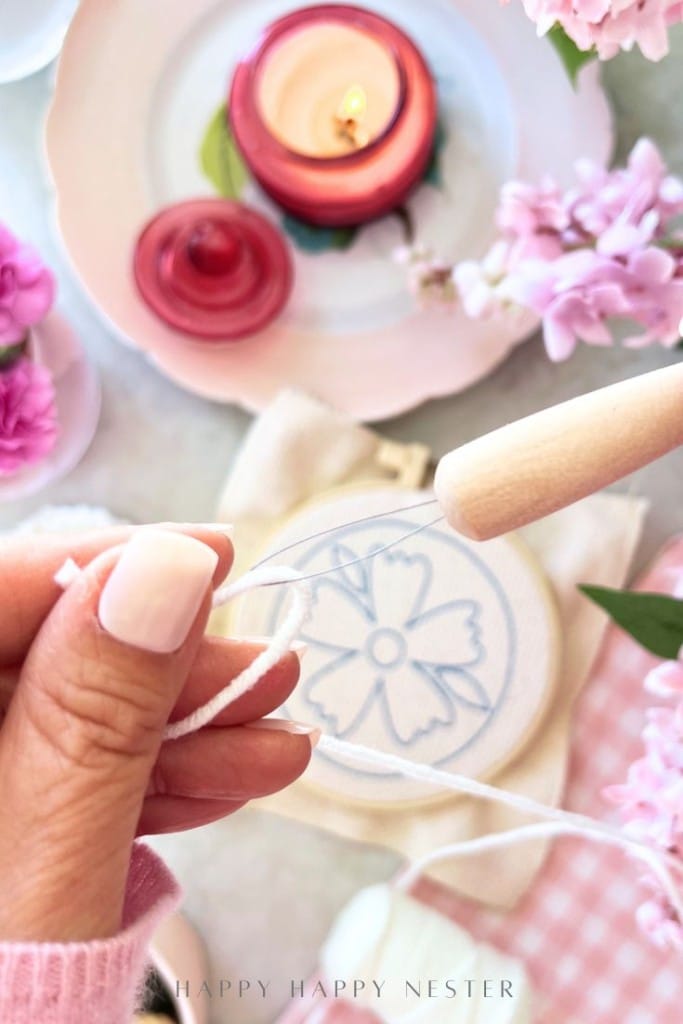
Step 4 — Start Punching

To begin, insert the needle straight down into the fabric until the handle touches the surface. For your very first stitch, gently pull the yarn tail through to the back of the fabric before bringing the needle back up — this helps secure your starting point and prevents loose loops. When making your next stitch, move the needle over about two fabric holes before punching down again, which keeps your stitches evenly spaced and nicely connected.

As you continue, lift the needle just slightly above the fabric and move forward without pulling too high. I also like to rotate the embroidery hoop (and fabric) as I work, which helps maintain a smooth stitching pattern and ensures the yarn tail and needle opening stay behind the direction of your stitching.

✔ Keep the needle close to the fabric surface
✔ Move slowly and evenly as you stitch
✔ Make sure the yarn trails behind the needle (with the needle opening facing opposite your stitching direction)
✔ Avoid holding the threaded yarn down with your hand or fingers while punching, since the yarn needs to feed freely through the needle

This steady motion creates smooth, even loops and helps your design stay neat and secure.

A flat lay of pink flowers, a pink candle in a glass holder, yarn, a pink gingham napkin, and a floral embroidery hoop with punch needle crafting DIY tools on a white surface.
A pink candle, cherry blossoms, a cup of tea, and a pink punch needle crafting embroidery in a hoop are arranged on a white surface with a pink gingham napkin, creating a soft, spring-themed DIY setting.
An embroidery hoop with a pink floral punch needle design sits on a table surrounded by pink flowers, a pink candle, scissors, and thread, creating a cozy, pastel punch needle crafting DIY scene.

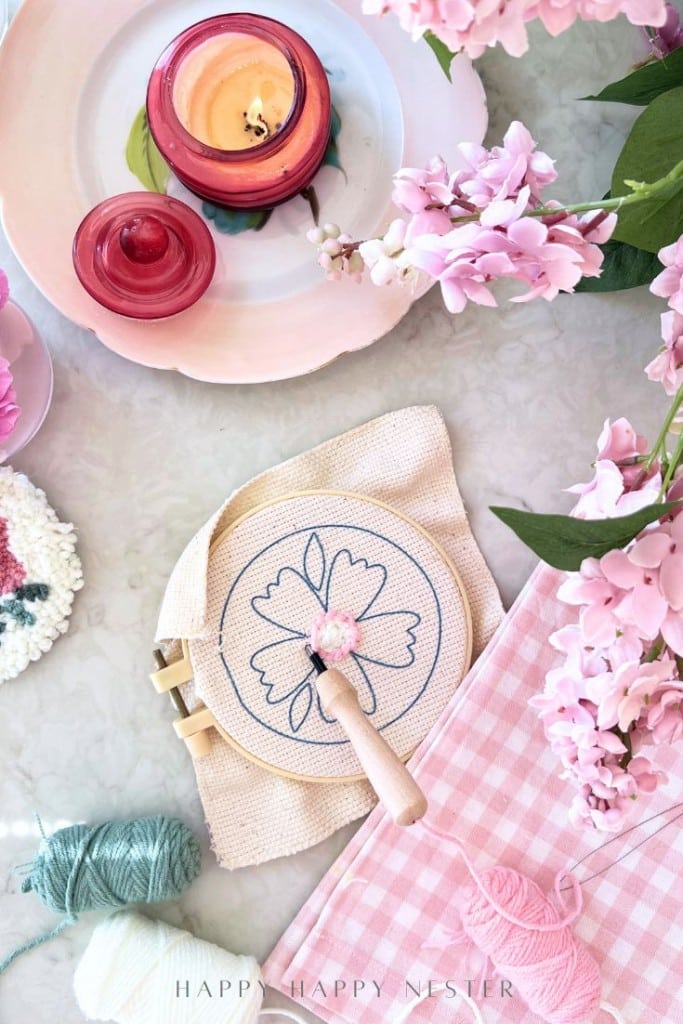
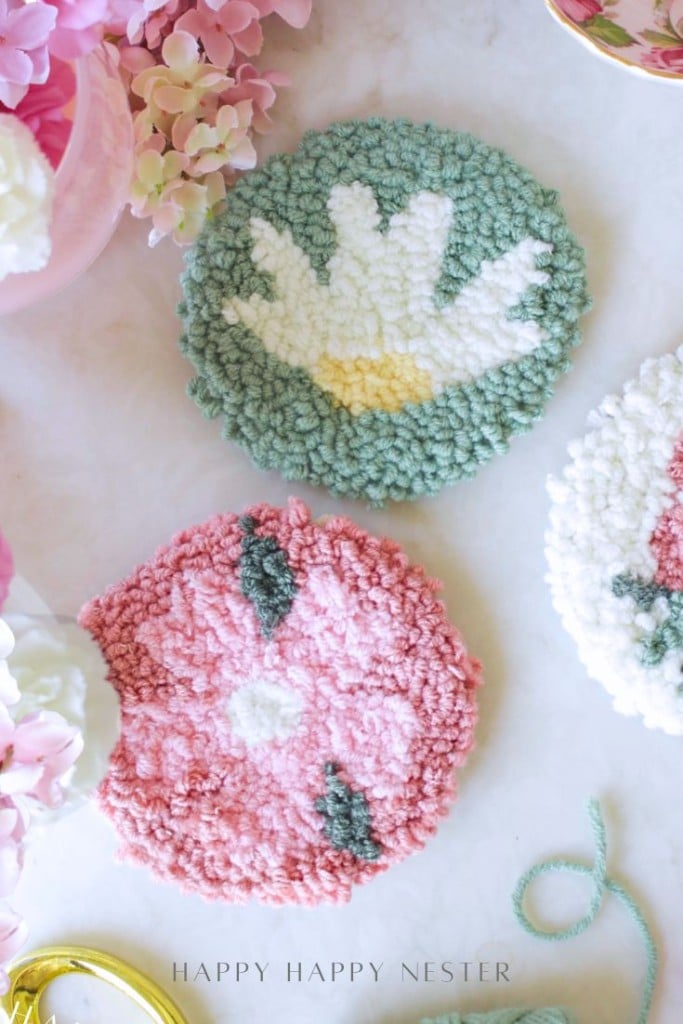
Step 5 — Fill in Your Design

Outline your design first, then fill the interior with rows of stitches. You can change yarn colors to create fun patterns and texture.

A pink-themed flat lay features a candle, pink flowers, and an embroidery hoop with a floral pattern, surrounded by scissors and other sewing supplies on a white surface.
A hand cuts the edge of a pink floral punch needle embroidery on fabric, surrounded by pink flowers, a pink plate with a candle, and a glass jar on a marble tabletop.
A pink candle in a glass holder sits on a pastel plate surrounded by pink flowers, crochet coasters with floral patterns, and punch needle crafting DIY accents atop pink gingham fabric on a white surface.
A top view of a pink-themed table with a candle, pink flowers, punch needle crafting DIY coasters, embroidery hoops, and a pink checkered cloth arranged on a white surface.
A table with pink flowers, a candle on a pink plate, a glue gun, white string, and two handmade round flower crafts on a pink gingham cloth. The scene is bright and arranged for a DIY project.
A hand holding a round white paper above a pink table setting with flowers, a candle, a pink gingham napkin, and floral coasters. The scene has a soft, springtime feel—perfect inspiration for punch needle crafting DIY projects.
A person holding a round gray felt coaster above a table decorated with pink flowers, a candle, and other handmade coasters, one with a flower pattern and another with a pink and white design.
A flat lay of two round felt coasters, a candle, pink flowers, a spool of white string, and a pink gingham cloth on a marble surface. The scene is bright and decorative.

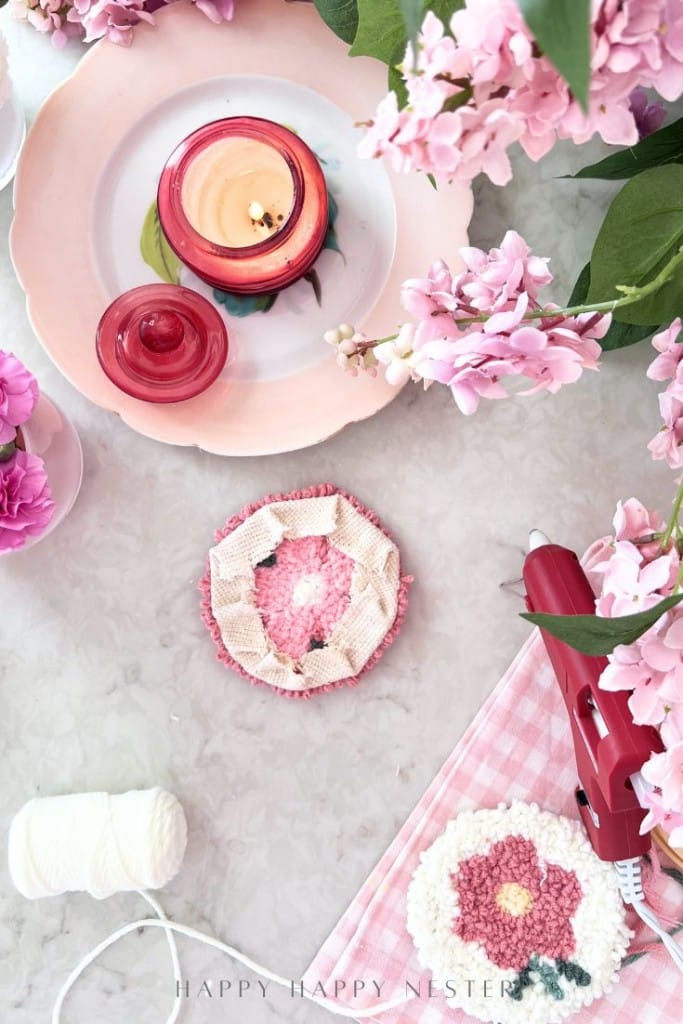
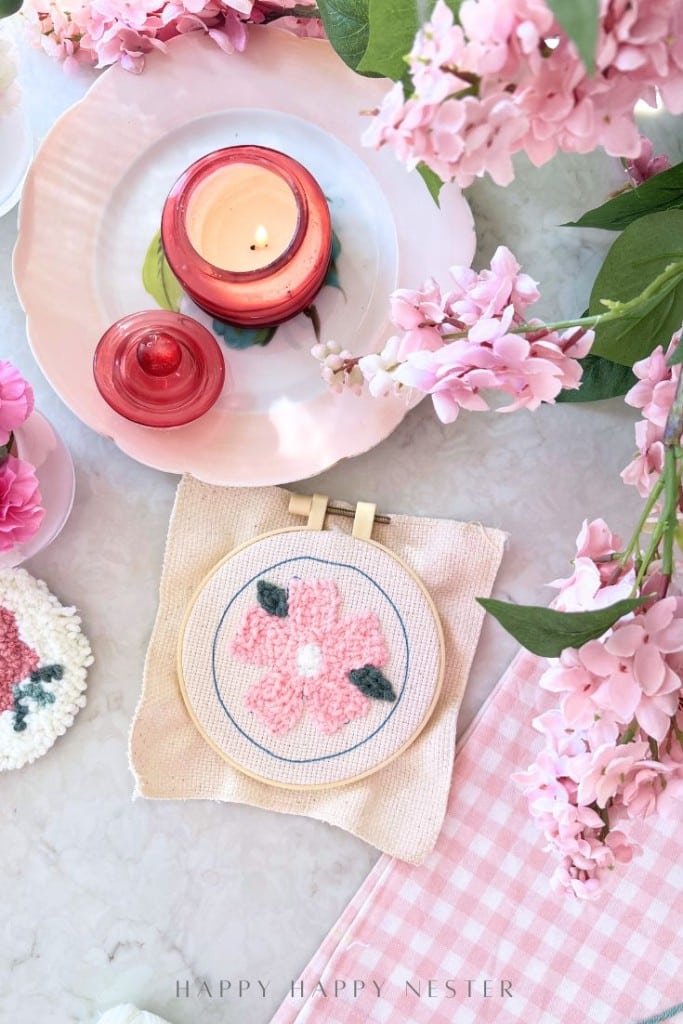
Step 6 — Secure and Finish the Coaster

Once finished:

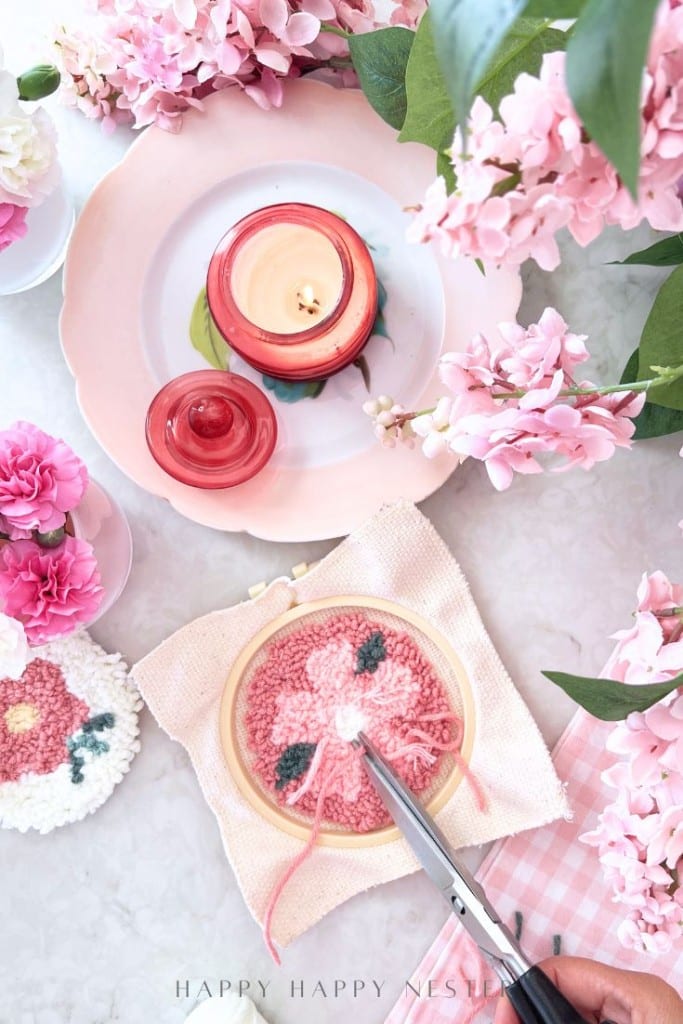
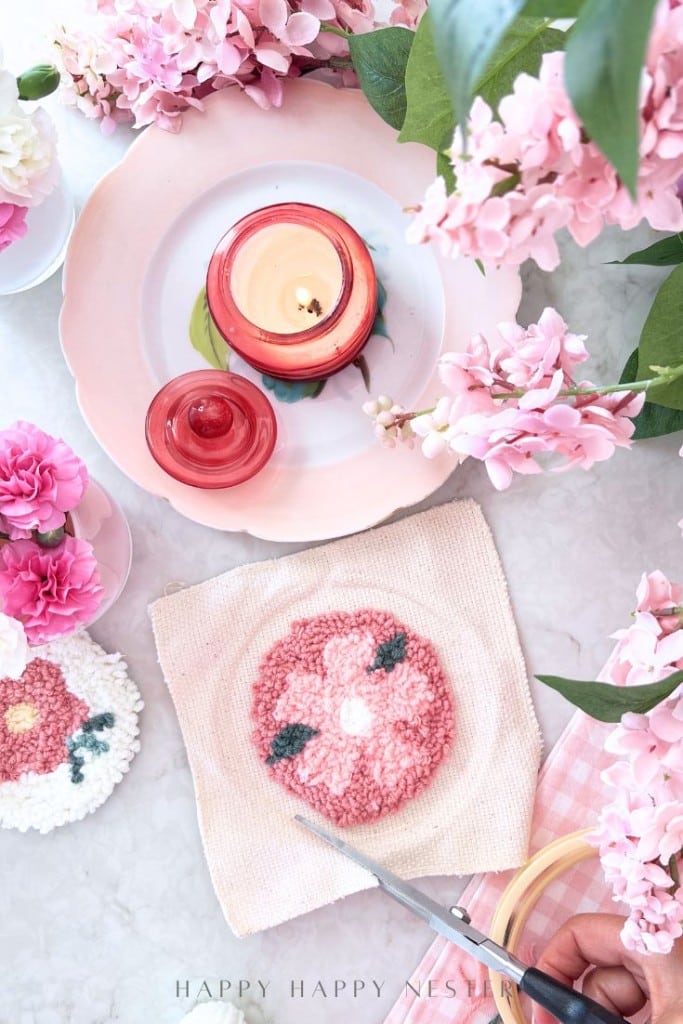
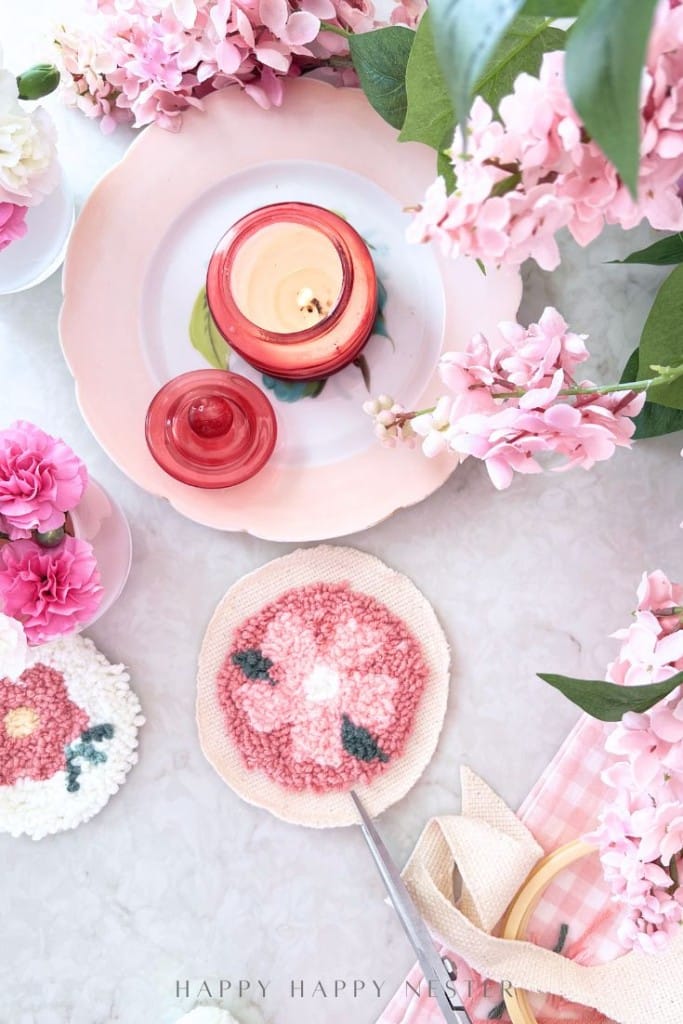
  • Once your punch needle design is complete, it’s time to secure the stitches and turn your piece into a finished coaster. Start by flipping your work to the front and trimming any excess yarn tails, being careful not to cut your loops.
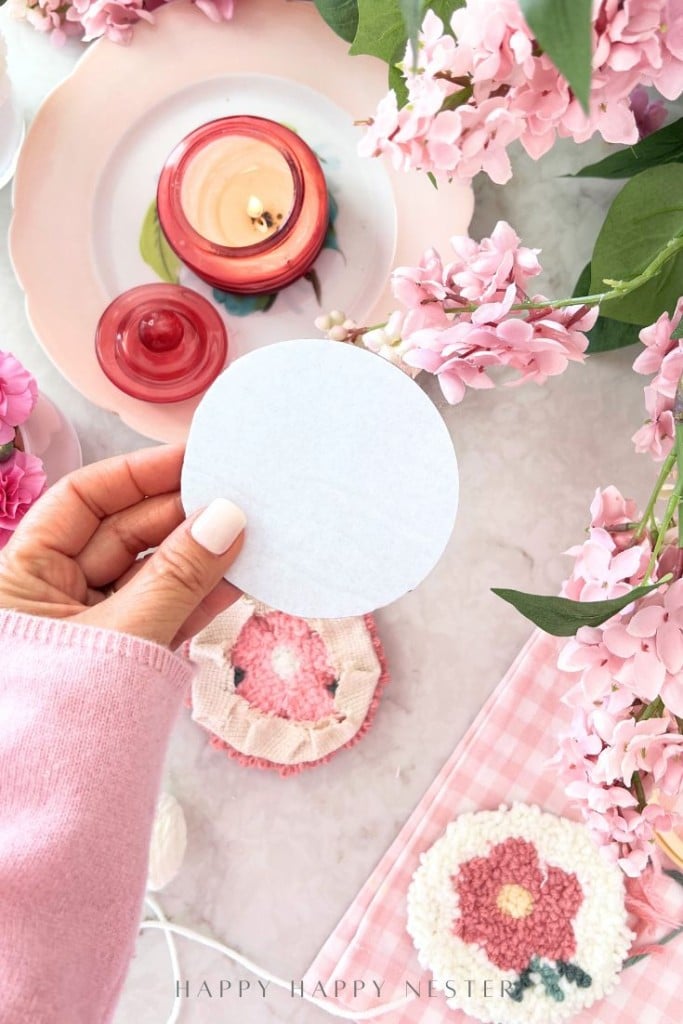
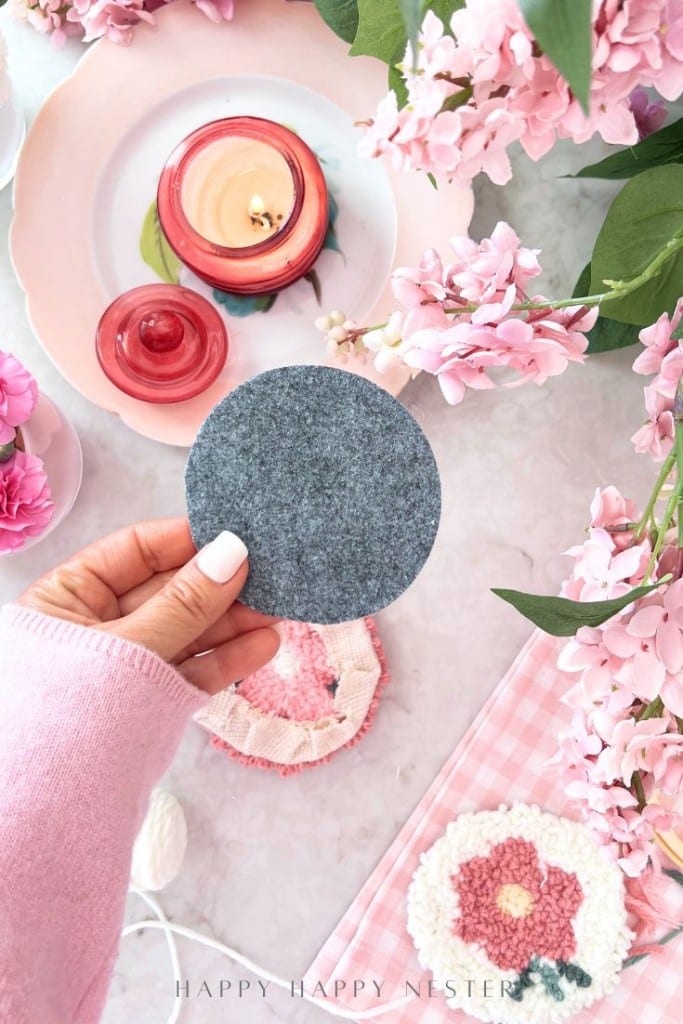
  • Next, remove the embroidery hoop. You’ll notice a faint crease line left by the hoop — this makes the perfect guide for trimming away the excess fabric. Carefully cut around your coaster shape, then snip a few small perpendicular cuts from the outer edge of the fabric toward the design, stopping just shy of the loops. These small cuts allow the fabric to fold smoothly around curves without bunching.
  • Fold the trimmed fabric flaps over to the backside and secure them with hot glue, pressing gently so the edges lay flat and tidy. To finish, peel and stick a piece of sticky felt backing over the glued fabric. This adds durability, protects surfaces, and gives your coaster a clean, professional finish.

Beginner Tips for Punch Needle Success

  • Keep fabric tight in the hoop
  • Don’t pull the needle too high between stitches
  • Use yarn that matches your needle size
  • Work slowly to avoid skipped stitches
  • Practice on scrap fabric first

Why Punch Needle Coasters Are a Great Beginner Project

These little coasters are perfect because:

  • Small and quick to finish
  • Great way to practice technique
  • Minimal yarn needed
  • Easy to gift or decorate with

Plus, they add the cutest handmade touch to your home (and look adorable styled with coffee mugs!).


Fun Variations to Try

  • Floral coaster designs
  • Geometric patterns
  • Neutral-textured coasters
  • Holiday shapes
  • Monogram or personalized coasters

Two round, handmade tufted coasters with floral designs—one pink with a white and green flower, the other green with a white and yellow flower—lie on a white surface surrounded by pink flowers.

FAQs About Punch Needle Crafting

Why are my stitches pulling out?
Usually, the needle is pointing the wrong way or is lifted too high.

Can I use regular yarn?
Yes! Just match yarn thickness with your needle size.

Do I need to seal punch needle projects?
For coasters, sealing with glue and adding backing helps durability.


Punch needle crafting is such a relaxing and satisfying DIY, and these cute little coasters are the perfect way to learn the technique. Once you get the hang of keeping the yarn trailing the stitch, the process becomes smooth and almost meditative. I loved how each coaster turned out with its soft texture and handmade charm. If you’ve been looking for a cozy new craft, this punch needle project is definitely worth trying.

Happy Crafting!

The image displays the cursive word "janine" in light gray text on a white background.

Make sure to check out my talented blogging friends’ flower crafts below!

Tap on the image to shop the product!

A punch needle crafting kit with tools, yarn, fabric, a wooden hoop, instructions, and six finished embroidered designs: daisy, cupcake, macaron, donut, strawberry, and cherries—all pastel on a pink background for DIY fun.
A round embroidery hoop holds needlework featuring a colorful butterfly with blue, orange, and black wings on a light green background—perfect for punch needle crafting or DIY decor projects.
A set of six round, floral-patterned coasters made with punch needle crafting, yarn in five colors, two DIY tools, and a mug resting on a coaster are displayed on a white background.
Two finished punch needle crafting hoops with colorful flower designs, embroidery threads in pink, yellow, and green, metal tools, and a diy instruction booklet displayed on a white background.
Embroidery art inspired by punch needle crafting DIY, featuring white daisies with yellow centers, green leaves, and orange flower buds on a light green background bordered by a pale pink edge.
Four square punch needle embroidery canvases with floral designs are shown. Each diy set includes colored yarn bundles, a punch needle tool, threader, and scissors, arranged neatly around the finished canvases—perfect for punch needle crafting.

Blogger’s Best DIY Flower Crafts

Two greeting cards on a light wooden surface: one with punch needle blue flowers and “so happy for you,” the other with two red tulips and “a new little blessing.” DIY purple and pink blooms and green leaves surround them.

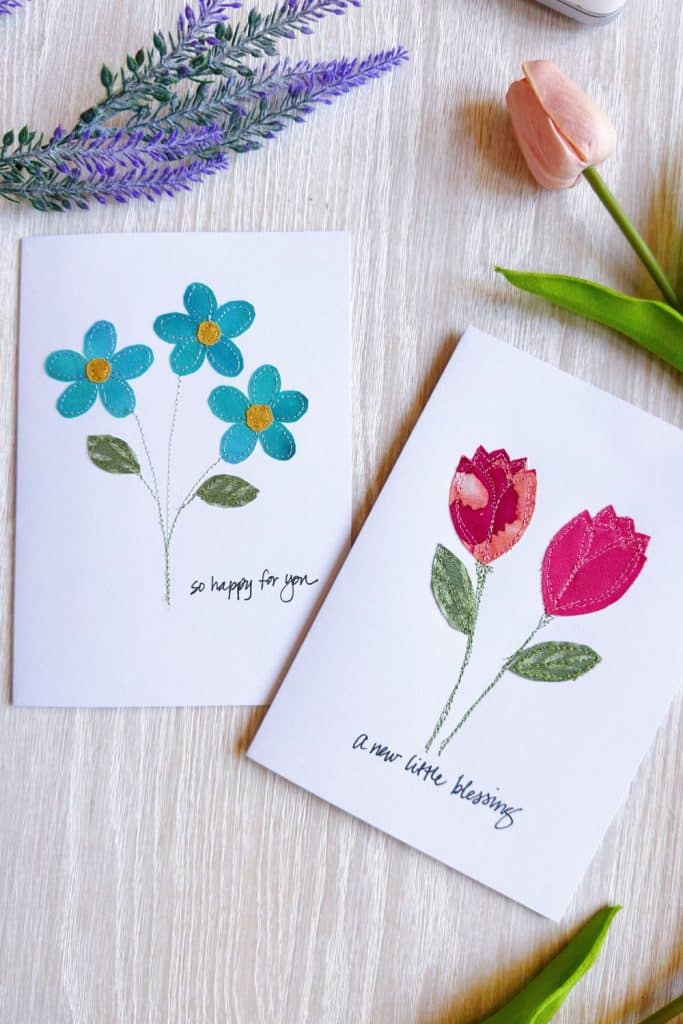
Floral Embroidered Handmade Cards | My 100 Year Old Home

Floral Embroidered Handmade Cards are one of those projects that combine creativity, storytelling, and meaningful making in the most beautiful way. Using fabric scraps, simple stitching techniques, and a little imagination, I created a collection of stitched cards that feel personal, artistic, and truly special to give.

A lit cream-colored taper candle in a glass holder is decorated with yellow roses, small white and yellow flowers, and greenery—a charming DIY crafting accent for your white kitchen countertop.

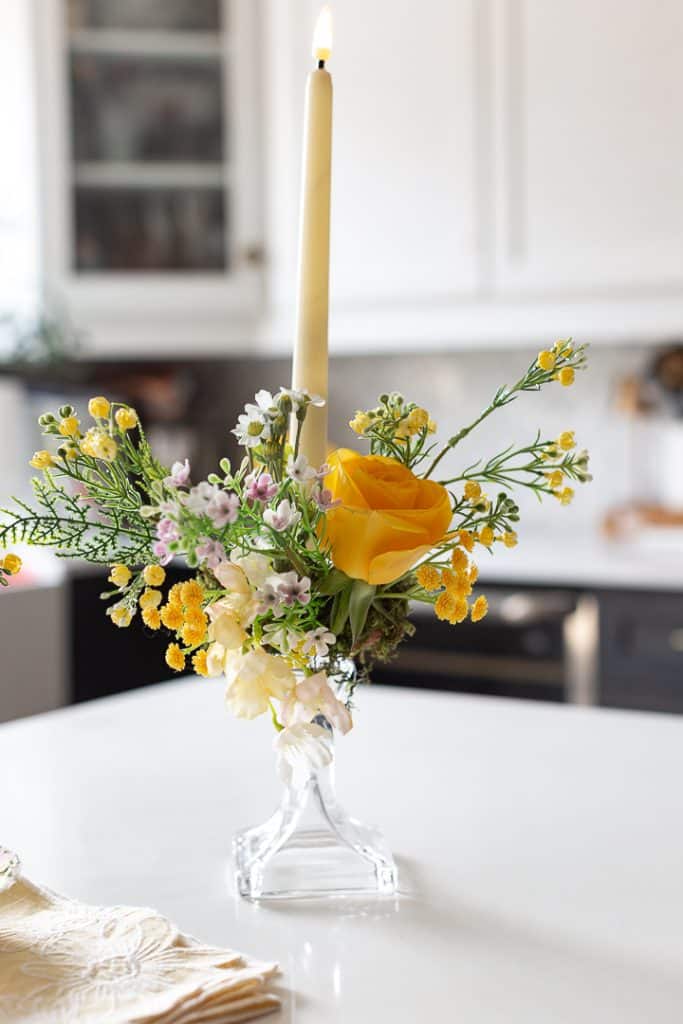
Candlestick Holder Floral Arrangement | Craftberry Bush

P

A garland of flower-shaped decorations, perfect for punch needle crafting or other DIY projects, is made from brown and patterned paper strips with circular centers, laid out on a white fabric background next to a spool of green string.

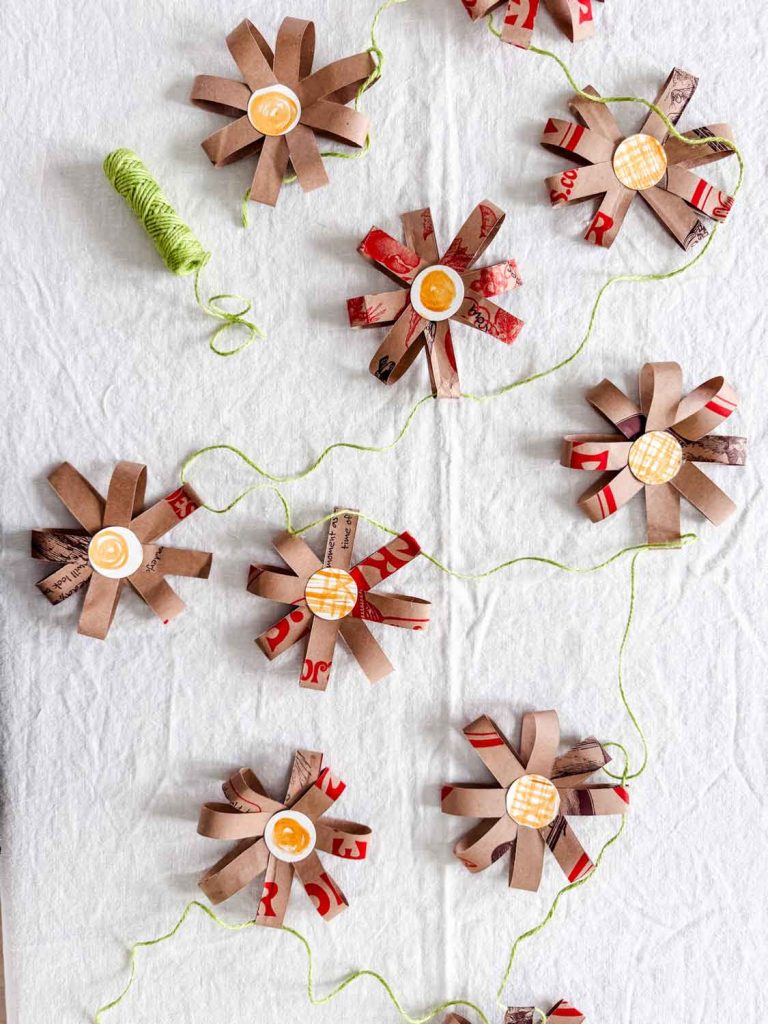
Paper Bag Flower Garland (Using a Trader Joe’s Bag) | Most Lovely Things

A simple paper flower garland made from a Trader Joe’s paper bag and hand-painted watercolor circles — an easy, charming craft that turns everyday materials into something unexpectedly sweet.

Two handcrafted ceramic tiles with artistic floral and abstract designs rest on a light wooden surface, surrounded by dried flowers and small white petals—a charming addition to any crafting or DIY space.

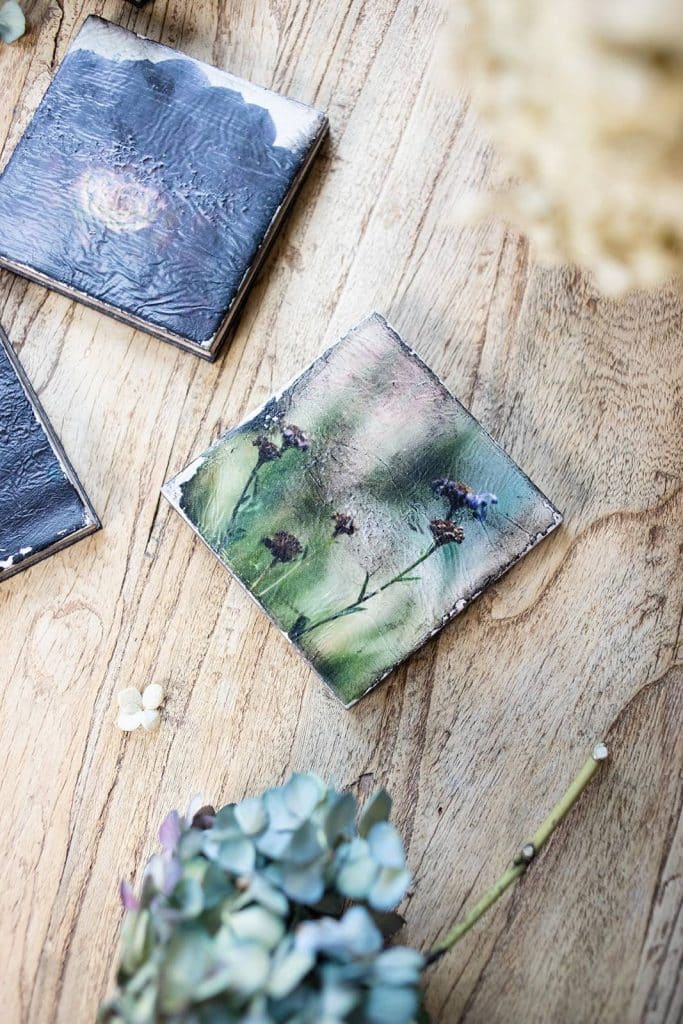
Floral Decoupage Tile Coasters | My Sweet Savannah

pin it button
Three round punch needle coasters with floral designs are surrounded by pink flowers, green yarn, gold scissors, and a pink background. The text "Punch Needle Crafts" highlights this charming punch needle crafting DIY scene.
  • Author
  • Recent Posts
Janine Waite
Follow me
Janine Waite
I named my blog Happy Happy Nester because I love everything related to the home. I’ve always enjoyed decorating my surroundings. Get cozy and stay for a bit, thanks for visiting!
Janine Waite
Follow me
Latest posts by Janine Waite (see all)
  • Punch Needle Crafting DIY - February 26, 2026
  • Spring Plates and Dishes from Walmart - February 25, 2026
  • Spring Doormats from Walmart - February 18, 2026

You May Also Like

  • christmas garland diy
    Easy Garland DIY - 5 Minute Project
  • Three crocheted potholders—two green and one white—each with a stitched snowflake design sit on a festive table with greenery, a candle, peppermint candies, and more. These diy creations make charming potholder Christmas gifts for the holiday season.
    Potholders Christmas Gifts DIY
  • paper snowflakes
    Easy Paper Bag Snowflakes Tutorial
  • make your own ornament with a mini cloche 2
    Make Your Own Ornament With a Cloche

Sharing This!

  • Facebook
  • Twitter
  • Email

Reader Interactions

Comments

  1. Annie Diamond

    February 26, 2026 at 7:32 am

    Janine, these are so beautiful. I’ve never tried punch needle, but I’m tempted now! Pinned!
    Annie

    Reply

Leave a Reply Cancel reply

Your email address will not be published. Required fields are marked *

Recipe Rating


Sidebar

Janine the Nester

Hello from the Nester

We love everything related to home, so get cozy and stay for a bit. Thanks for visiting our blog. Learn More...

Reader Favorites

The Best Crunchy Crispy Chocolate Chip Cookie

This Italian Cream Cake has a pumpkin cream cheese frosting that makes this a winning combination. This dessert is perfect for the holidays.

Italian Cream Cake with a Twist of Pumpkin

French Apple Custard Tart with Puff Pastry

DIY Paper Flowers Tutorial (Tissue Paper)

Upcycling Tin Cans with Scrapbooking Paper

How to Make a Paper Flower Wreath DIY

Popular Categories

  • Cakes
  • Cookies
  • Dinners
  • Wreaths
  • Organizing

Join Our Newsletter

Join our mailing list to receive the latest news and updates from our team.

You have Successfully Subscribed!

AFFILIATE DISCLOSURE:
I am grateful to be of service and bring you content free of charge. In order to do this, please note that when you click links and purchase items, in most (not all) cases, I will receive a referral commission. Your support in purchasing through these links enables me to keep my design and customization prices ridiculously low and empower more people worldwide to blog with less worry and less hassle.
Happy Happy Nester is a participant in the Amazon Services LLC Associates Program, an affiliate advertising program designed to provide a means for sites to earn advertising fees by advertising and linking to amazon.com.
Thank you! :)
-Happy Happy Nester

Our Guide

Join Our Newsletter

Join our mailing list to receive the latest news and updates from our team.

You have Successfully Subscribed!

  • Facebook
  • Instagram
  • Pinterest
  • Twitter

Recipes

Appetizers
Breakfast/Brunch
Desserts
Dinners
Drinks

Crafts & Decor

DIY
Gardening
Holiday
Wreaths

About

About The Nester
Contact
Privacy Policy

Copyright © 2026 · Happy Happy Nester by Janine Waite · Privacy Policy

↑ BACK TO TOP