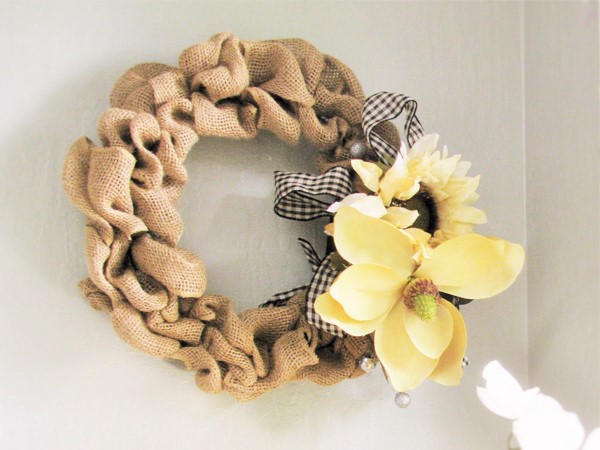
Happy Happy Nester

Weekly Inspiration for Your Nest

  • About
    • Contact
  • Recipes
    • Appetizers
    • Breakfast/Brunch
    • Desserts
    • Dinners
    • Drinks
  • Crafts
  • Decor
  • Shop My Favorites
    • Fall Decor
    • Kitchen
    • Pillows
    • Holiday Decor
  • Boutique of the Week
  • Saturday Chitchat

Home » Decor » Decorate » Easy DIY Burlap Wreath

Crafts Decor Decorate

Easy DIY Burlap Wreath

burlap wreath main photo
 DIY Burlap Wreath

Hello, friends, today I would love to share with you a fun DIY burlap wreath that is versatile and simple to style for your home. I’m guest posting over at Shabby Creek Cottage for the whole year and I’m blogging about everything burlap. I must say I haven’t made too many things out of this material and I have been pleasantly surprised. I made sure to design a wreath that wouldn’t clash with our home decor. I’m pretty happy with the results and I hope you are inspired to make this easy burlap wreath.

~ A Note About the Nester ~

My friend, Marci had a couple of beautiful wreaths on her front door. After a few months, she noticed that a pair of birds decided to build a nest in her gorgeous Crate and Barrel wreaths!

burlap wreath supplies

The great thing about this wreath is how few items it requires.

Supplies

1 Wire wreath (12 inches)

1  4-inch roll of Burlap ribbon (10 yards)

Scissors

Wire

Instructions


burlap wreath instruct

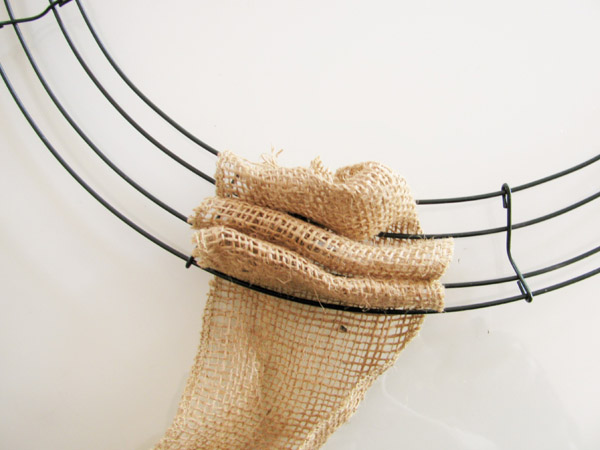
1. Place the Burlap ribbon underneath the wire wreath. Now here is an important step, make sure the burlap is perpendicular to the circular frame. The ribbon (and the roll) should be pointing in the direction of the outer circle.


burlap wreath ribbon
3. Wrap the ribbon around the inside ring. Then thread the a piece of wire through the burlap and twist around the wreath structure.
burlap wreath loop
4. Next, working from the inside out, bring up ribbon through the open space. Make a 1 1/2 inch loop.
burlap wreath loops
Move to the next area and make another loop the same length.
burlap wreath many loops


Continue the same for the final outer space. At this point, you will have three loops of ribbon.


burlap wreath twist


5. Turn your wreath over. Grab ahold of the burlap and twist it two times. The twisted section will act as a knot and secure the burlap.

burlap wreath rows

6. Here is the next tricky step. Flip the wreath over to the front side. The ribbon should still be on the backside of the wreath. Bring the ribbon to the inner circle right next to the last row. Again, make sure the ribbon is facing perpendicular to the structure just like in step 3. Repeat step 4, making another row of loops.

7. Repeat step 5 through 6 and keep repeating till you have gone all the way around the wreath. At the final row, twist the burlap around the outer backside of the wreath and tie down with wire.

8. With the wire, make a loop for hanging.

burlap wreath flowers


burlap wreath close up
9. Decorate your wreath with additional ribbon, silk or dried flowers and any decor. And if you want you can change the style throughout the seasons. Swap out the flowers and the decorative ribbon and you’ll have a whole new look!
burlap wreath decor

Thanks for visiting and I hope I’ve inspired you to create this burlap wreath. Enjoy decorating it with your style to fit your home’s decor. If you like to make wreaths, here is another one of my projects that may interest you. bay leaf wreath

Cheers,

chores post signature


burlap wreath pin
  • Author
  • Recent Posts
happyhappynester
Follow me
happyhappynester
I named my blog Happy Happy Nester because I love everything related to the home. I’ve always enjoyed decorating my surroundings. Get cozy and stay for a bit, thanks for visiting!
happyhappynester
Follow me
Latest posts by happyhappynester (see all)
  • How to Decorate Plastic Easter Eggs - March 1, 2021
  • What Should I Bake Today? - February 27, 2021
  • The Best Lemon Sour Cream Pie - February 26, 2021

MORE FROM HAPPY HAPPY NESTER

Subscribe To Our Newsletter

Join our mailing list to receive the latest news and updates from Happy Happy Nester!

You have Successfully Subscribed!


6 Comments

« Home Decor: A Spring Living Room
Decorating ideas for spring »

Comments

  1. Coco in the Kitchen says

    March 14, 2016 at 4:54 pm

    This is such a lovely project.
    I’m going to make a few for my daughter’s upcoming bday!

    Reply
  2. Sarah says

    March 31, 2016 at 2:14 pm

    Janine, this is so pretty!!! It makes me want to go grab my roll of burlap ribbon and get started! ???? Thank you for sharing!! ????

    Reply
    • happyhappynester says

      April 5, 2016 at 4:08 pm

      Oh this project is super easy and cute. I hope you try it Sarah!

Trackbacks

  1. Cute Burlap Frame - (easy DIY burlap craft) says:
    April 5, 2016 at 8:33 am

    […] and this is the perfect accessory. If you like this craft, you might enjoy this burlap post: Burlap Wreath  I’m confident you’ll like this simple, easy and cute burlap frame project. Enjoy and […]

    Reply
  2. 25 Gift Ideas That Cost Under $20 - Happy Happy Nester says:
    April 22, 2016 at 11:30 pm

    […] Happy Happy Nester | Easy Burlap Wreath […]

    Reply
  3. How to Make a Bay Leaf Wreath - Happy Happy Nester says:
    December 28, 2016 at 10:08 pm

    […] green styrofoam wreath, and florist wire.   If you like this project make sure to check out my Burlap Wreath project.                         Wire ~ […]

    Reply

Leave a Reply Cancel reply

Your email address will not be published. Required fields are marked *

Recipe Rating


Home, Craft & Cooking Circle Membership

portrait
hello from the nester We love everything related to home, so get cozy and stay for a bit. Thanks for visiting our blog.
  • Bloglovin
  • Facebook
  • Instagram
  • Pinterest
  • Twitter

Holiday Printables eBook

search

Most Popular Posts

Home for the Holidays Blog Tour: White Christmas

December 2, 2016 By happyhappynester 115 Comments

Almond Cookies are my family's favorite cookie. This recipe comes from my mom. It is easy to make and is a delicious and light cookie.

Amy’s Almond Cookies (Super Easy Recipe)

October 6, 2012 By happyhappynester 72 Comments

Organizing Kitchen Labels That You’ll Love!

January 17, 2018 By happyhappynester 72 Comments

DIY Paper Flowers Tutorial | How to Make Paper Flowers

January 11, 2019 By happyhappynester 59 Comments

If beautiful linens and comfort are important, then Hallstrom Home is for you. Rhonda creates gorgeous linens that are comfy and perfect for your home.

Linens and More: Interview with Hallstrom Home

October 29, 2016 By happyhappynester 57 Comments

Join Our Newsletter

Join our mailing list to receive the latest news and updates from our team.

You have Successfully Subscribed!

Affiliate Disclosure:
I am grateful to be of service and bring you content free of charge. In order to do this, please note that when you click links and purchase items, in most (not all) cases, I will receive a referral commission. Your support in purchasing through these links enables me to keep my design and customization prices ridiculously low and empower more people worldwide to blog with less worry and less hassle. Happy Happy Nester is a participant in the Amazon Services LLC Associates Program, an affiliate advertising program designed to provide a means for sites to earn advertising fees by advertising and linking to amazon.com.
Thank you! :)
- Happy Happy Nester

Categories

Archives

you might also like

Decorating and Patience

Spring Decorating

Great Lunch Boxes

Spring Flowers

White Slipcover Sofa choices: Ikea, Pottery Barn, Ethan and Allen, and Crate and Barrel

Copyright © 2021 · Happy Happy Nester by Janine Waite

Copyright © 2021 · Divine Theme on Genesis Framework · WordPress · Privacy Policy · Log in