If you’re into a bit of nostalgia, check out this Vintage Tinsel Christmas Tree DIY. They’re a shimmering, glitzy throwback, perfect for adding old-school sparkle and charm to your holiday decor.

With its twinkling lights and small ornaments, this little tinsel tree is a beautiful little holiday tree. And if crafting is your thing, you can create your retro-style tabletop tree, giving it that personal, handmade touch.
I’ve always loved these unique trees and I have a few fun projects over here.
This project is a little involved, so plan to break down this DIY over a few days. One of these days, I’ll buy an authentic feather tree, but in the meantime, my little vintage-style tinsel tree will have to do.
WHAT IS A TINSEL TREE OR FEATHER TREE?
A feather tree is this incredible, old-fashioned Christmas tree that first appeared in Germany in the 19th century.
It was made from goose feathers dyed green and wrapped around wire branches, an early artificial tree when deforestation was a big concern.
These trees were super popular because they were less of a fire hazard than real trees with candles. Nowadays, feather trees are like a nostalgic nod to Christmases past, often sought after by vintage décor enthusiasts.

HOW TO MAKE A VINTAGE TINSEL FEATHER TREE
Some important details about making your tinsel tree!
- This tree has 7 levels of tree branches
- It is 18 inches tall
- The top boughs have three parts, the second tier has four branches, the third tier has four branches, the fourth tier has six branches, the fifth tier has six branches, the sixth tier has eight branches, and the seventh tier has eight branches as well.
- The top tier branches are the shortest, and each tier after it gets longer than the previous tier. When cutting your wire, you’ll want it about a 1/2 longer than my meaurements below since you’ll wrap it around the tree.
- These are the finished measurements.
- 1st tier – each branch is 1 1/2 inches, and there are 3 branches (cut 1 wire 3 1/2 inches long, 1 wire 2 inches long)
- 2nd tier – each branch is 2 inches, and there are 4 branches (cut 2 wires 4 1/2 inches long)
- 3rd tier – each branch is 3 inches, and there are 4 branches (cut 2 wires 6 1/2 inches long)
- 4th tier – each branch is 4 inches, and there are 6 branches (cut 3 wires 8 1/2 inches long)
- 5th tier – each branch is 5 inches, and there are 6 branches (cut 3 wires 10 1/2 inches long)
- 6th tier – each branch is 6 inches, and there are 8 branches (cut 4 wires 12 1/2 inches long)
- 7th tier – each branch is 7 inches, and there are 8 branches (cut 4 wires 14 1/2 inches long)
- Tree Trunk – Cut an 36 inch wire and bend in half.
- There are about 1 inch to 1 1/2 inches in between each tier of branches.
SUPPLIES YOU’LL NEED:
- Wire for the Tree Trunk and Branches
- Thin Wire for Tying Branches to Trunk
- Wire Cutters
- Tinsel Garland
- 1 Chopstick
- Glue Gun
- Brown Embrodery Thread
- Wooden Plaque (Round, Square)
- Drill
- Wood Glue

Step-by-Step: Crafting a Retro Tinsel Tree for a Vintage Christmas
Step 1 – Make Your Tree Trunk
For the tree trunk, you’ll want to double the wire so cut a 36 inch piece. Bend the wire in half so that it’s equal lengths. Now twist the wires together a couple of times. The twisting strenghtens the wire and the trunk.
Step 2 – Cut Wire Branches
For the first tier of branches (on the top of your tree) you’ll cut one wire that is 3 1/2 inches long and another that is 2 inches long.
Find the middle of the 3 1/2 inch wire and wrap it around the top of the tree. I wrapped it about an inch from the top. Twist the wire around the tree trunk.
Branch out the wires so that they are opposite each other on the tree. Place the 2-nch wire on the tree trunk and wrap is around the trunk as well.
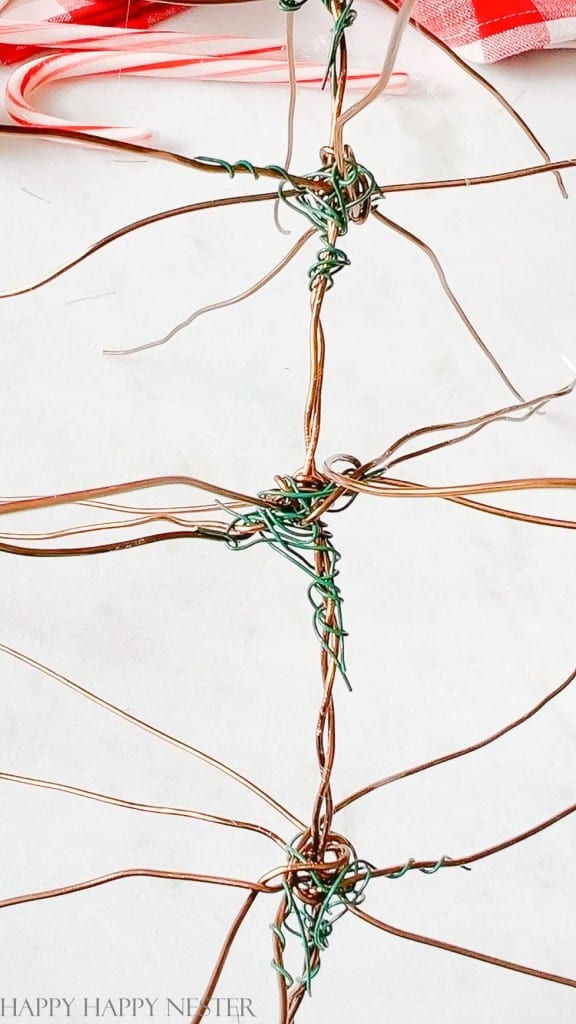
Take your thinner wire and wrap it around the branches and tree trunk to hold all three branches in place.
Once you have secured the branches, you’ll tackle the next tier. Now you can cut two 4 inch pieces of wire. You’ll wrap each around the trunk and then spread them out so that they are on opposite ends of the tree. Attach the thinner wire around the branches and the tree trunk to secure it on the tree.
Continue on down the tree with about an inch to an inch and a half in between each layer of branches.
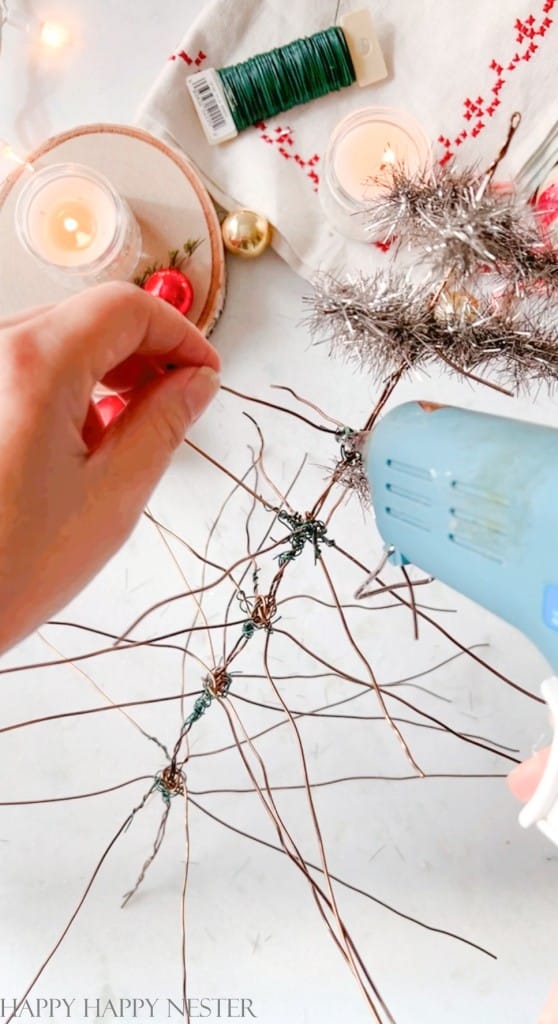

Step 3 – Wrap Branches with Tinsel
Using your glue gun, secure the tinsel with glue where the branches attach to the trunk. Then wrap the tinsel around the branch working your way out to the ends of the branch. Keep wrapping until you covered the whole branch. At the end, hot glue the tinsel to the branch.
Repeat this until all your branches are covered with tinsel.

Step 4 – Attach a Chopstick
Attach a chopstick to the bottom of the tree trunk. If you want you can hot glue it to the wire trunk. The chopstick provides a big support to the the tree.

Step 5 – Wrap the Tree Trunk
Starting at the bottom of the tree, beginning wrapping the embroidery thread around the tree trunk. I made sure to cover all the tree trunk. Continue up the tree until you have wrapped the whole thing. I used one package of embroidery thread to cover my tree. Glue down the ends to the tree.
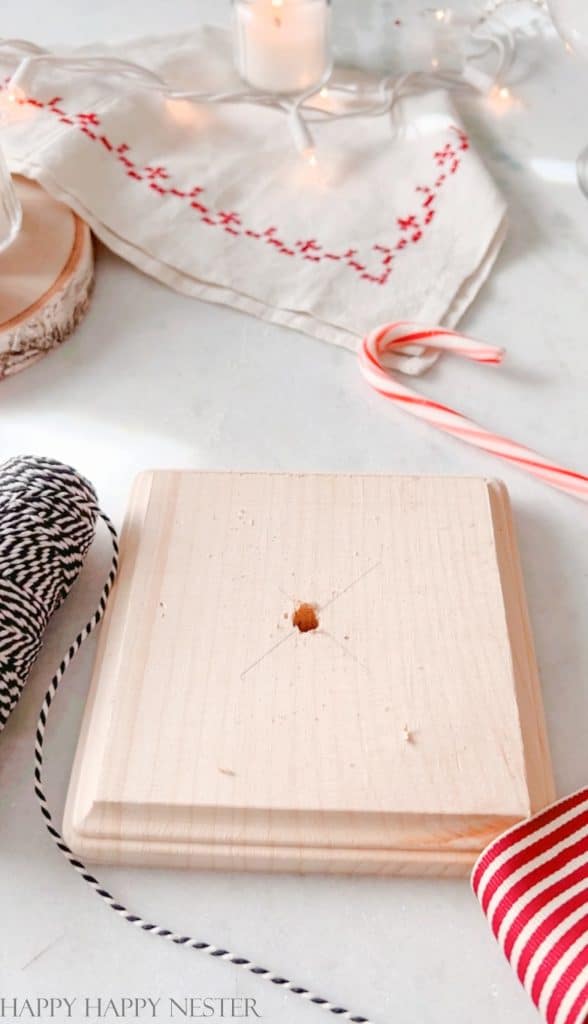
Step 6 – Drill Hole in Base
Drill a hole in the wooden base. Make sure the drill bit is slightly smaller than the tree trunk. You place the bit directly behind the bottom of the tree trunk. The two should be the same width, with the drill bit being a tiny bit smaller. Place the drill bit into the wood, making sure to drill perpendicular to the platform. If you drill at an angle then your hole is at an angle, your tree won’t sit straight and will lean to the side.
Step 7 – Place Trunk in Base
Place a little bit of wood glue in the hole of your platform. Then, place the base of your tree trunk into the hole. Make sure the tree stand straight and let is sit in the position until the glue is dry.

I’m totally in love with how this vintage tinsel Christmas tree turned out. If you get a chance, you should definitely make one for your place. It’s the kind of tree that’ll last for many years.
I hope you had a great time with this festive holiday tree project!
Happy Crafting!

Photo Credits: MyPhotography.com
- Heart Shaped Brownies Recipe - February 13, 2026
- Framed Artwork from Amazon - February 12, 2026
- Chocolate Covered Quinoa Recipe - February 5, 2026



Sandy
Hi Janine,
Thank you so much for the Thanksgiving Cookbook! That was so kind of you:)
Love all of your posts, sharing your creativity and wonderful cooking & baking recipes.
All the best to you and so thankful for bloggers like you with beautiful intentions!