In today’s post, I’ll show you How to Make Suncatchers. It’s such a fun craft for adults and kids. All you need are a few materials, and in just a few minutes, you’ll have a fun homemade suncatcher to hang on your wall or window.
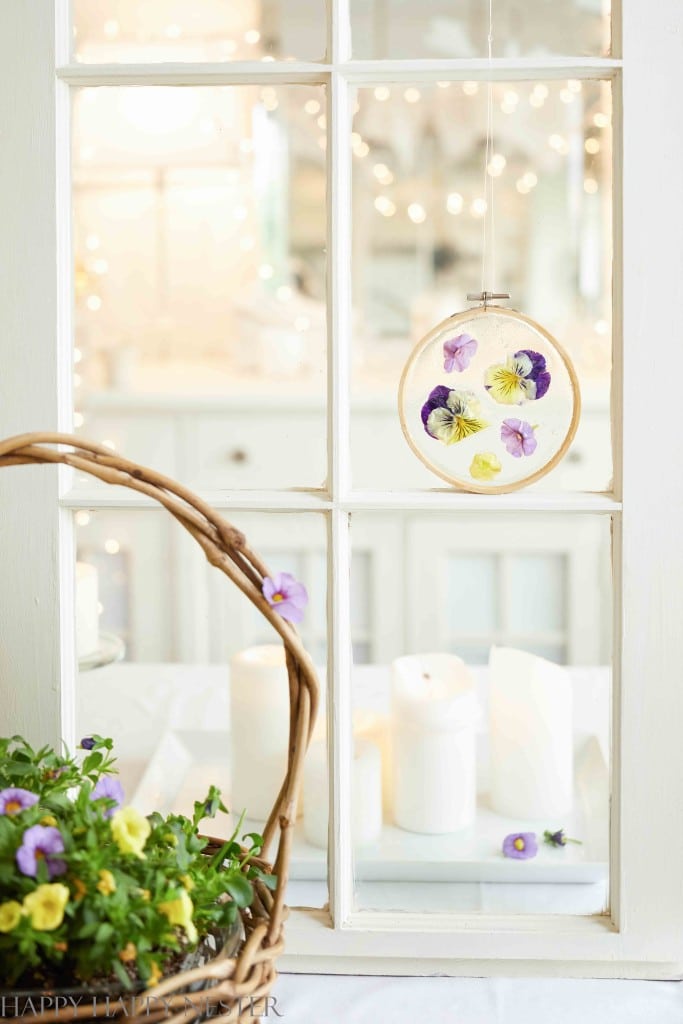
For my project, I added some beautiful pansy blossoms to my suncatchers, and I must say, they look absolutely gorgeous! You can use whatever you want to create your unique style. I’m a big fan of the natural look, so I tend to gravitate towards using elements from nature in my crafts. What about you? What’s your favorite style or material to work with?
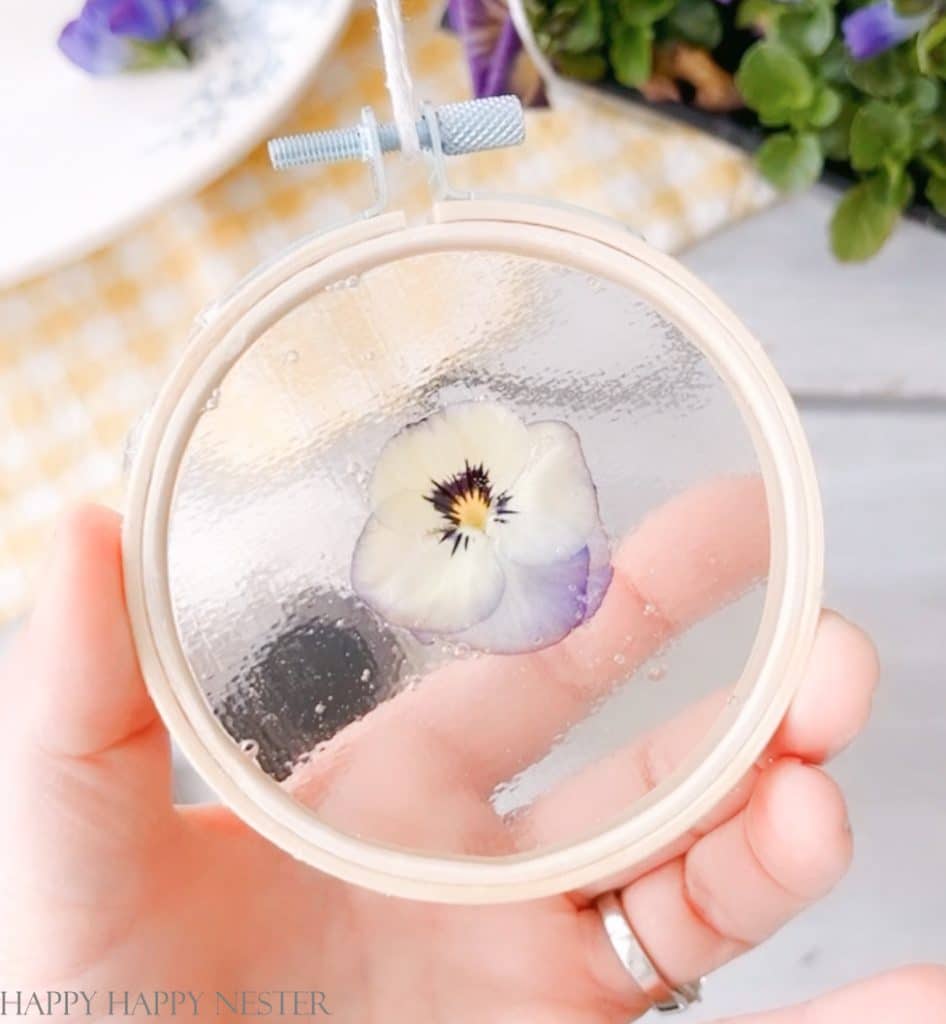
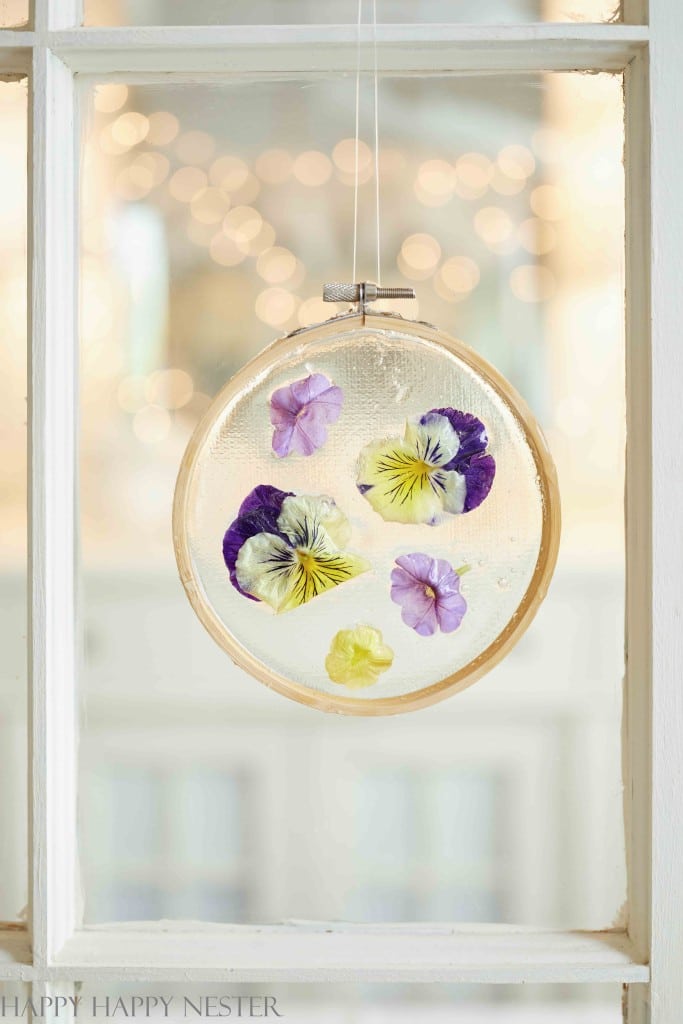
If you’re looking for a relaxing and creative project, these DIY suncatchers for adults are such a fun way to bring a bit of nature indoors. This easy DIY suncatcher craft uses simple materials—just gelatin and a small embroidery hoop—to create a stunning, botanical-inspired window decoration. Once the gelatin is poured into the hoop, you can gently press in flowers, leaves, or even herbs to create your mini work of art. As the gelatin sets and catches the sunlight, it becomes a beautiful, nature-filled decoration that glows in your window.

Before we get into the step-by-step tutorial, if you love getting creative with your hands, you might enjoy exploring a few more of my favorite craft projects. From seasonal home décor to nature-inspired DIYs, I’ve got plenty of ideas to keep you inspired year-round. Be sure to browse my collection of crafty tutorials before you dive in—you just might find your next project!
Nature-Inspired DIY Projects to Brighten Your Home
So, I was scrolling through Instagram the other day and stumbled upon these amazing-looking suncatchers. And as soon as I saw them, I knew I had to give them a shot!
To be honest, I was a bit skeptical at first. I mean, how hard could they be to make? But I was pleasantly surprised that they were super easy and fun to create. And the result was gorgeous – I couldn’t believe I had made something so beautiful!
I just wanted to give you a heads-up before we get started. There are a few things I think might be helpful for you to know before we dive in. Don’t worry, they won’t take too long, but I promise they’ll be worth it in the end! So buckle up, and let’s get started with some quick insights.
Tips for Making a Suncatcher
- Gelatin is ideal for making a suncatcher because it sets clear with minimal bubbles, giving you the best results for sunlight to shine through.
- Add gelatin slowly to hot water to avoid clumping, and stir gently—vigorous mixing causes unwanted bubbles in the finished suncatcher.
- I used a 3-inch embroidery hoop for this tutorial. You can go up to 5 inches, but I wouldn’t recommend anything larger as the gelatin can become too fragile.
- Want to go hoop-free? You can absolutely make freeform suncatchers by pouring the gelatin directly onto a flat surface and threading fishing line through once it’s set.
- For a smooth surface, use a Silpat mat. Parchment paper reacts with the gelatin and can leave ripples or texture behind.
- Make sure your Silpat and hoop are on a completely flat surface. If there’s a gap underneath, the gelatin may leak out the bottom of the hoop.
- Let the gelatin cool for about 8 minutes after mixing. This helps prevent leaking and gives it a slightly thicker consistency before pouring.
- Pour the gelatin in layers. This gives you time to place flowers and objects between each pour, keeping everything suspended in the gelatin.
Let’s get crafting!
What Materials Do You Need to Make a Suncatcher?
- Gelatin Powder (unflavored)
- Boiling Water
- Parchment Paper/Heavy Book for Pressing the Flowers.
- Small (3-5 inch) Embroidery Hoops
- Silpat Mat
- Flower Blossoms, Ferns, Leaves, etc.
- Fishing Line or Ribbon
- Measuring Cups and Spoons
- A Small Whisk or Fork
- A Small Pot or Saucepan
DIY Suncatchers for Adults and Kids
The only issue I had was the leaking of gelatin under the hoop. So, make sure you make yours in layers and press on the embroidery hoop while the gelatin is set up. Also, make sure to create your suncatcher on your kitchen counter so that if it leaks, you won’t damage anything on the counter.
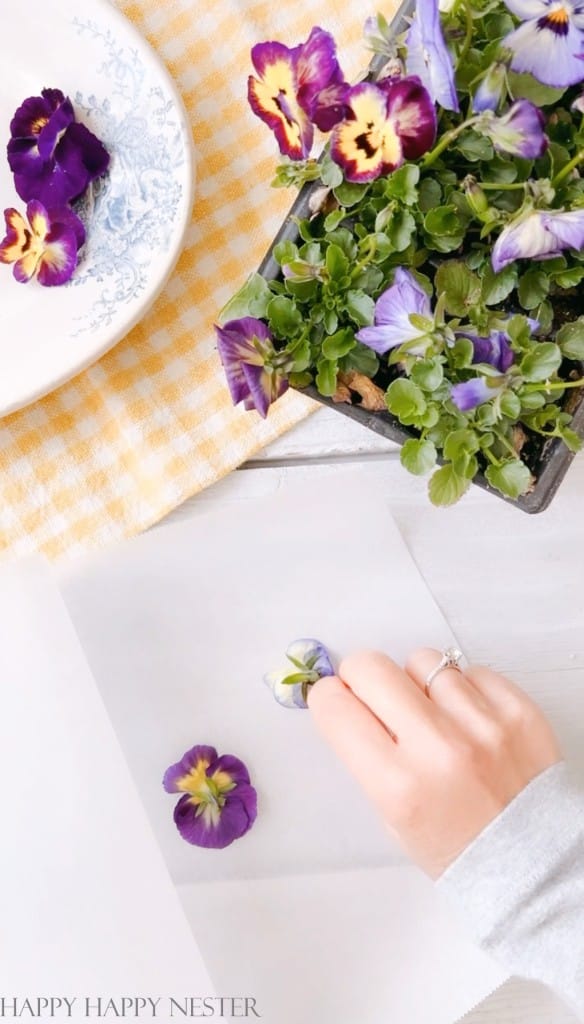
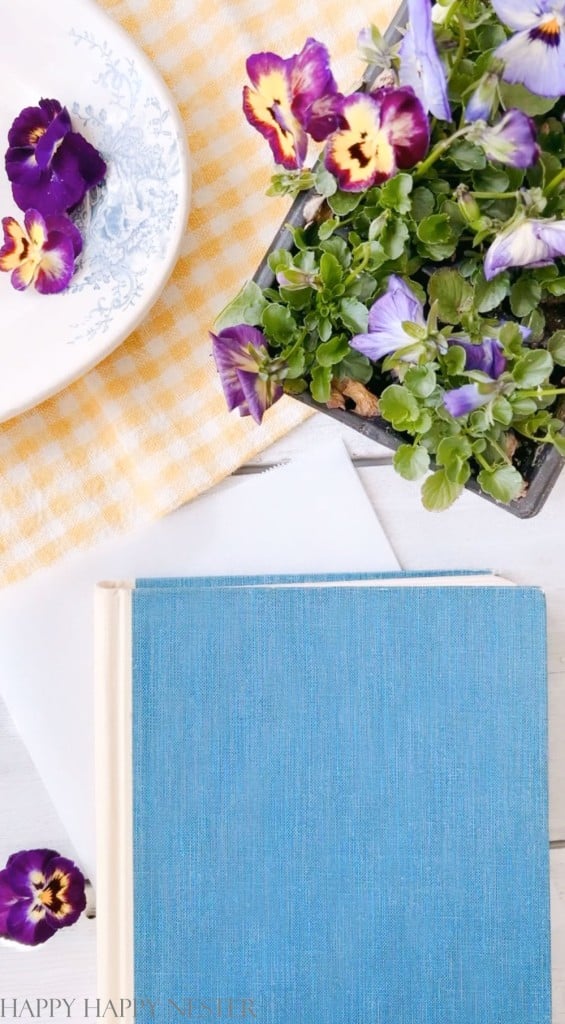
Step 1 – Gather Supplies
Prep your flower blossoms by pinching the flowers off plants. Place them blossom side down in between two pieces of paper or parchment and place a heavy object or book on top of them. You want them to flatten a bit before using them.
This step only takes a couple of minutes while you make the gelatin.
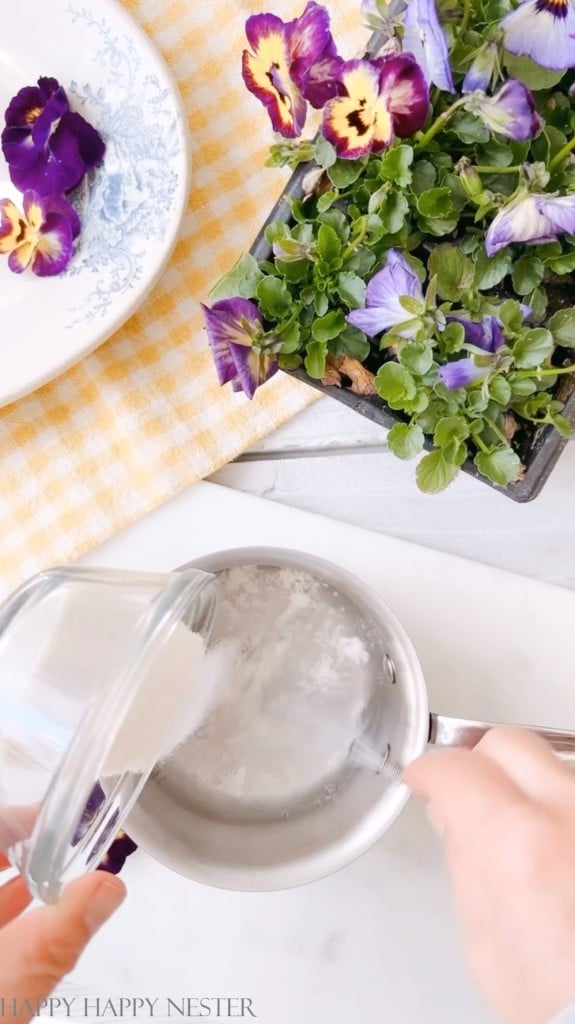

Step 2 – Make the Gelatin
The ratio of gelatin to water is as follows. 4 parts water to 1 part gelatin.
I used two packets and 1/2 cup of boiling water. Each packet is like one tablespoon of gelatin.
When using two packets of gelatin, I roughly made two suncatchers that are 3 inches wide.
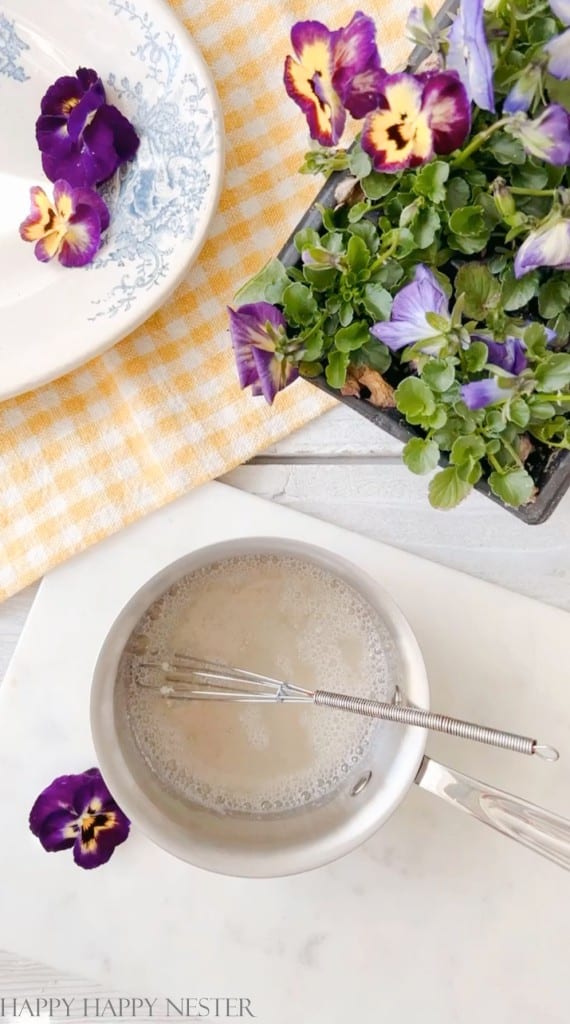
Boil water on the stovetop in a small pan, or you can boil it in a microwave. Once the water is boiling, take it off the stove and sprinkle gelatin powder into the water and stir thoroughly with a whisk or a fork. If you have small clumps of gelatin, you can toss them out.
Remove excess bubbles with a spoon.
Allow the gelatin to cool in the pan for 8 minutes before pouring. You want it not terribly runny since it will seep out the sides of the hoop. You will get a little bit of leakage, so make sure the surface is flat. If you allow it to cool beyond 9 minutes, it will begin to gel, so you have a tiny window in which to use the gelatin.
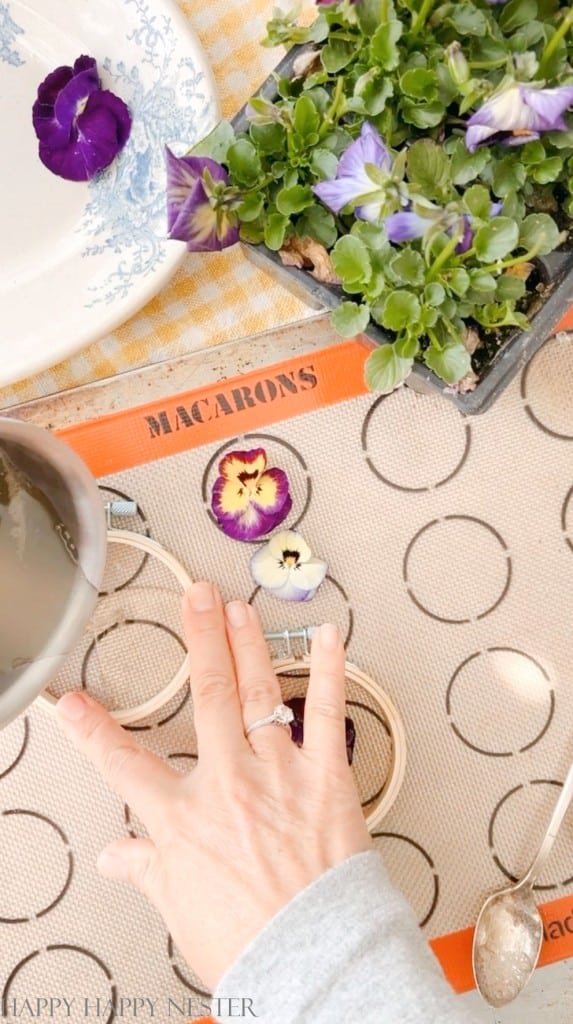
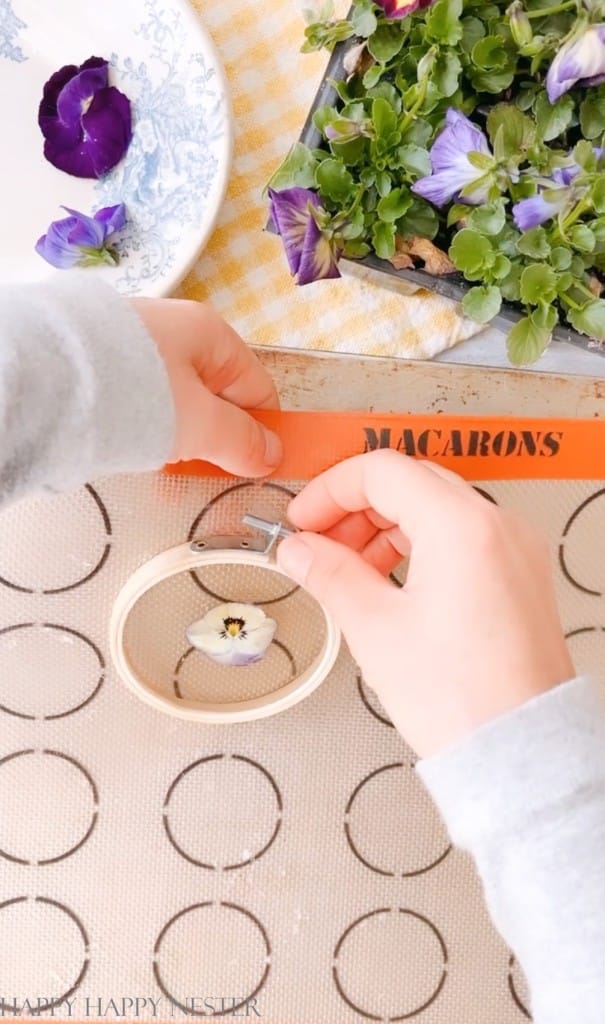
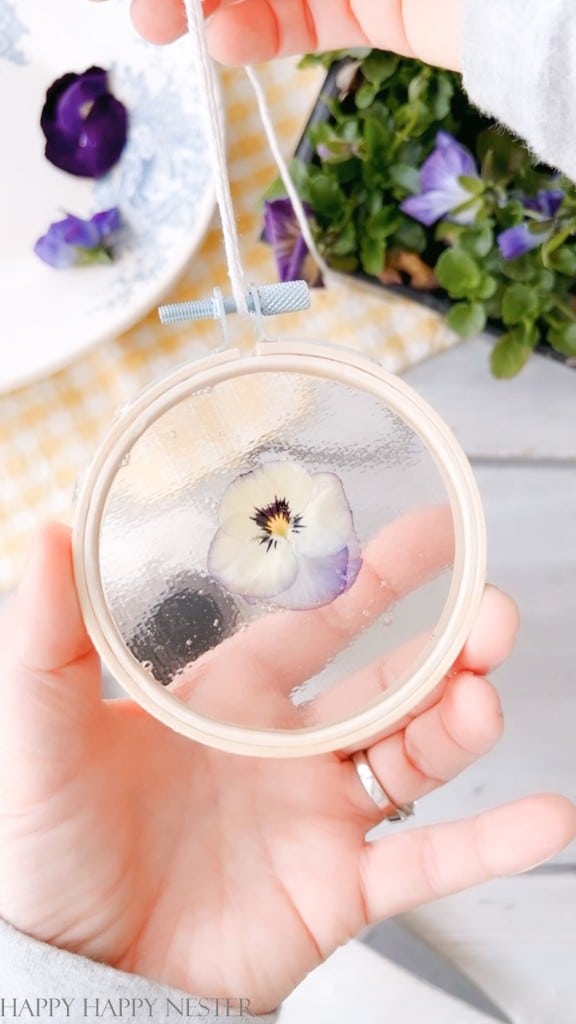
Place your hoop on top of your Silpat mat. You’ll notice that the hoop comes in two parts, I used the whole hoop.
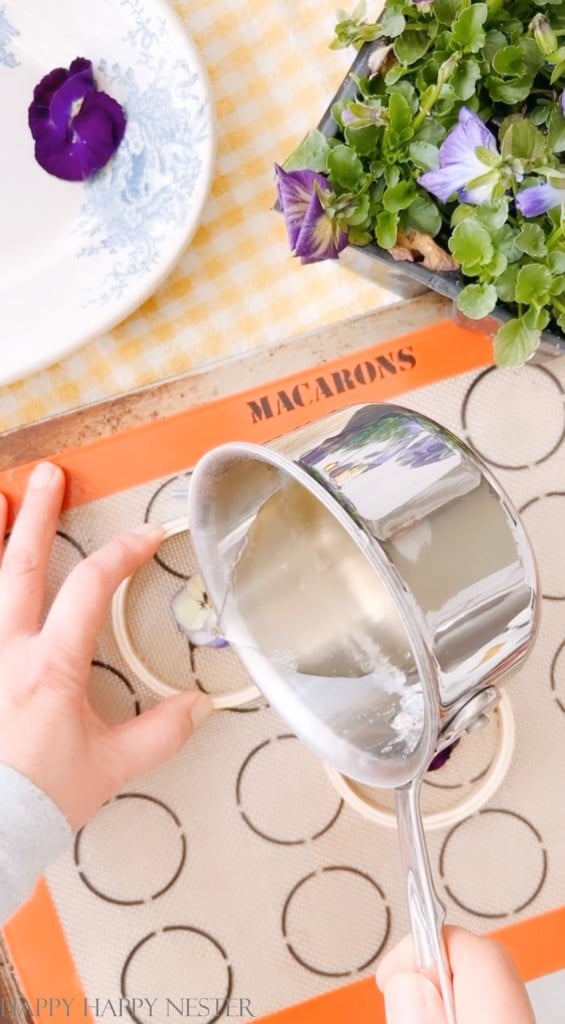
Once your gelatin mixture is ready, pour it into your embroidery hoop, making sure to fill it about halfway. You can use a spoon to spread the mixture evenly.
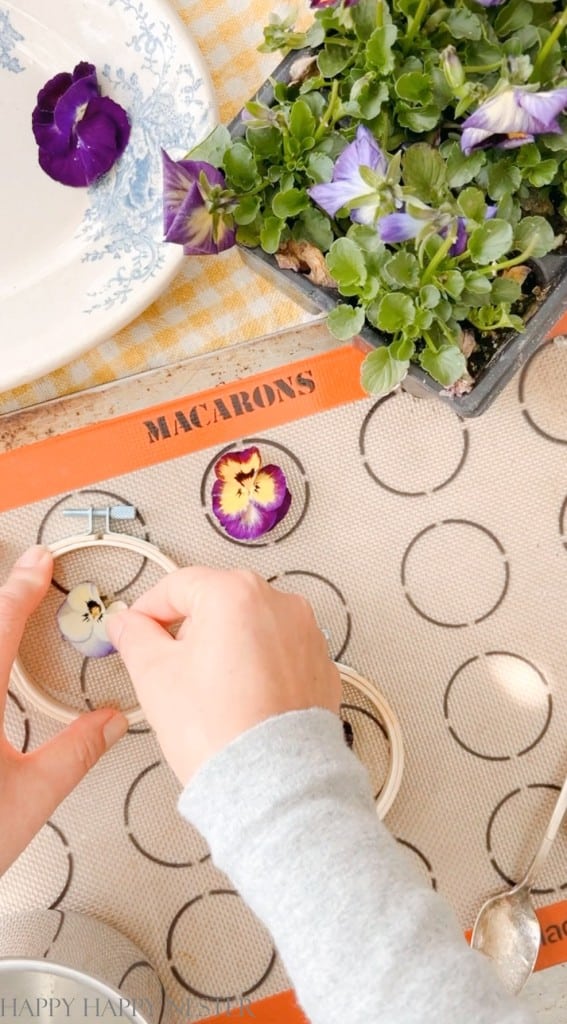
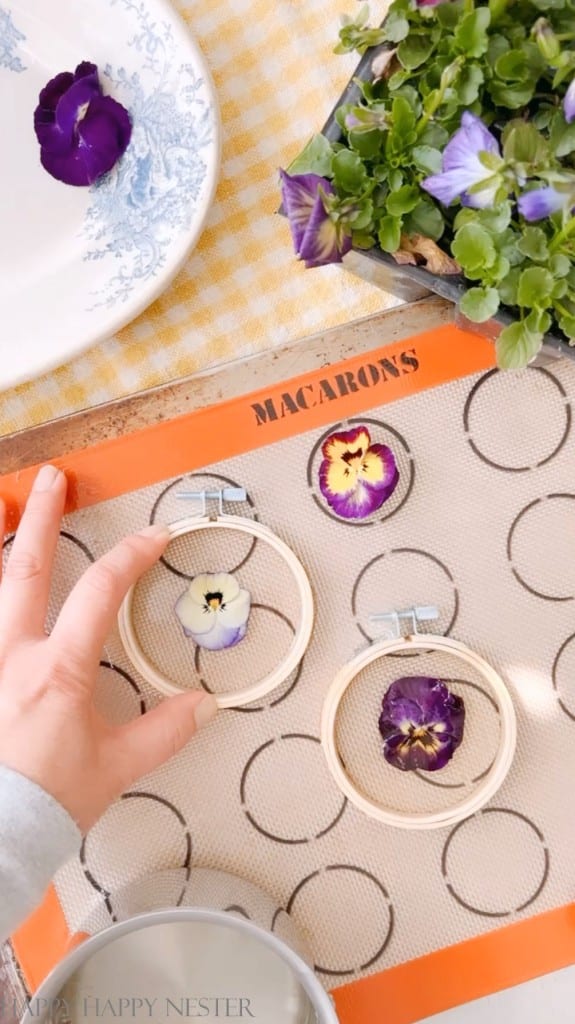
Step 3 – Place Flowers in the Gelatin
When the gelatin begins to solidify a bit, add a little bit more of the gelatin and flowers. Make sure to distribute them evenly so that your suncatcher looks balanced. If the flower isn’t covered with gelatin, push it down into the mixture and add more on top.
Hold down the embroidery hoop so the gelatin doesn’t leak out onto your counter.
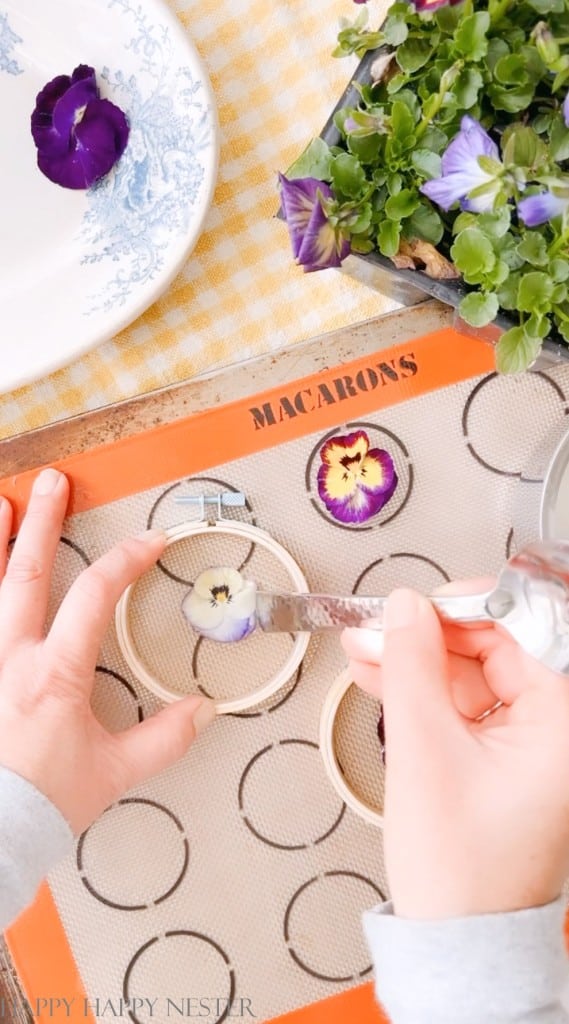
Step 4 – Add Final Layer
Once the flowers are in place, add the final gelatin. Make sure the flowers are covered in gelatin and in the position you want them in.
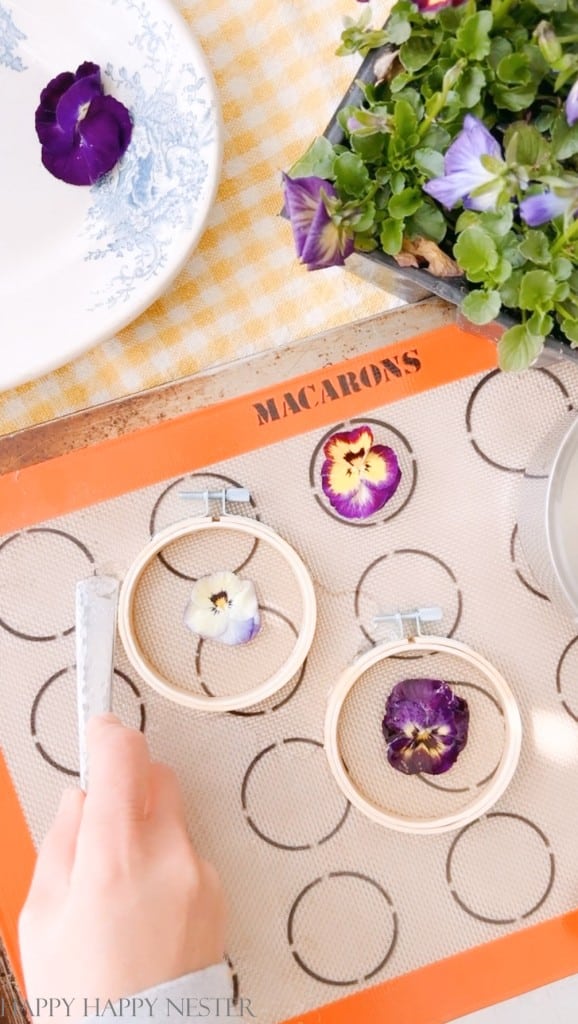
Step 5 – Clean Off Excess Gelatin
Once the gelatin begins to set, scrape off the excess gelatin off the sides of the hoop. Allow the gelatin to totally set up before lifting it off the Silpat.
Step 6 – Cool and Remove
Allow the gelatin to cool thoroughly before removing it from the Silpat. I left mine for about 30 minutes before lifting it up from the mat. When taking the suncatcher off, lift the mat and remove the suncatcher.
Step 6- Attach a Hanger
At the top of the hoop is the metal tightening knob. Add some fishing line or a ribbon to it, and hang the suncatcher from your window.
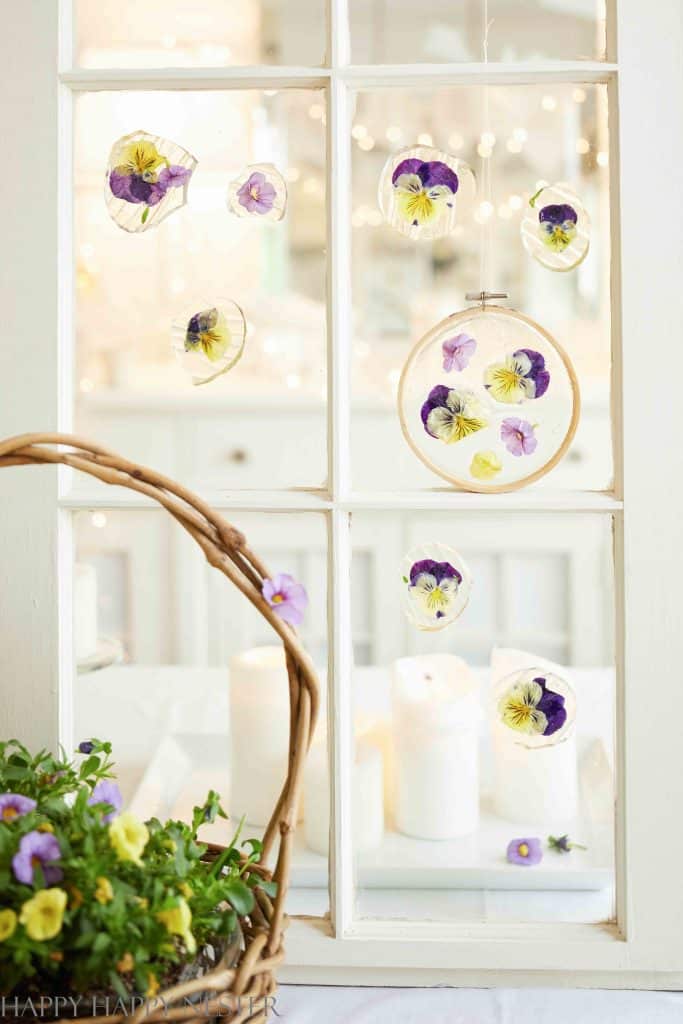
Hang your suncatcher in a sunny window and watch as the light shines through.


A Few Add-Ons to Your Suncatcher
- A variety of small trinkets, beads, and/or small plastic flowers
- Add dried flowers
- I haven’t tried this, but you could use colored Jello instead of clear.
FAQs
I did use a bigger embroidery hoop (5-inch), and the gelatin surface was larger. I worried it would break, but it fared well. I wouldn’t go any larger in hoop size for fear the gelatin might break.
These suncatchers can actually last for years if handled gently. The key is to hang them up and avoid touching the gelatin surface—moisture or direct contact can cause damage or shorten their lifespan.
Do I have to allow the gelatin to cool for eight minutes?
I made my suncatchers two ways. One where I poured the hot gelatin all at once, and it leaked everywhere. When I cooled the gelatin for 8 minutes, it had the least leakage.
Can I use some other mixture instead of gelatin?
The Instagram video tutorial I saw used corn syrup, cornstarch, vinegar, and water, and the suncatchers came out cloudy and bubbly. My recipe with gelatin comes out clear.
Can I place it on parchment paper?
You can, but the gelatin reacts with the paper, and moisture creates waves in the paper and, as a result, waves in the gelatin.
Yes, you can make it in free form. I made some, and I placed them right on the windows. You can hang them by threading the fishing line right through the top portion of the cooled gelatin.
Alternative Materials and Methods
Other Materials
- CD Suncatchers: Repurposing old CDs by removing their reflective layer and decorating them with transparent paints or markers. suzyssitcom.com
- Contact Paper and Tissue Paper: Creating suncatchers by sandwiching colorful tissue paper between contact paper frames. YouTube
- Melted Bead Suncatchers: Using melted plastic beads to form vibrant designs. suzyssitcom.com
Seasonal and Thematic Variations
ICustomizing suncatchers to fit various seasons or themes:
- Spring: Incorporate pressed flowers and pastel colors.
- Summer: Use bright colors and beach-themed elements like small shells.
- Autumn: Include dried leaves and warm-toned beads. suzyssitcom.com
- Winter: Add glitter or faux snow for a festive touch.
Advanced Techniques for Adults
Here are some ideas for readers seeking more complex projects:
- Wire-Wrapped Crystal Suncatchers: Using wire to wrap crystals or beads, creating intricate designs. YouTube
- 3D Terrarium Suncatchers: Crafting three-dimensional suncatchers that resemble terrariums, filled with faux plants or seasonal decorations. Soap Deli News
Display and Maintenance Tips
How to display and care for suncatchers:
- Hanging Options: Use suction cups, ribbons, or fishing lines to hang suncatchers in windows.
- Maintenance: Protect suncatchers from direct sunlight to prevent fading.
Start collecting a few pretty blooms from your garden and get inspired to create your own nature-inspired suncatchers. I had so much fun making these and loved how magical they look in the sunlight. When I first made them, I had no idea how long they would last—but it’s been a few years now, and they still look just as lovely. Just be sure not to touch the gelatin surface—one of mine got cloudy from contact, but the rest have stayed pristine and crystal clear.
Thanks for stopping by to my How to Make Suncatcher DIY post!
Happy Crafting.
Cheers,


- Lazy Saturday Morning Breakfast Ideas - July 18, 2026
- Lemon Blueberry Crumble (With Creamy Mascarpone) - July 16, 2026
- Red and White Christmas Tree - July 9, 2026


Heidi
This is the neatest spring craft Janine! They are beautiful and so unique!!! Definitely adding this and your decoupage oyster shells on my list of things to make!
Janine Waite
Heidi,
Thanks so much for your visit and comment. They’re so fun and magical, and I hope you have a chance to make a few!
Annie Diamond
Janine! These are so beautiful! I’ve seen a few on pinterest, but I had no idea they were made using gelatin!
Janine Waite
Annie, this craft is right up your alley!
Melaine Thompson
Your sun catchers look so fun and easy to make!
Janine Waite
Thanks so much, Melaine!