I was determined to make these Valentine’s Day Chocolate Covered Strawberries this year. And, of course, in my style, I complicated the project. I wanted to create some chocolate roses, so I got busy and came up with a fun alternative to the standard chocolate-dipped strawberries.
I always have to tweak ideas until I develop a new twist on a recipe. I’m excited about my unique version, and I hope you like it too. In today’s post, I share how to make the strawberries traditionally or try my chocolate petal version.
I cover both scenarios, so you’re getting two for one in this post.
If you are here to find more Valentine’s Day projects, here is a shortlist of some holiday crafts and recipes.
I must note that these chocolate-covered strawberries are fragile. The petals can break so when handling them with care.
Valentine’s Day Chocolate Covered Strawberries
*The following post contains affiliate links
So, as I mentioned, I’ve always wanted to cover strawberries with chocolate. But, melting the chocolate has always intimidated me, and I couldn’t get past that fear.
Through failing a couple of times, I finally conquered how to melt chocolate!
First things first, let’s address what I learned.
The Best Melting Chocolate
The chocolate you use is crazy important.
Like most of you, I bought the Wilton packages of melting chocolate. However, I have four bags in my studio that I should return since they aren’t cheap.
Well, little did I know Wilton’s chocolate is so finicky.
Yup, you heard correctly. But, unfortunately, I failed miserably when I microwaved it and when I placed it over a double boiler. I found that it melted, but it would instantly solidify and not stay in a smooth state for very long. It always felt like I had such a small window of time to coat my strawberries. Which makes me wonder, why do they call it melting chocolate?
I was pretty frustrated with melting chocolate until I found Merckens.
My life changed, and now I’m melting chocolate like a madwoman! This chocolate is smooth and stays smooth for a long time. And I love how it’s not touchy at all. I don’t even use a food thermometer. That’s how easy it is to melt.
Melting Chocolate
I haven’t used the microwave since melting chocolate in a double boiler. Why change when one technique works so beautifully. So, use a medium to a small pot and fill it with about three inches of water. Then place a heat-proof bowl on top and melt the chocolate.
I love how this chocolate stays melted that I keep the burner on low and keep the chocolate warm. You want some melted chocolate available for the rose technique to add the petals to the strawberry.
Let’s Make Chocolate Strawberry Roses!
Ingredients you’ll need:
fresh strawberries
Mercken white melting chocolate (1 cup of chocolate covers about 3 small strawberries with petals)
spoon
Directions:
Step 1 – Clean and Dry Strawberries
The strawberries need to be dry so that the chocolate sticks to the surface. Once dry, place on a plate and make sure to keep the stems on the strawberries. You’ll hold on to the stems while dipping them in the chocolate.
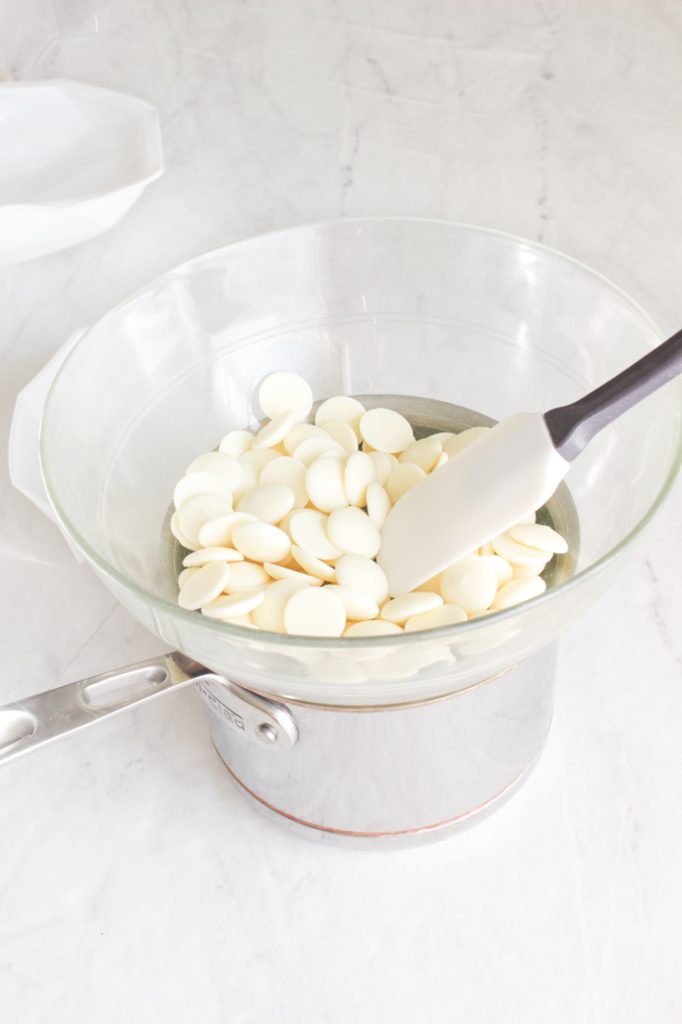
Step 2 – Melt Chocolate
Fill a pot with water and bring two to three inches of water to a simmer. Place a heat-proof glass bowl on top of the pot and pour about one cup of chocolate melts in the bowl. Stir chocolate until it melts.
Step 3 – Dip Strawberries
Hold on to the strawberry with the stem, dip, roll, and strawberry in the melted chocolate. Once the strawberry is covered, carefully place its stem side down on a piece of parchment paper.
If you want to cover the strawberries, repeat these three steps with all the strawberries you want to cover. But, if you’re going to make your strawberry into a chocolate rose, keep going on with this tutorial.
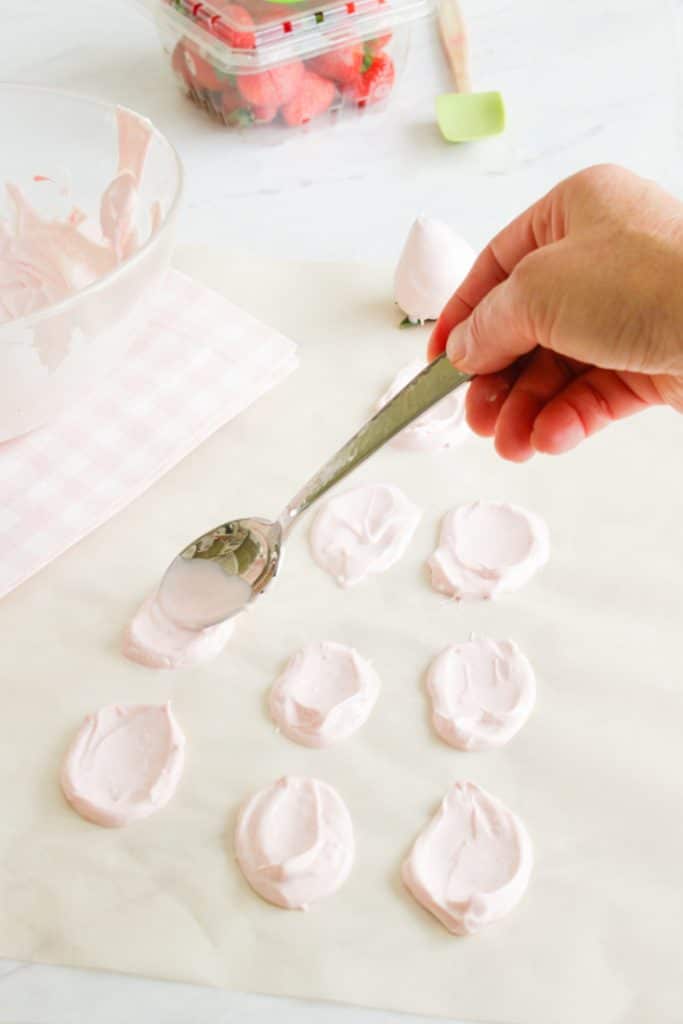
Step 4 – Make Chocolate Petals
Layout a piece of parchment paper on the counter. Take a spoon and place a small amount on the parchment paper. Spread the chocolate in a shape of a rose petal. I used the back of a spoon to create the form. Make about five petals for each strawberry.
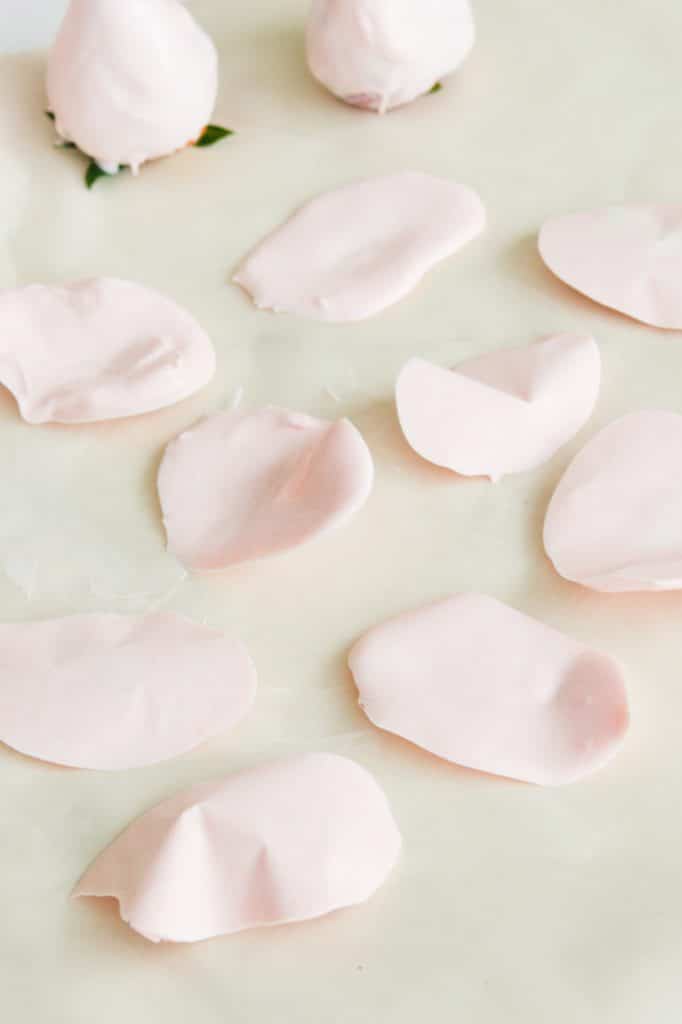
Step 5 – Freeze Petals
Place petals in the freezer for a couple of minutes. So, my first batch of petals came out organic in form since I placed them on top of things. Well, I found that the wavey petals were a bit difficult to attach. So, maybe keep the petal somewhat flat. It’s up to you what look you like when it comes to the petals.
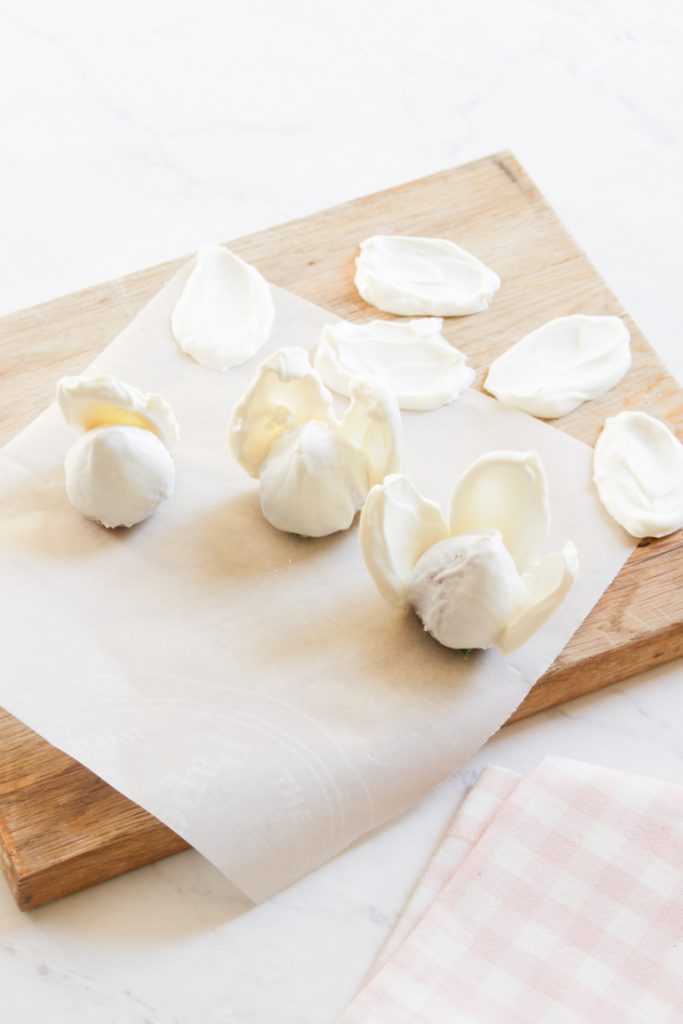
Step 5 – Attach Petals
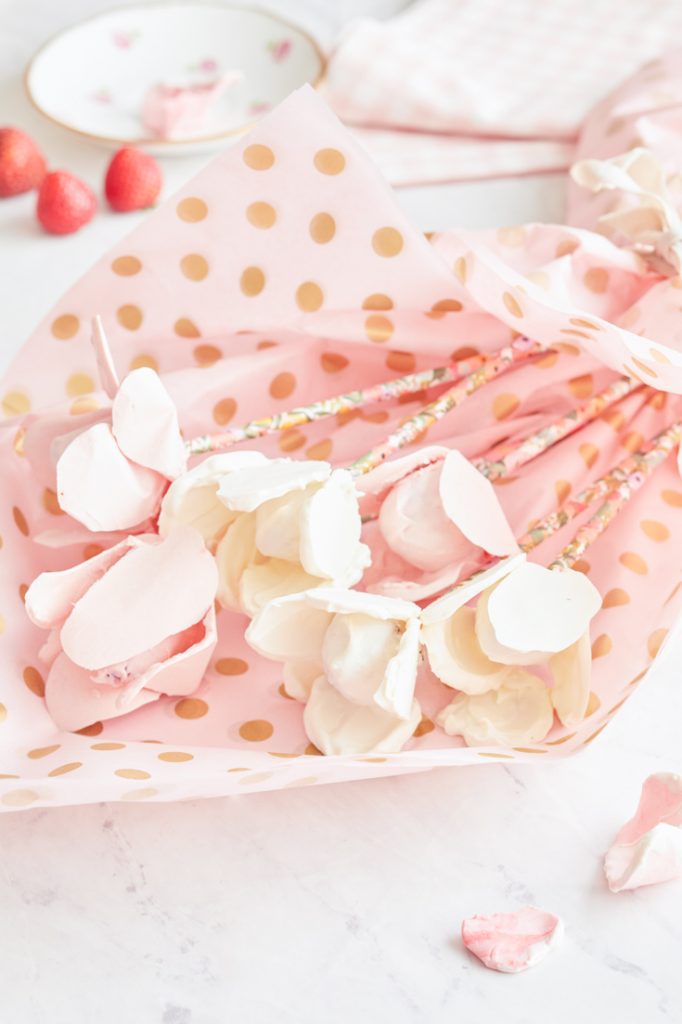
Dip the bottom of the petals in the chocolate and attach them to the strawberry. Hold in place and then pop in the freezer, ensuring the petal is propped up and attached to the strawberry. Once the chocolate is firm, take it out of the freezer, attach another, and repeat the process until the strawberry is complete with petals.
Also, you might like to know that I placed the backside of the petal (the side that adhered to the parchment paper) is the outside of the rose.
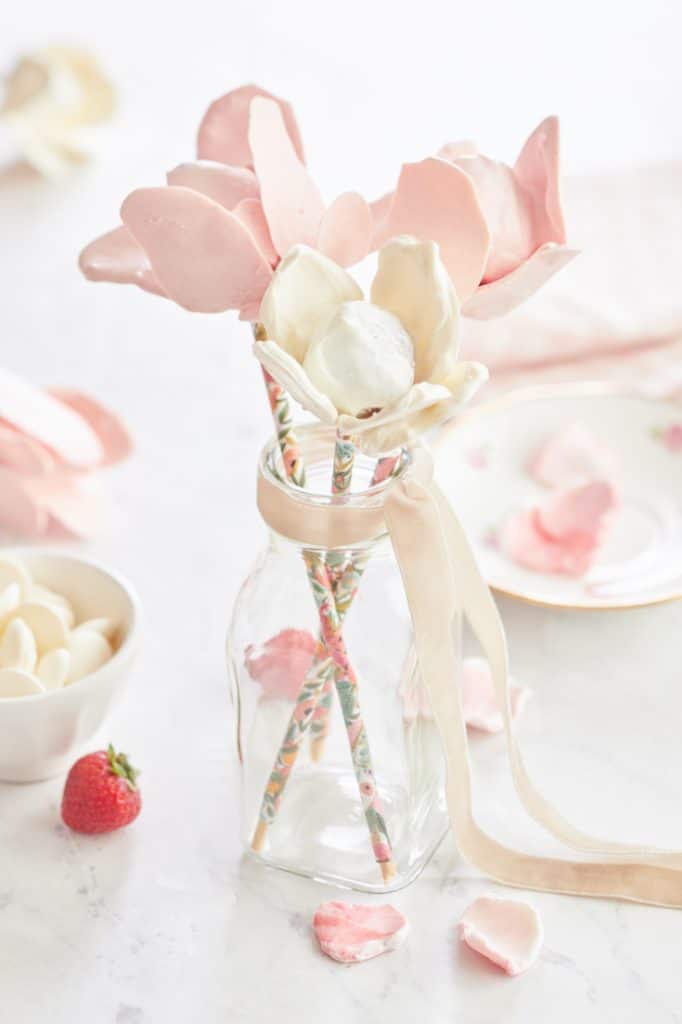
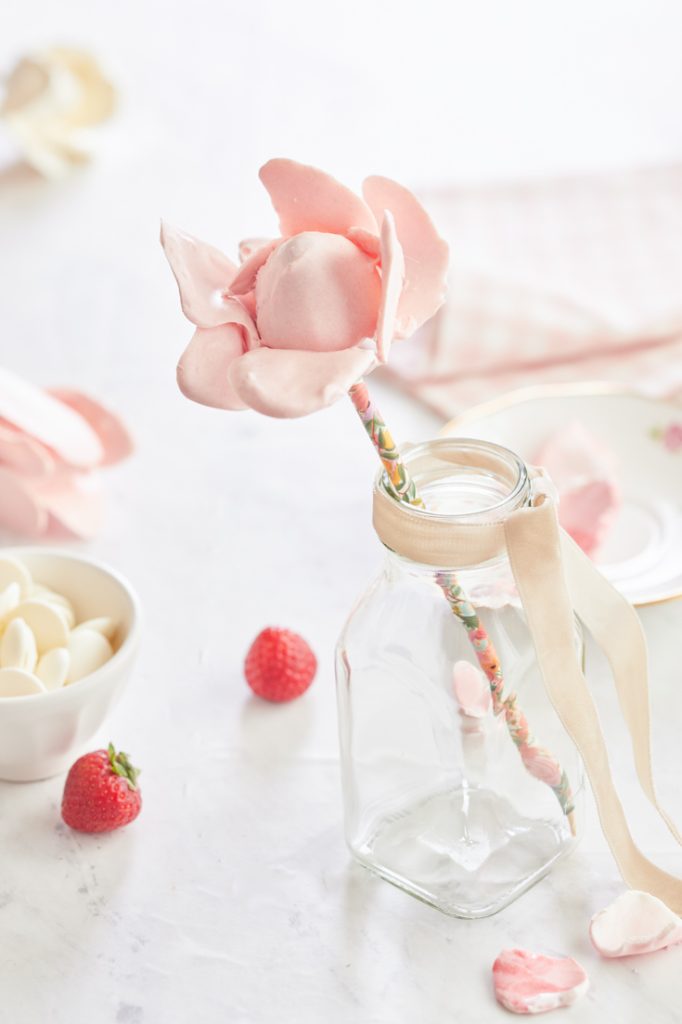
Step 6 – Place Wooden Skewer in Strawberry
If you want the strawberry rose to have a stem, place a bit of melted chocolate on the bottom of the strawberry. Next, place the skewer in the strawberry right through the warm chocolate. When it’s firm, the chocolate will hold the skewer in place.
I also, slid a cute drinking straw up the skewer to make it look like a green rose stem. To hold the straw in place attach a piece of tape to its end along with the skewer.
How to Store The Strawberries
I place mine in the refrigerator on a place. You can cover them with plastic wrap. If they don’t have the skewers attached, then place them in an airtight container and refrigerate.
It is best to eat them the same day you make them. They do tend to drip strawberry juice so store in a place that you don’t mind a bit of sticky fluid.

- Irish Soda Bread Recipe (with Buttermilk) - March 26, 2026
- Outdoor & Indoor Faux Flowers from Amazon - March 25, 2026
- Meringue Cookies Recipe - March 20, 2026


")
")
Leave a Reply