• Skip to main content
  • Skip to header right navigation
  • Skip to site footer
  • About
  • Contact
  • Boutique of the Week
  • Facebook
  • Instagram
  • Pinterest
  • Twitter

Happy Happy Nester

Weekly Inspiration for Your Nest

  • Recipes
    • Appetizers
    • Breakfast/Brunch
    • Desserts
    • Dinners
    • Drinks
  • Crafts
  • Decor
  • Shop
    • Fall Decor
    • Kitchen
    • Pillows
    • Holiday Decor
  • Saturday Chitchat
  • Recipes
    • Appetizers
    • Breakfast/Brunch
    • Desserts
    • Dinners
    • Drinks
    • Snacks
  • Crafts
  • Decor
  • Shop
    • Fall Decor
    • Kitchen Favorites
    • Pillows
    • Holiday Decor
  • Saturday Chitchat
  • Boutique of the Week
  • About
  • Contact
  • Facebook
  • Instagram
  • Pinterest
  • Twitter

See What’s Trending…

Cakes

Cookies

Dinners

Wreaths

Drinks

Home › Crafts › Easy Christmas Ornament DIY

Easy Christmas Ornament DIY

Crafts
By Janine Waite · Published on Nov 13, 2019
Affiliate Disclosure: This Post May Contain Affiliate Links.

These Easy Christmas Ornament DIY are so fun to make, and even your kids will like it.

This holiday project uses oven-baked clay and sparkly crystal glitter.

You'll want to make these adorable Christmas clay ornaments. The touch of glitter adds the bonus sparkly feature that takes this craft to a higher level. Enjoy making these with your kids. #crafts #christmasornaments #ornamentdiy

*This project contains affiliate links.

Today, I’m part of an ornament blog hop, and you will love all the creative projects my friends are posting. I love this community that Krista from The Happy Housie has brought together. So enjoy all the other ornaments this Christmas!

This easy Christmas ornament DIY is so fun that I made about 40 ornaments. My dear friend Leslie from My 100 Year Old Home showed me how to make this cool craft. Well, I also love glitter, so I encouraged her to use my Hobby Lobby glitter. This glitter is the best, and I shout it from the rooftops on every glitter post.

Make this easy clay ornament this holiday. Add a bit of crystal clear glitter to add a bit of sparkle and attach a cotton twine string to hang it from the tree. This is such an easy holiday diy that even your kids will love joining in on this project. #crafts #kidcrafts #ornaments #christmasornaments

Have you ever worked with Sculpey, the clay?

It is a great clay that you can mold, shape, and roll out, and then you can let it air dry or bake. If you want your item to harden, then you’ll want to bake it. My husband used it when he was an art teacher many years ago. I love that once I rolled out the clay, I could make quite a few ornaments. I’m all about making a lot of something!

Make this clay ornament this holiday. Add a bit of glitter to add a bit of sparkle and attach a cotton twine string to hang it from the tree. This is such an easy holiday diy that even your kids will love joining in on this project. #crafts #kidcrafts #ornaments #christmasornaments

Check out these other holiday craft projects:

  • Easy Christmas Craft Book Project
  • Easy Washi Tape Christmas Ornament
  • Fleece Christmas Tree

Also, If you like this project and want more personal holiday projects, then make sure to sign up for my private FB membership community. You can find out more about it over on this page. We would for you to join this fun group of women!

Easy Christmas Ornament DIY


Supplies:

Sculpey

Snowflake Cookie Cutter

Rolling pin

Parchment paper

Hobby Lobby Glitter

Skewer or pencil

glue and watercolor brush

Black and white baker’s twine


Instructions on how to make an easy Christmas ornament DIY

1. Sculpey can be stiff, and so it is useful to prep the clay. You can do this by working with your warm hands. Just squish it in your hands, and the clay will become more flexible.

2. In the meantime, place a sheet of parchment paper down on the counter.

3. Roll out clay to about 1/4 inch or so in thickness on top of the paper.

4. To prevent the clay from sticking to the paper while you roll it out, make sure to peel it off the paper and flip it to the other side. Do this a couple of times.

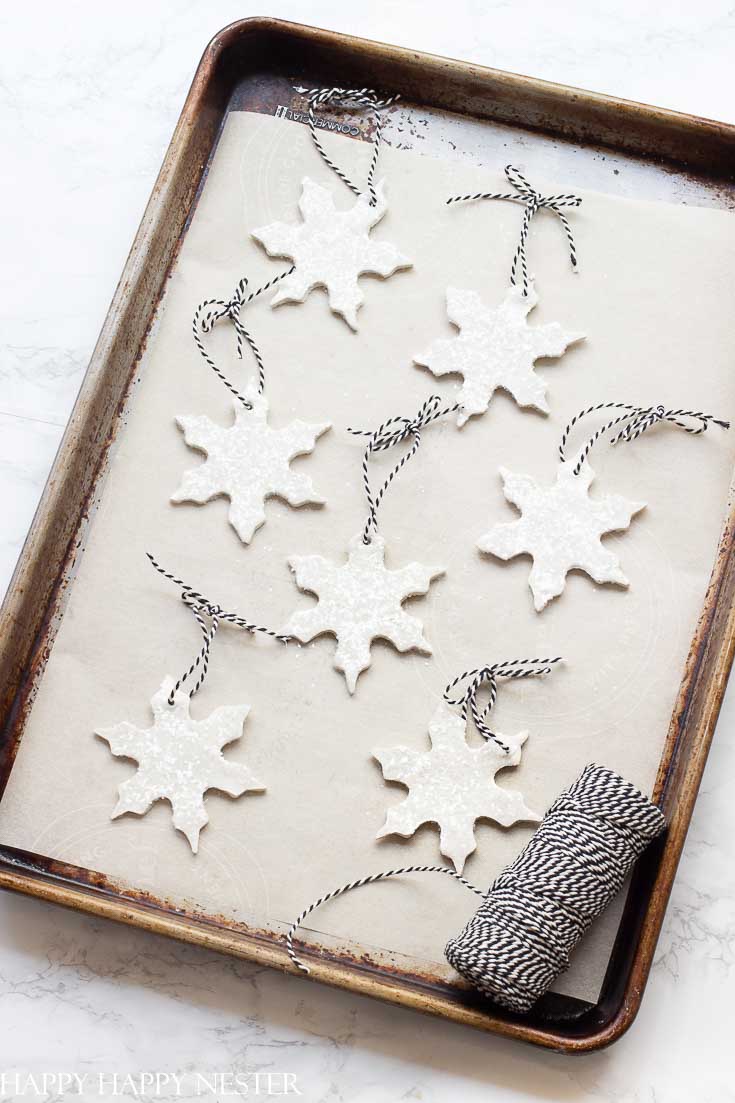
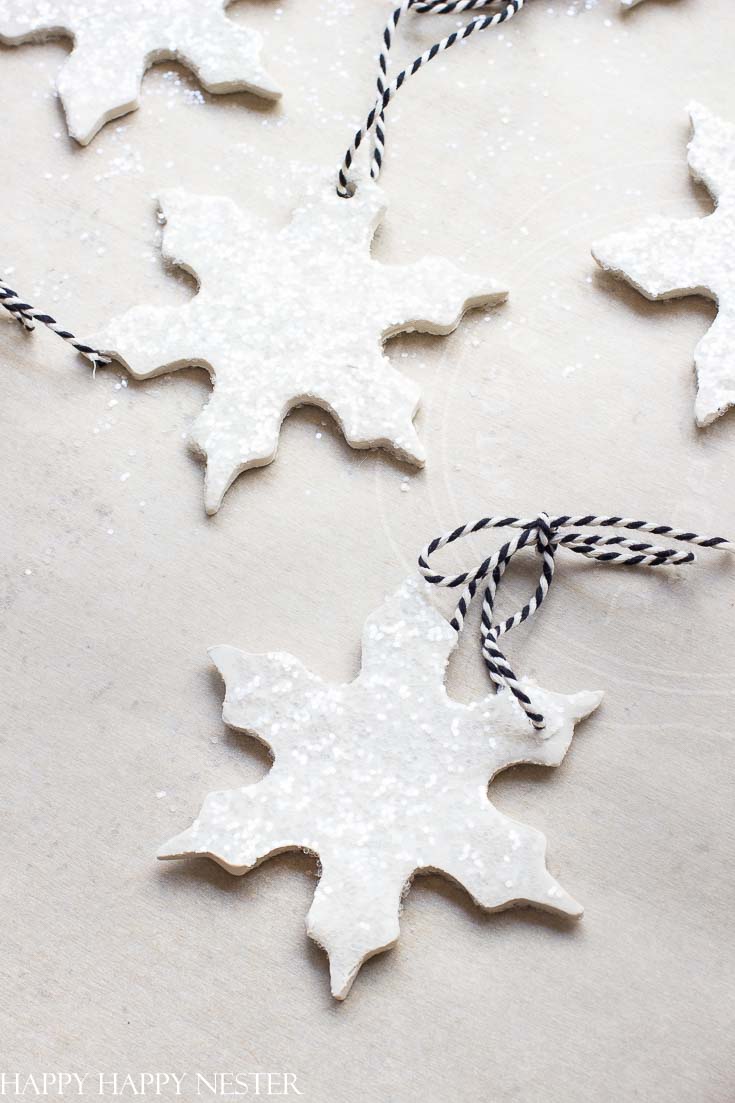
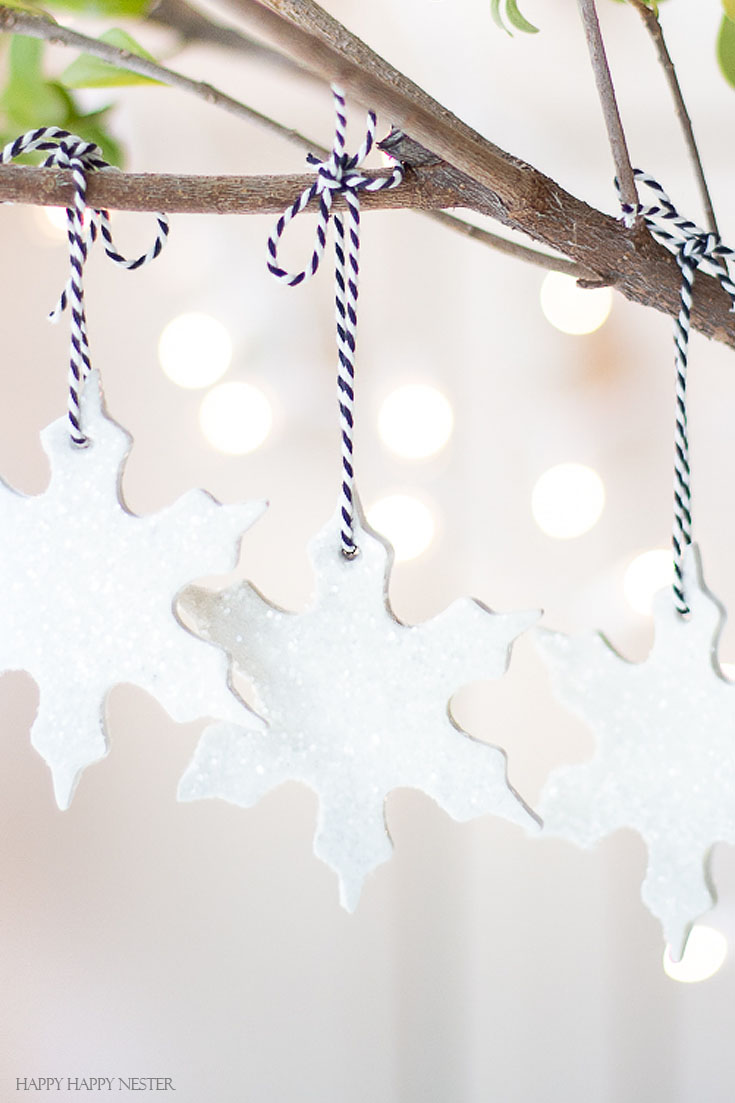
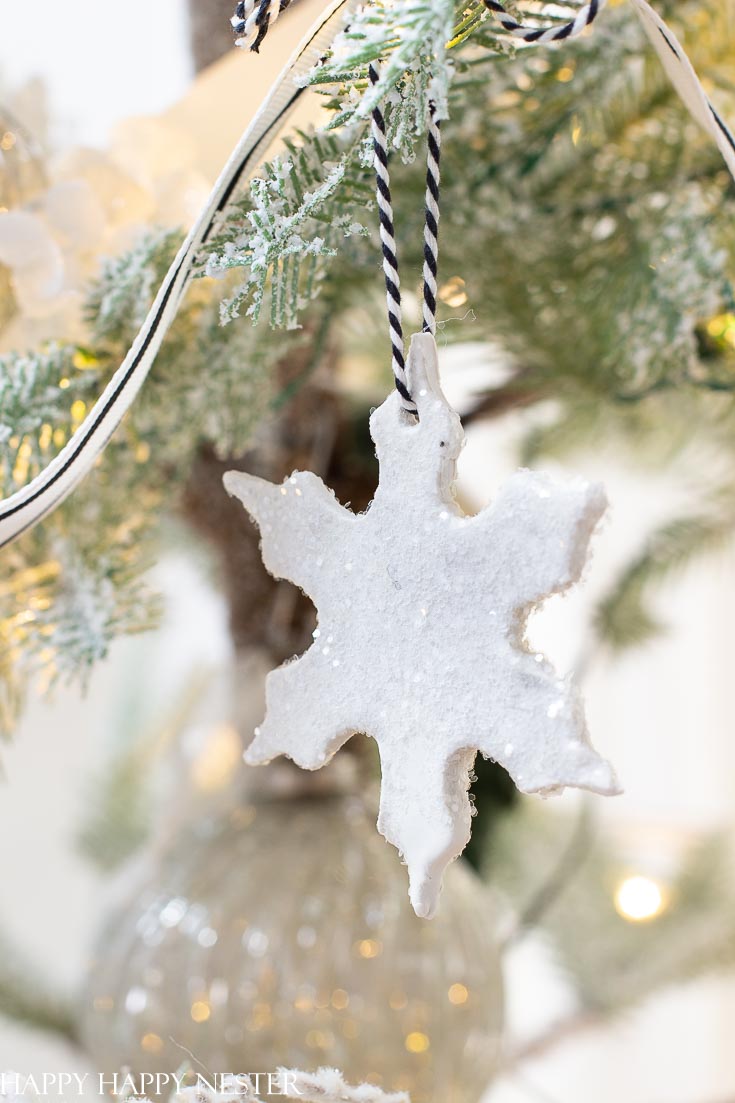
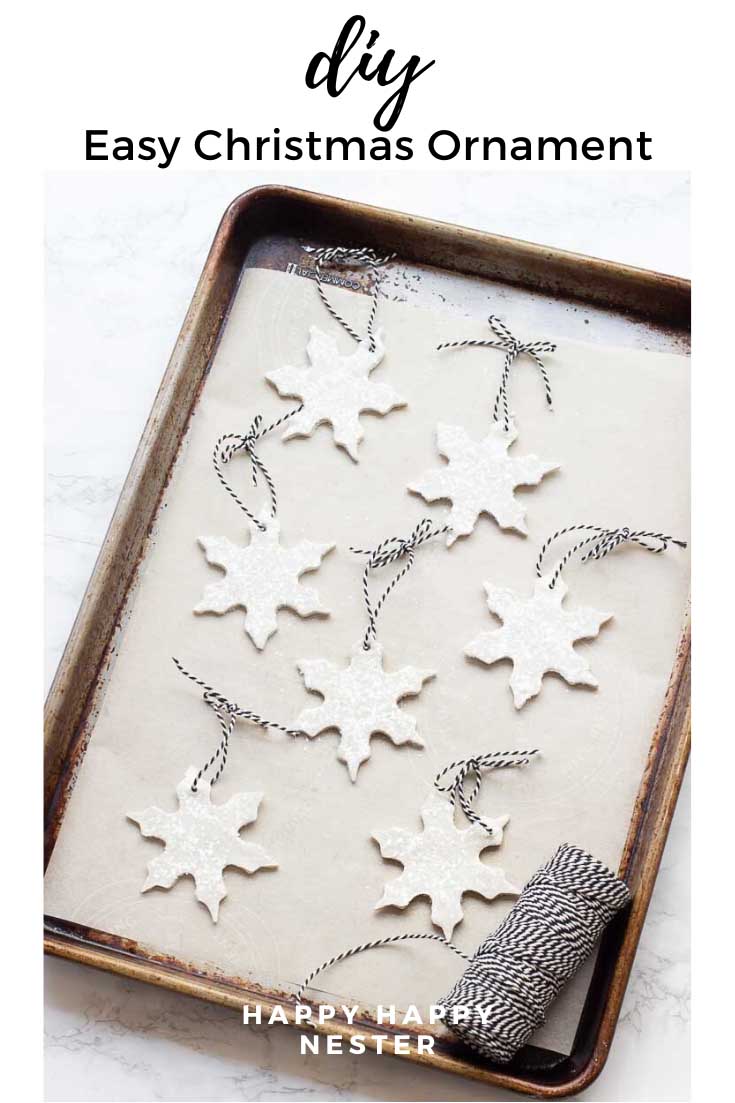
5. Cut out your snowflakes and poke a hole with your skewer at the top of the ornament. Next, place the snowflakes on a cookie sheet that is lined with parchment paper.

6. Bake at 275 degrees for 15 minutes.

7. When they come out of the oven, they are a bit soft, and as they cool, they get hard.

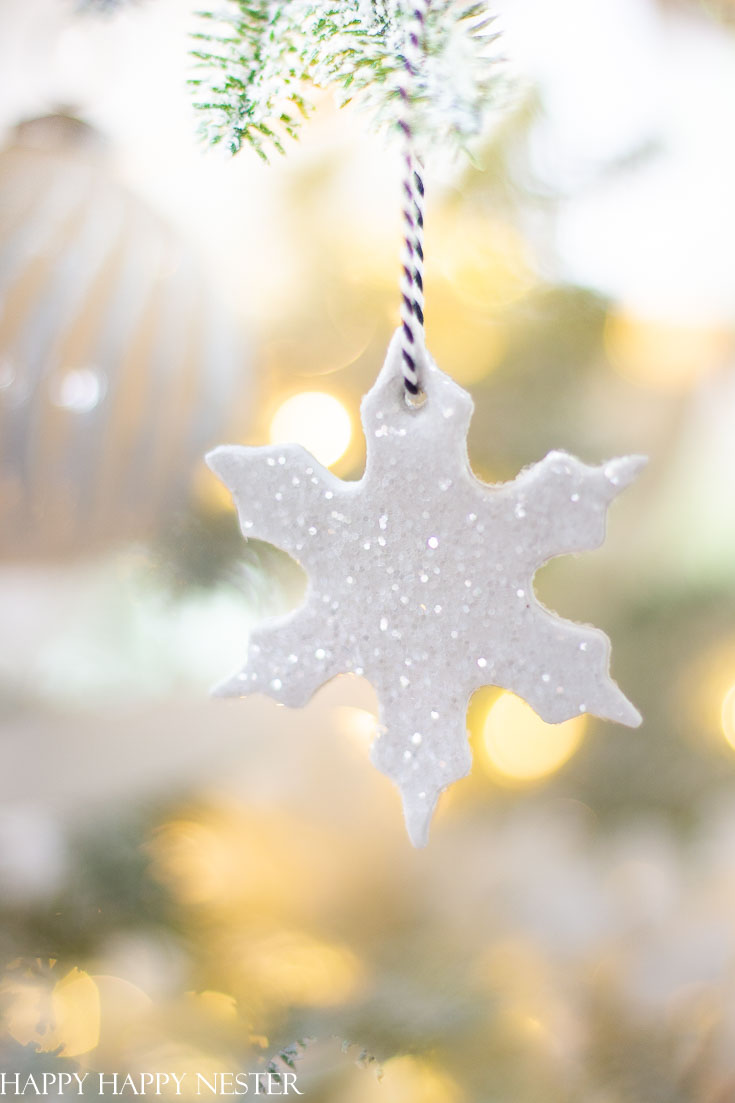
8. Apply slightly watered down glue to one side of the ornament and sprinkle it with glitter. After it is dried, paint another layer of glue on the other side and sprinkle with glitter.

9. Thread a piece of cotton twine through the hole and tie a bow. Hang your ornament on your tree.

This is an Easy Christmas Ornament DIY. This clay ornament is pretty, and one container of clay makes a lot of ornaments. Make sure to add glitter for a bit of sparkle. #ornaments #crafts #Christmasdiy #clay

This is an Easy Christmas Ornament DIY. This clay ornament is pretty, and one container of clay makes a lot of ornaments. Add glitter for a bit of sparkle. #ornaments #crafts #Christmasdiy #clay

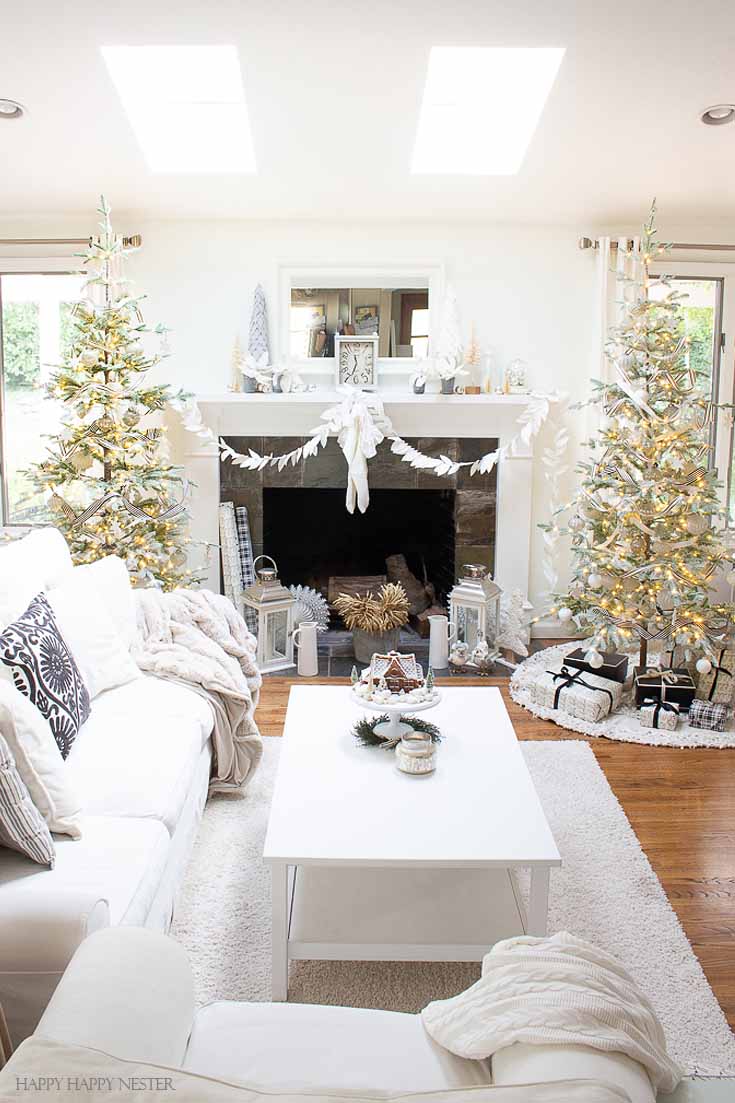
This time of year is super busy around here. I feel like every day, I have a project due. Well, I’m over exaggerating a tiny bit. Well, I worked in my living room and these ornaments over the past couple of days. Here is a peek at my Balsam Hill Christmas trees and my homemade clay snowflake ornaments.

Thanks so much for joining me on this Easy Christmas Ornament DIY, and I hope you have a chance to make these cute ornaments.

Cheers,

signature


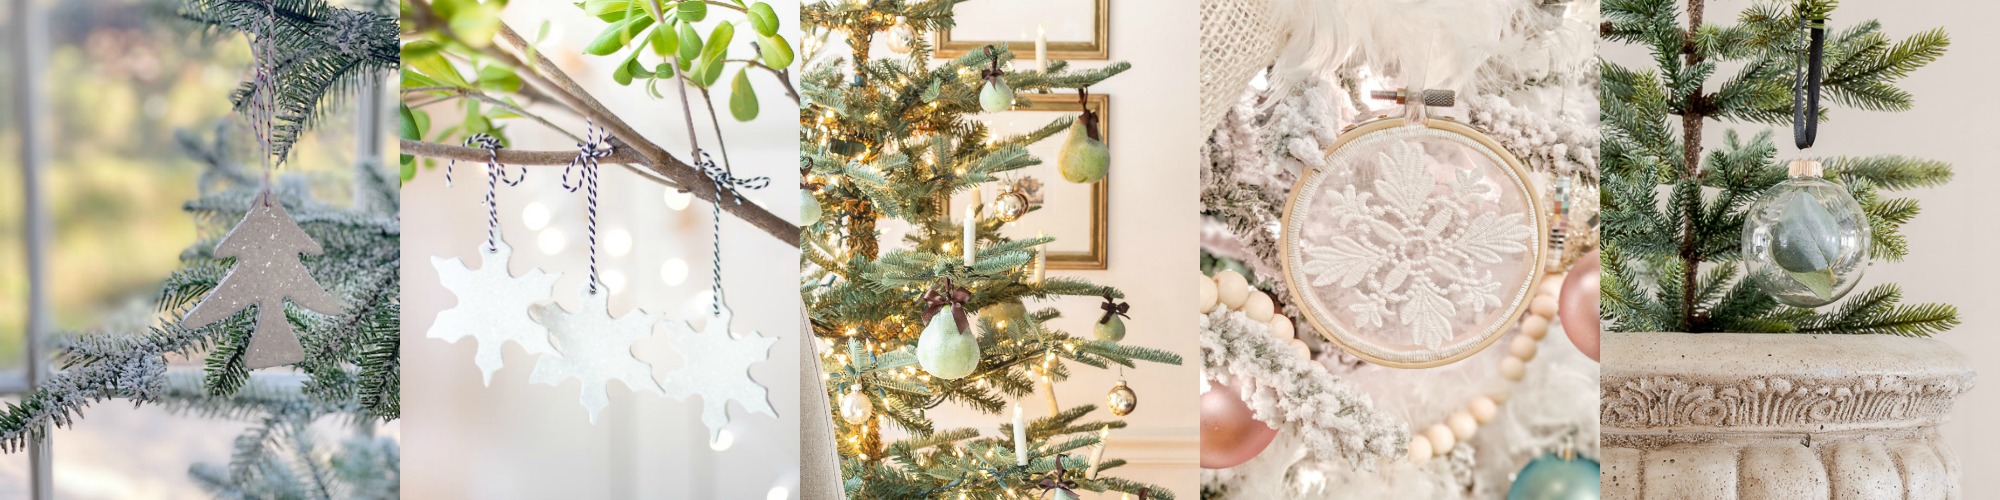
Welcome to the second week of the Seasonal Simplicity Christmas Series! Today a group of my blogging friends and I are sharing our DIY Christmas Ornament projects to help inspire you to get crafty for the upcoming holiday season. Click on the links below each image to be taken directly to the different posts!

DIY Christmas Light Tree Ornaments at The Happy Housie
Handmade Ornaments from Free Printables at The Handmade Home
DIY Dollar Store Christmas Tree Ornament at Craftberry Bush
DIY Twig Christmas Tree Ornament at The Turquoise Home

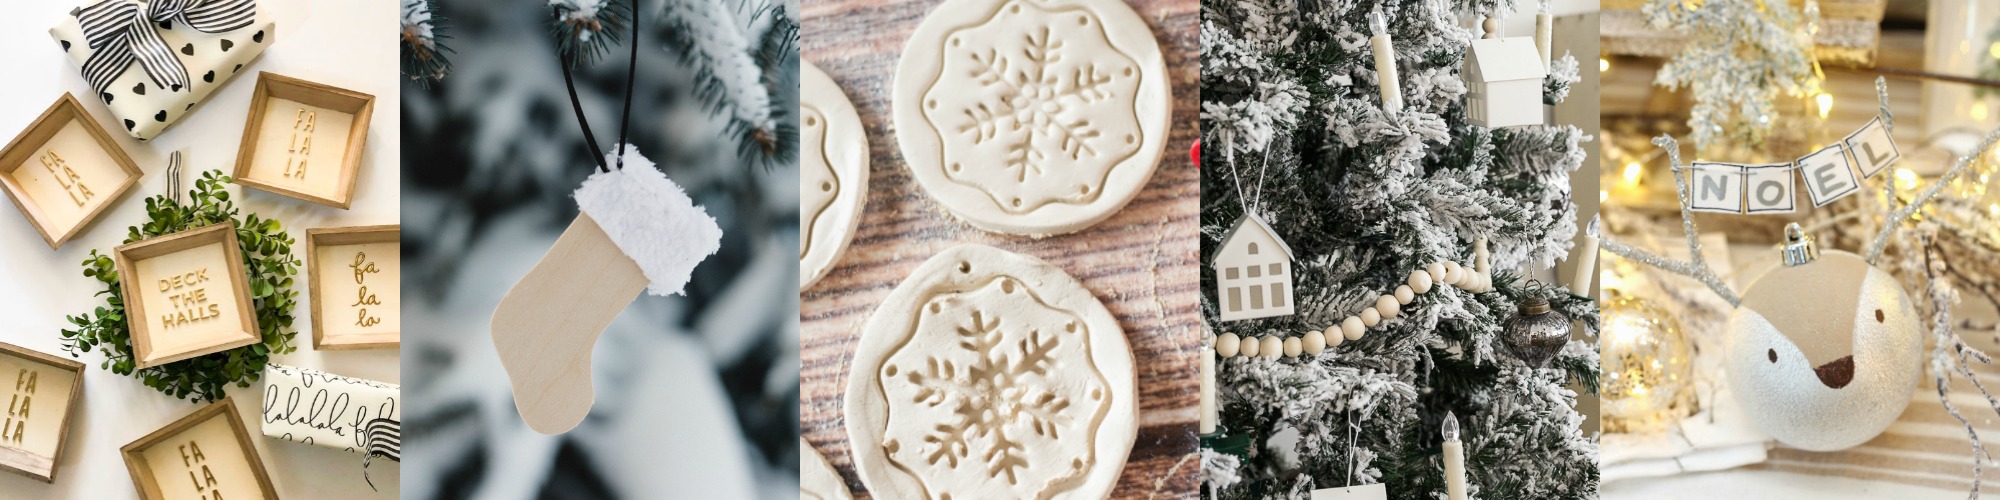
Farmhouse Christmas Sign Ornaments at Tatertots and Jello
DIY Stocking Ornament at Love Create Celebrate
DIY Kid Friendly Christmas Ornaments at Jenna Kate at Home
DIY Wood Bead Christmas Garland at So Much Better With Age
Reindeer Handmade Christmas Ornament Clean & Scentsible

DIY Christmas Ornament at My 100 Year Old Home
Easy Christmas Ornament DIY at Happy Happy Nester
Frosted Pear Tree Ornaments at Sincerely, Marie Designs
Elegant Embroidery Hoop Ornaments at All Things With Purpose
Homemade Christmas Ornament at Seeking Lavender Lane

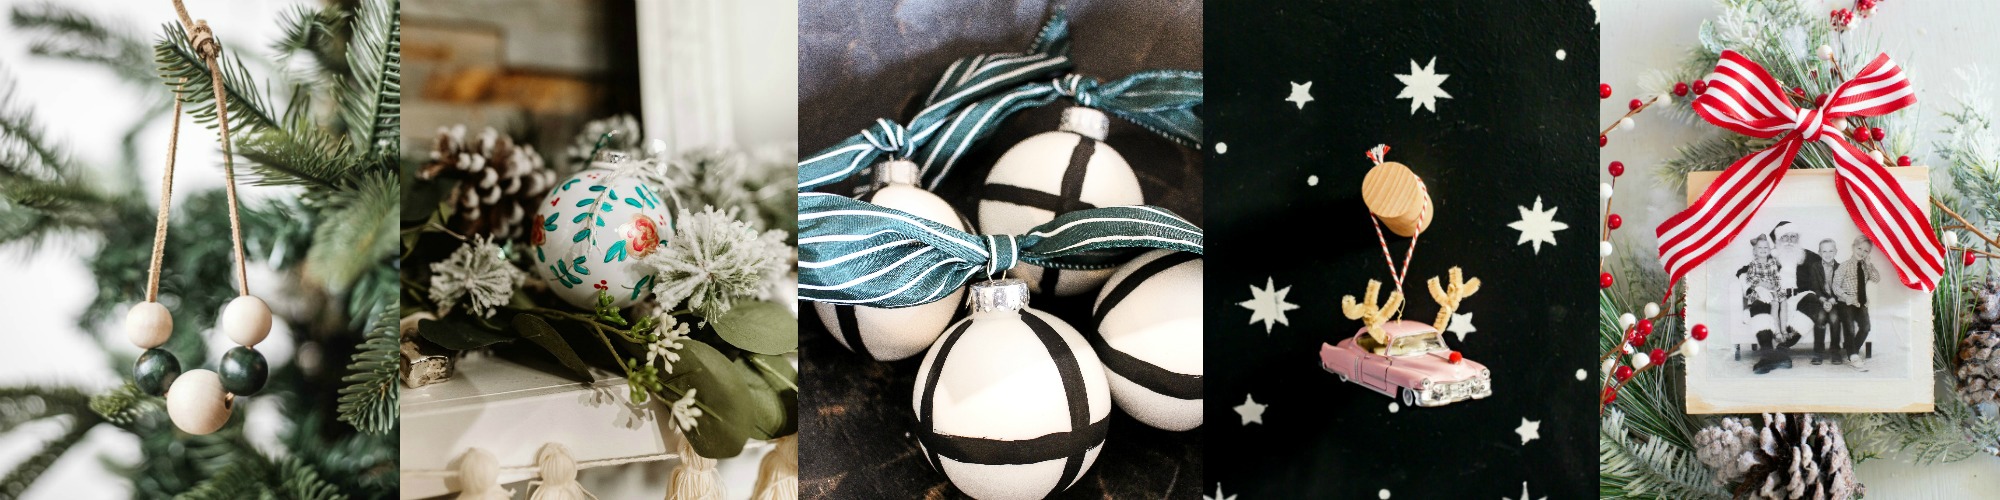
Easy Wood Bead Christmas Ornaments at Cherished Bliss
DIY Hand Painted Floral Christmas Ornaments at The DIY Mommy
DIY Black and White Ornaments at Taryn Whiteaker
DIY Reindeer Vintage Car Christmas Ornament at Cassie Bustamante
Photo Block Christmas Ornament at Amber Tysl

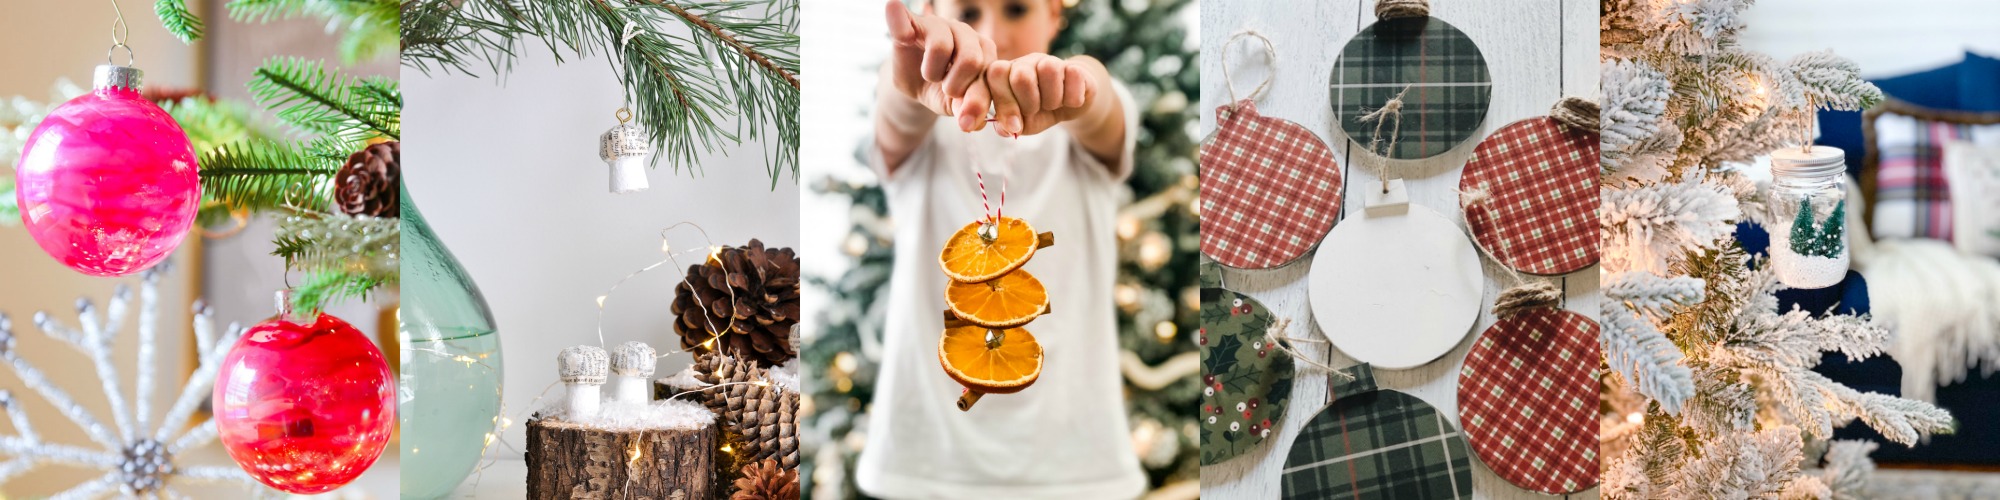
Melted Crayon Ornaments at Modern Glam
Wine Cork Mushroom Christmas Ornaments at Life is a Party
Cinnamon Stick and Orange Slice Ornaments at A Pretty Life
Easy DIY Reversible Christmas Ornaments at She Gave it a Go
DIY Mason Jar Snow Globe Ornament at Lolly Jane

christmas craft post pin button

This is an Easy Christmas Ornament DIY. This clay ornament is pretty, and one container of clay makes a lot of ornaments. Make sure to add glitter for a bit of sparkle. #ornaments #crafts #Christmasdiy #clay


  • Author
  • Recent Posts
Janine Waite
Follow me
Janine Waite
I named my blog Happy Happy Nester because I love everything related to the home. I’ve always enjoyed decorating my surroundings. Get cozy and stay for a bit, thanks for visiting!
Janine Waite
Follow me
Latest posts by Janine Waite (see all)
  • Gluten Free Easter Desserts - March 25, 2023
  • Mini Lemon Tarts - March 24, 2023
  • Book Page Wreath DIY - March 23, 2023

You May Also Like

  • Easy Washi Tape Christmas Ornament DIY
    Easy Washi Tape Christmas Ornament DIY
  • Make Your Own Ornament With a Cloche
    Make Your Own Ornament With a Cloche
  • DIY Christmas Diorama Ornaments
    DIY Christmas Diorama Ornaments
  • DIY Fabric Ornament Balls (Christmas)
    DIY Fabric Ornament Balls (Christmas)

Sharing This!

  • Facebook
  • Twitter
  • Email

Reader Interactions

Comments

  1. Cassie Bustamante

    November 13, 2019 at 7:57 am

    these turned out so well and i love them paired with the black and white twine!

    Reply
    • happyhappynester

      November 18, 2019 at 11:59 am

      This is my favorite ribbon!

  2. Jo-Anna

    November 13, 2019 at 8:43 am

    Gorgeous Janine! SO many pretty possibilities…I’m definitely inspired to make some clay ornaments this year!

    Reply
  3. Krista

    November 13, 2019 at 3:55 pm

    So easy and I love the snowflakes! Thanks for sharing Janine. Your trees are so pretty too.

    Reply
  4. Colette

    November 14, 2019 at 1:46 pm

    Your living room looks s festive, Janine!

    Love the sparkly snowflakes! These are great to do with kids.

    Reply
  5. Sarah @ The DIY Mommy

    November 19, 2019 at 8:35 pm

    So cute! Love the twine choice!!

    Reply
    • happyhappynester

      March 27, 2021 at 9:19 pm

      Thanks, Sarah!

  6. Carole

    December 17, 2019 at 6:20 pm

    When I was first married I had some wooden ornaments that I made that looked very similar to these. I painted the wooden snowflakes, glittered them, and added eye hooks. We used those things for years.

    Reply
    • happyhappynester

      March 27, 2021 at 9:19 pm

      Hi Carole,
      I love that you did the same thing as me! What great memories.

Leave a Reply Cancel reply

Your email address will not be published. Required fields are marked *

Recipe Rating


Sidebar

Janine the Nester

Hello from the Nester

We love everything related to home, so get cozy and stay for a bit. Thanks for visiting our blog. Learn More...

Reader Favorites

This Italian Cream Cake has a pumpkin cream cheese frosting that makes this a winning combination. This dessert is perfect for the holidays.

Italian Cream Cake with a Twist of Pumpkin

The Best Crunchy Crispy Chocolate Chip Cookie

French Apple Custard Tart with Puff Pastry

DIY Paper Flowers Tutorial (Tissue Paper)

Upcycling Tin Cans with Scrapbooking Paper

How to Make a Paper Flower Wreath DIY

Popular Categories

  • Cakes
  • Cookies
  • Dinners
  • Wreaths
  • Organizing

Join Our Newsletter

Join our mailing list to receive the latest news and updates from our team.

You have Successfully Subscribed!

AFFILIATE DISCLOSURE:
I am grateful to be of service and bring you content free of charge. In order to do this, please note that when you click links and purchase items, in most (not all) cases, I will receive a referral commission. Your support in purchasing through these links enables me to keep my design and customization prices ridiculously low and empower more people worldwide to blog with less worry and less hassle.
Happy Happy Nester is a participant in the Amazon Services LLC Associates Program, an affiliate advertising program designed to provide a means for sites to earn advertising fees by advertising and linking to amazon.com.
Thank you! :)
-Happy Happy Nester

Our Guide

Join Our Newsletter

Join our mailing list to receive the latest news and updates from our team.

You have Successfully Subscribed!

  • Facebook
  • Instagram
  • Pinterest
  • Twitter

Recipes

Appetizers
Breakfast/Brunch
Desserts
Dinners
Drinks

Crafts & Decor

DIY
Gardening
Holiday
Wreaths

About

About The Nester
Contact
Privacy Policy

Copyright © 2023 · Happy Happy Nester by Janine Waite · Privacy Policy

↑ BACK TO TOP