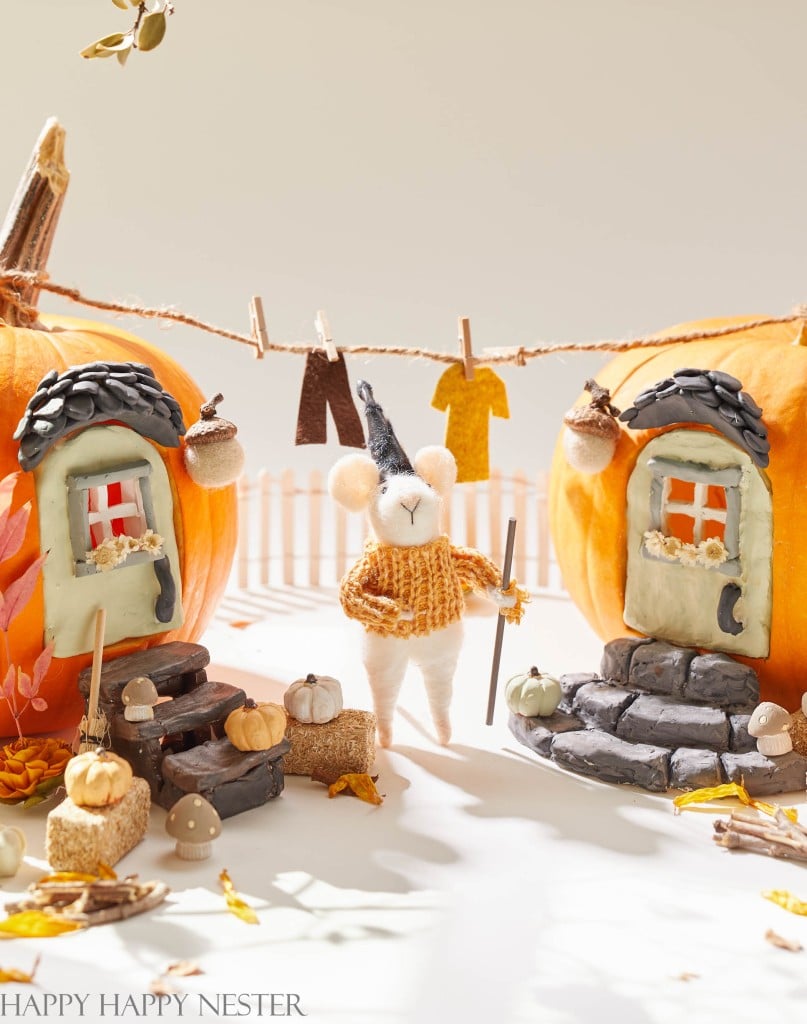
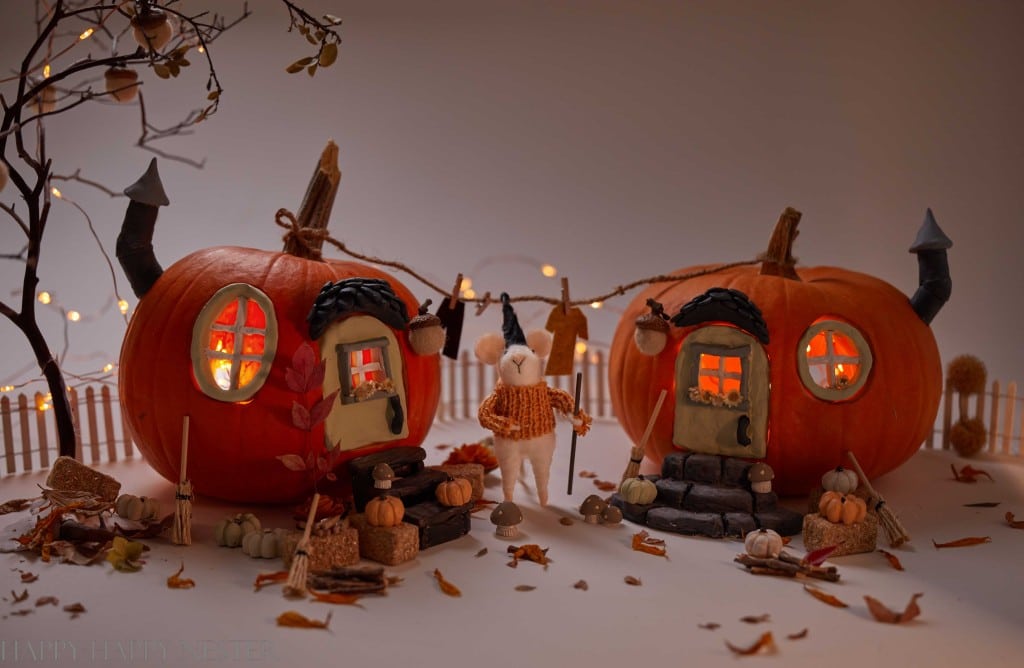
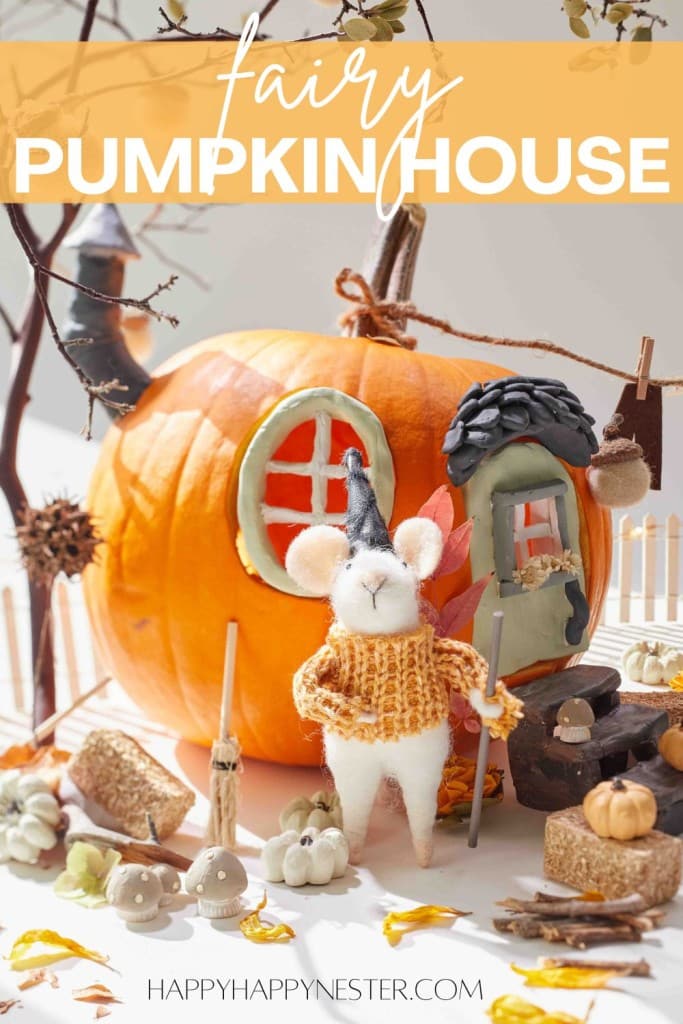
Here is an adorable Pumpkin Fairy House! It’s an enchanted pumpkin with all the fun fall decorations. Use natural and sculpted elements to decorate your fun and festive fall pumpkin house. Also, get your kids involved and let them create the magical scene. And learn how to create a fun Halloween carved pumpkin fairy house in this DIY.
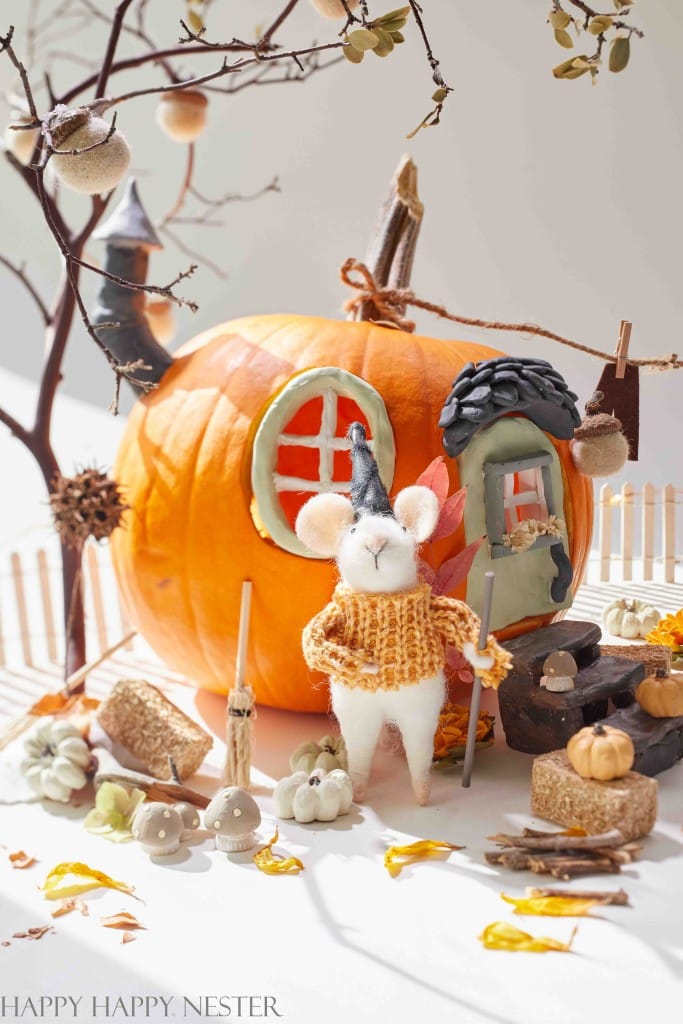
Make the doors, windows, and stairs out of Sculpey clay and reuse them with a new pumpkin each year. You and your family will love this unique and cute Halloween pumpkin project.
I love all the seasons, and I especially love fall and Halloween.
This time of year, it’s about creating a cozy home for your family. Over the years, I’ve enjoyed decorating pumpkins, porches, and more. Here is a short list of some of those projects.
- Ghost Painted Pumpkins
- DIY Pumpkin Succulent
- How to Make Glitter Pumpkins
- Harry Potter Floating Candles DIY


I’ve always wanted to build a pumpkin fairy house, and this year, I decided to tackle the project. The big question I faced was, do I use a real or faux pumpkin?
Well, I decided to use a real pumpkin as much as the faux route would be easier.
I guess I’m a purist at heart.
But don’t let me sway you; use whatever pumpkin you like for this fun project.
Before I forget, I want to mention that this blog post is part of a Pumpkin DIY roundup. Here are my blogging friends who create some beautiful projects!
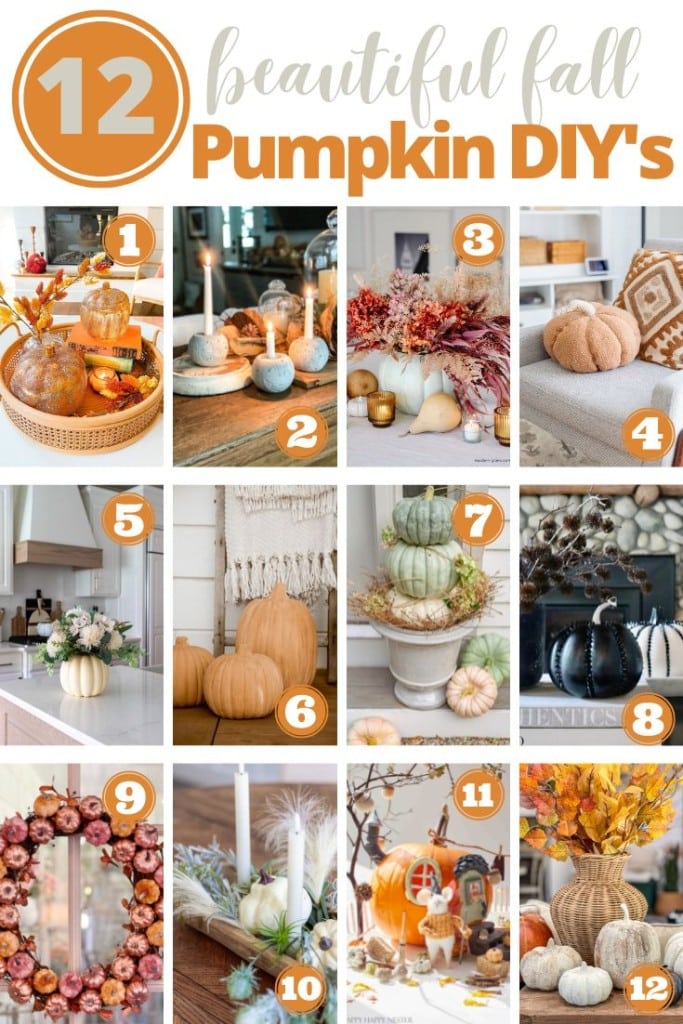
Blogger’s Best Pumpkin DIYs
- Pottery Barn Inspired Amber Pumpkin Cloches by Tatertots and Jello
- How to Make Concrete Pumpkin Candle Holders by Robyn’s French Nest
- Dried Floral Pumpkin Centerpiece by Modern Glam
- Sherpa Pumpkin Pillow PB Knockoff by Craftberry Bush
- DIY Fall Decor Ideas by Jennifer Maune
- DIY Faux Terra Cotta Pumpkins by Twelve on Main
- Pumpkin Planters by Finding Lovely
- Luxe Studded Pumpkins by My Sweet Savannah
- The Best Pumpkin Wreath DIY by My 100 Year Old Home
- Easy Pumpkin and Candle Decoration by Zevy Joy
- Pumpkin Fairy House by Happy Happy Nester
- Fall Pumpkins: How to Easily Make Costly Pottery Barn Look for Less by The Design Twins
My love for everything miniature enticed me to tackle this fall pumpkin project. There is something magical about little houses and furniture.
So, when I mentioned this to my husband, I would decorate a pumpkin, and he laughed at me. The funny thing about his response is that he got heavily involved in my project since, deep down, he loves to sculpt something.
We sculpted and worked on our pumpkins every evening over the long Labor Day holiday. I have to say we thoroughly enjoyed creating these fairy pumpkins! And our daughter was laughing at our obsession with decorating these pumpkins.
Too funny.
Let’s get started on this project!

How to Make a Pumpkin Fairy House
Supplies You’ll Need:
A Real Pumpkin
A Sturdy Pumpkin Carving Knife
Paper
Felt Tip Pen
Scissors
String Lights or a Votive Candle
Ancillary Accessories – Listed Below
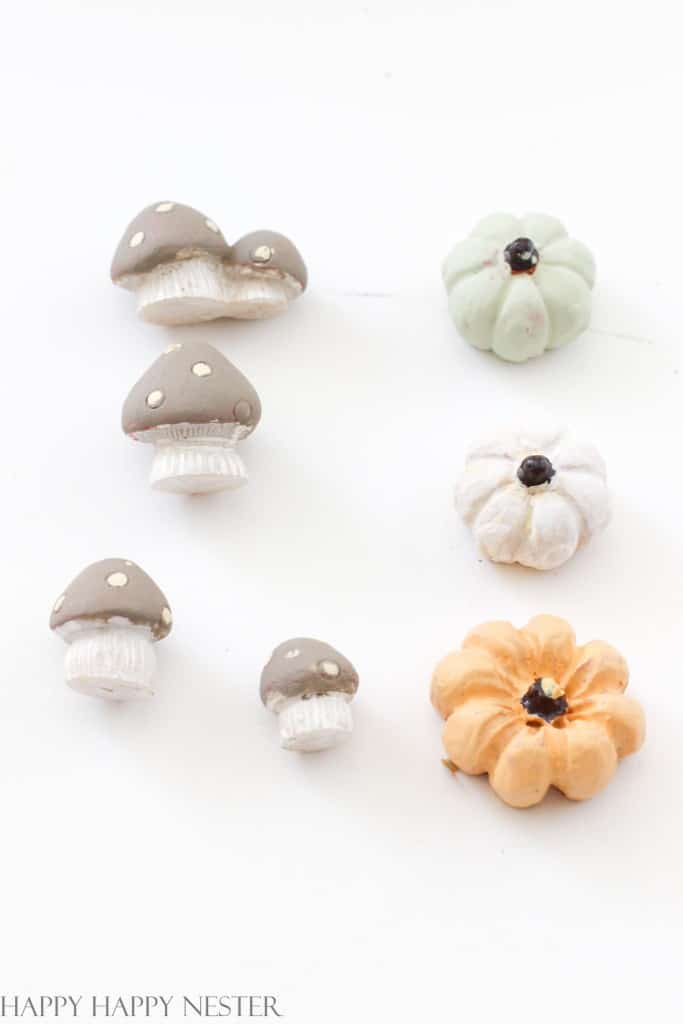
Small Mushrooms and Pumpkins – I bought these mushrooms, and they were initially red, so I painted them acrylic crafting paint. Also, my pumpkins were a vibrant orange, so I painted (acrylic paint) various colors. If you don’t want to buy mushrooms, you can easily make them with Sculpey.
Branches – I found this pretty Manzanita branch on one of my hikes. Add any branches you like from your garden.
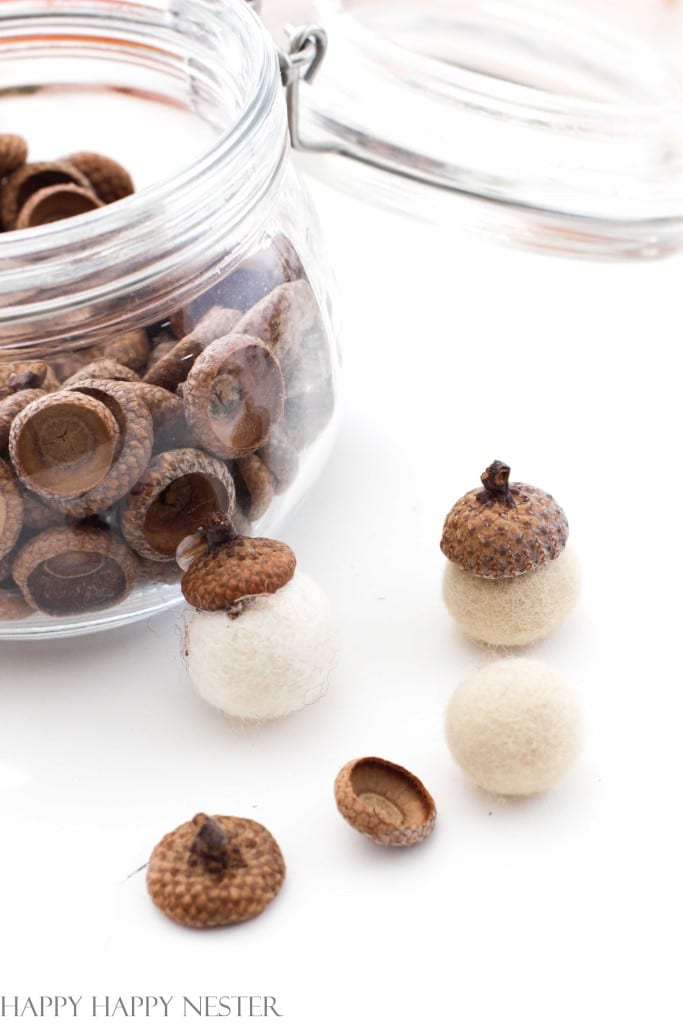
Acorns – I hot glued a real acorn cap to a wool ball and then glued it to my tree branch.
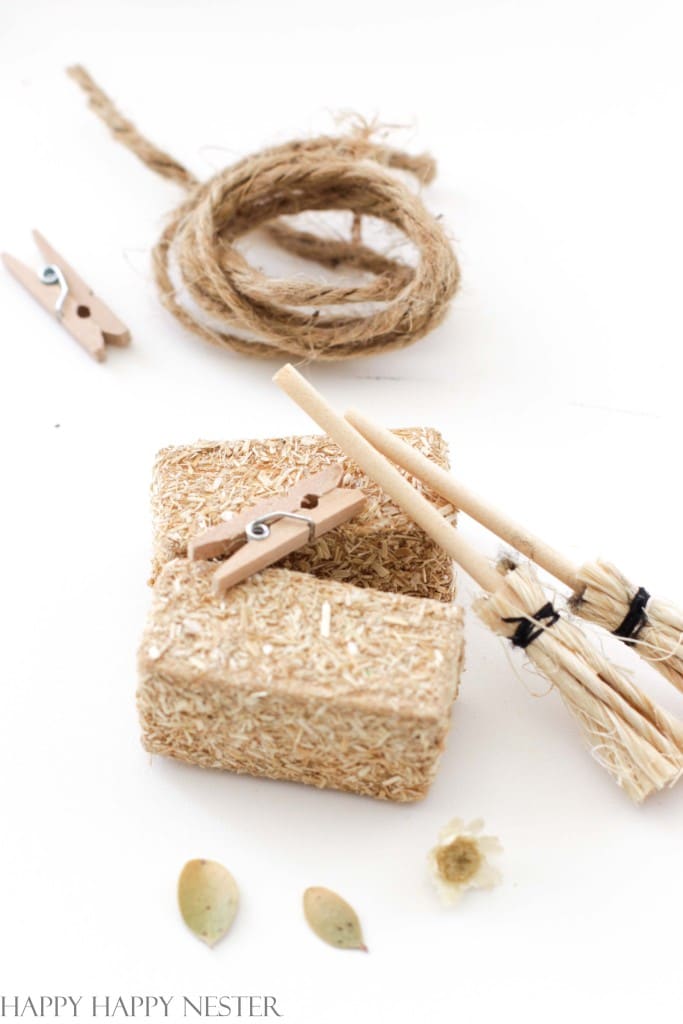
Hay Bales, Brooms, Twine, and Clothes Pins
These cute accents I bought online. The little dried flowers I glued in the door windows. And the little leaves next to them are from my Manzanita bush. Here are the links to the brooms, hay bales, twine, and mini-clothes pins.
Also, I must mention that the cute picket fence adds a lot to the scene. You can find the fence here.
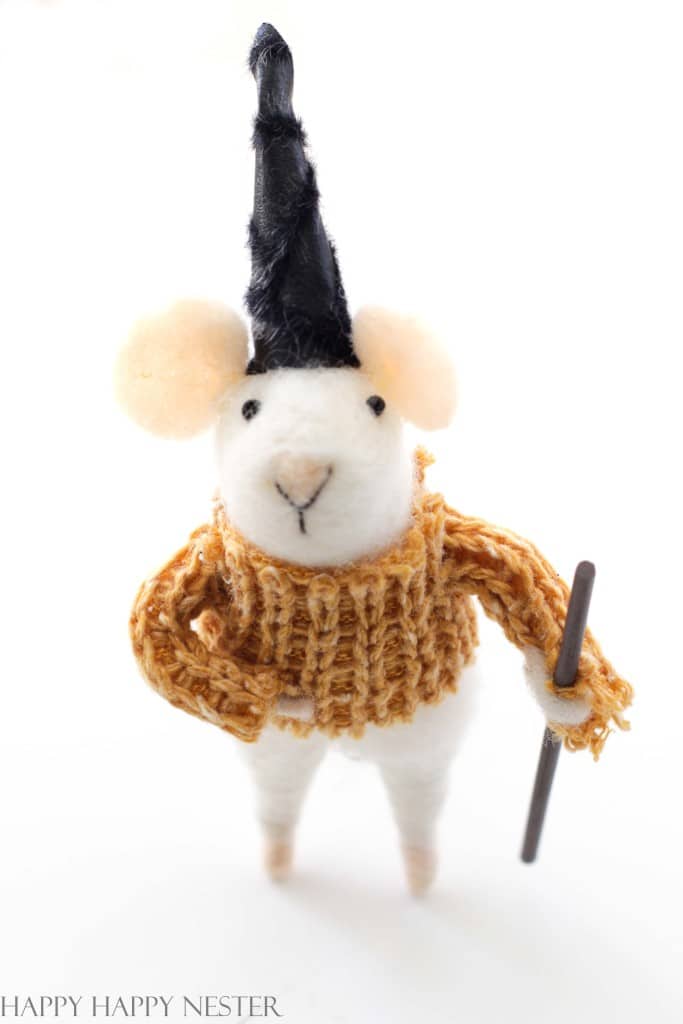
Cute Halloween Mouse
I bought him the minute I spied this little mouse at the store. He is so so cute and perfect for my little pumpkin fairy house! It’s like I built the house around this little guy! If you want this exact mouse, it will be available starting September 25th! Here is a link to another Halloween mouse. And today I found this one that’s adorable too!
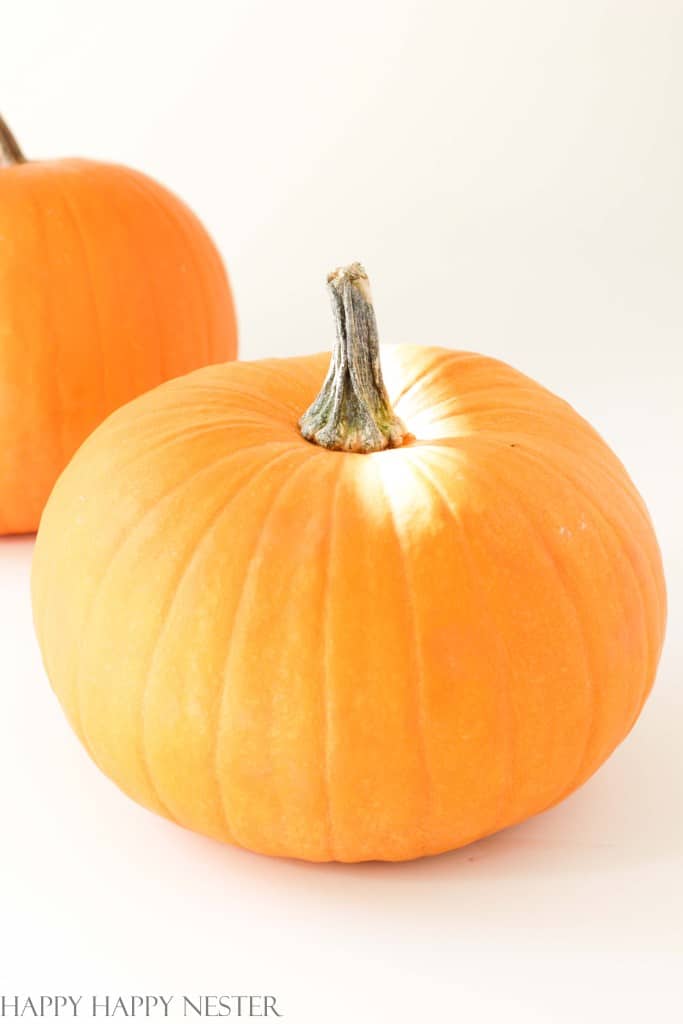
Choosing a Pumpkin
If you want to hang a clothesline between two pumpkins, you should buy pumpkins with a stem attached.
Faux or Real
That is the big question.
Faux is easier to carve, but the real pumpkin has a beautiful organic quality that adds charm to the fairy house.
Orange, White, Pink, or Green Pumpkin
The choices are plenty when it comes to pumpkins.
Orange is the traditional pumpkin and what most people love.
White has a more farmhouse style that might be nice with a sea of white pumpkins.
Of course, pink has a more feminine feel, and green pumpkins feel like they belong in your garden, surrounded by moss and ferns.
Large or Small Pumpkins
I chose a squatty pumpkin since I wanted to place windows on each side of the door. And I wanted them seen from the front. If the pumpkin were tall and skinny, the windows would face more of the side and be a bit invisible.
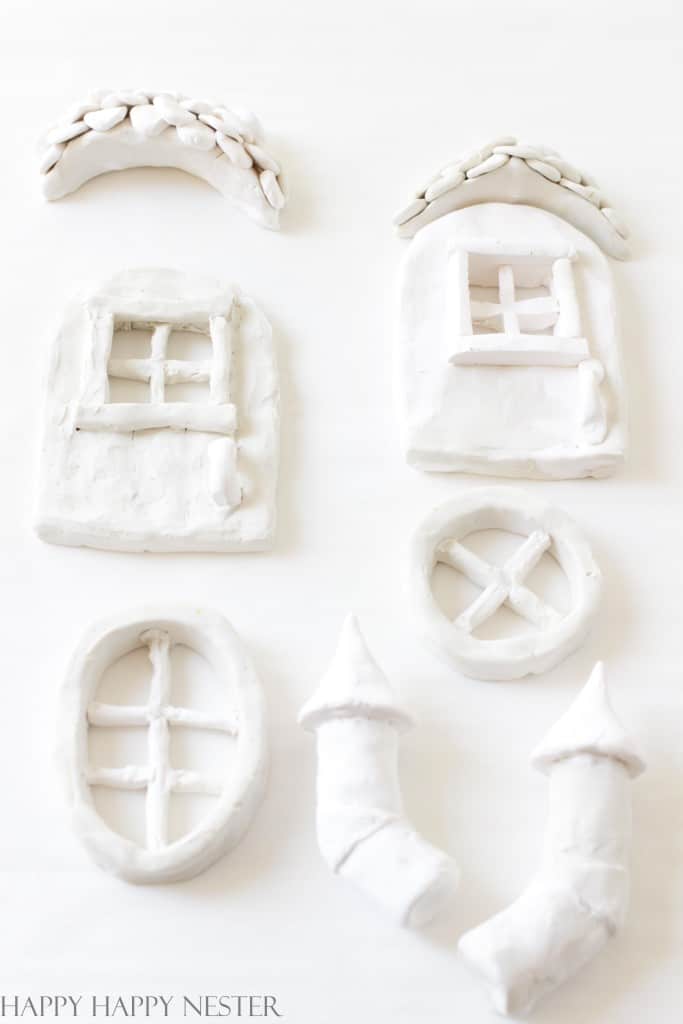
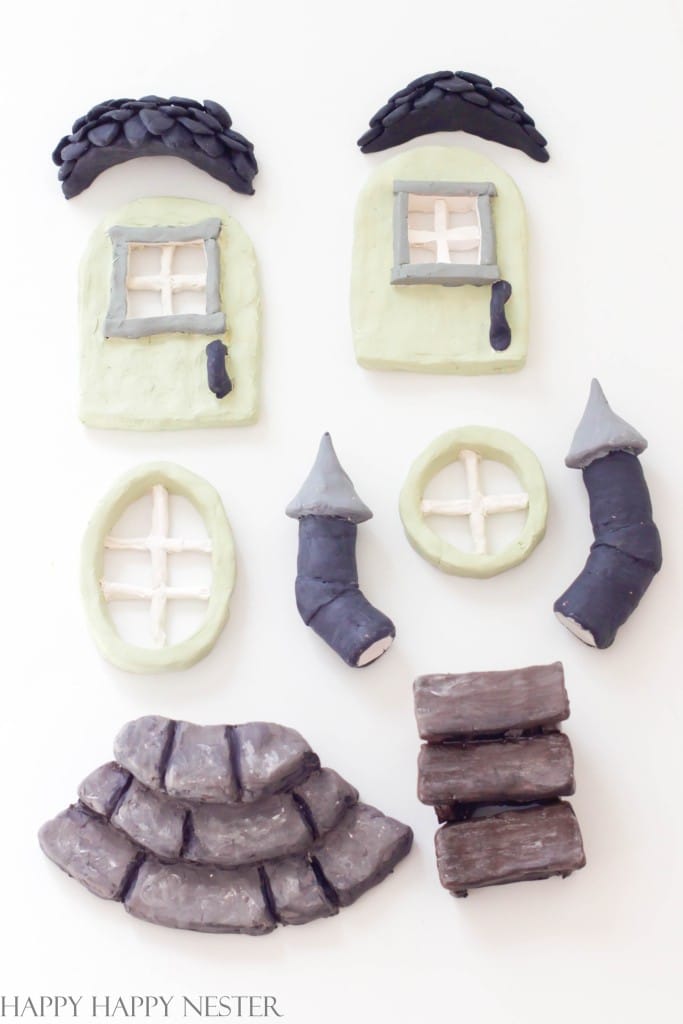
Sculpted Doors, Windows, and Chimney
If you’re not adept at sculpting, you can skip this stage. But, if you want to make these accents, it’s not too difficult if you follow my tutorial.
Important Notes: You want to create all the clay objects before carving the pumpkin. Once you bake them, they may change shapes. So it’s best to use the baked shapes as a cutting template for our pumpkin.
Also, make the door big enough for your hand to slip through. The door will be the opening where you’ll clean out the inside of the pumpkin.
A Few Tips About Sculpey
- You’ll want to work the Sculpey clay in your hands. The warmth of your hands makes the clay more pliable.
- To attach the clay, gently push the clay object together and make sure they stick. When it bakes, the clay will adhere more.
- Mold and smooth out the clay sculptures with your fingers or clay tools.
- Place your clay sculptures on a baking tray lined with parchment paper. And bake in a 275-degree oven for 15 minutes.
How to Make Your Fairy Pumpkin
Sculpting
Step 1 – Make the Door
Create the shape of your door and cut out a window if you prefer. I created a cozy window on my doors to add a place for the light to shine.
I also framed the outside of the window and added a door handle.
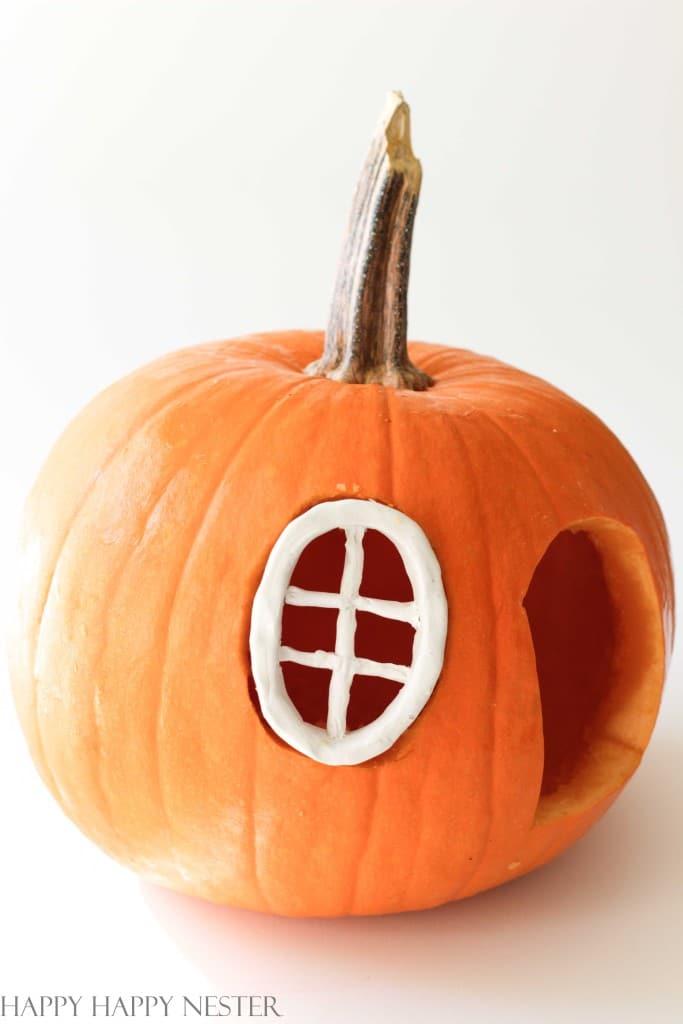
Step 2 – Make the Windows
Manipulate the clay and create a snake shape with the clay. Shape the snake into a round or oval shape and attach the ends. Then place the cross frames in the middle to add interest.
Step 3 – Make the Chimneys
Make three small tube shapes and attach them in a cattywampus style. Create a cone for the chimney and attach it to the top of the chimney. Also, fill in the bottom of the chimney tube so the filled-in tube will attach to the roof once it’s baked. We angled the chimney from the base, and then from that piece, we secured another tube that went straight up to the cone cover.
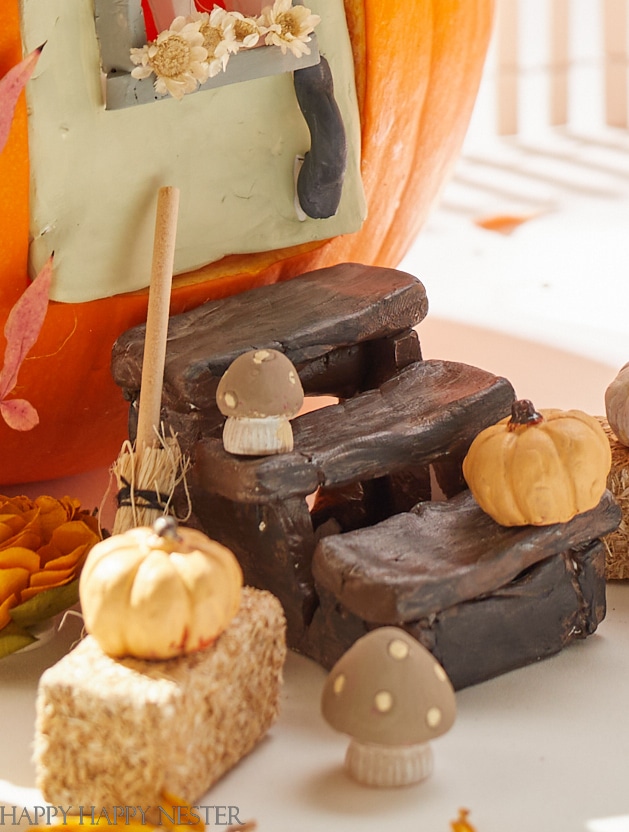
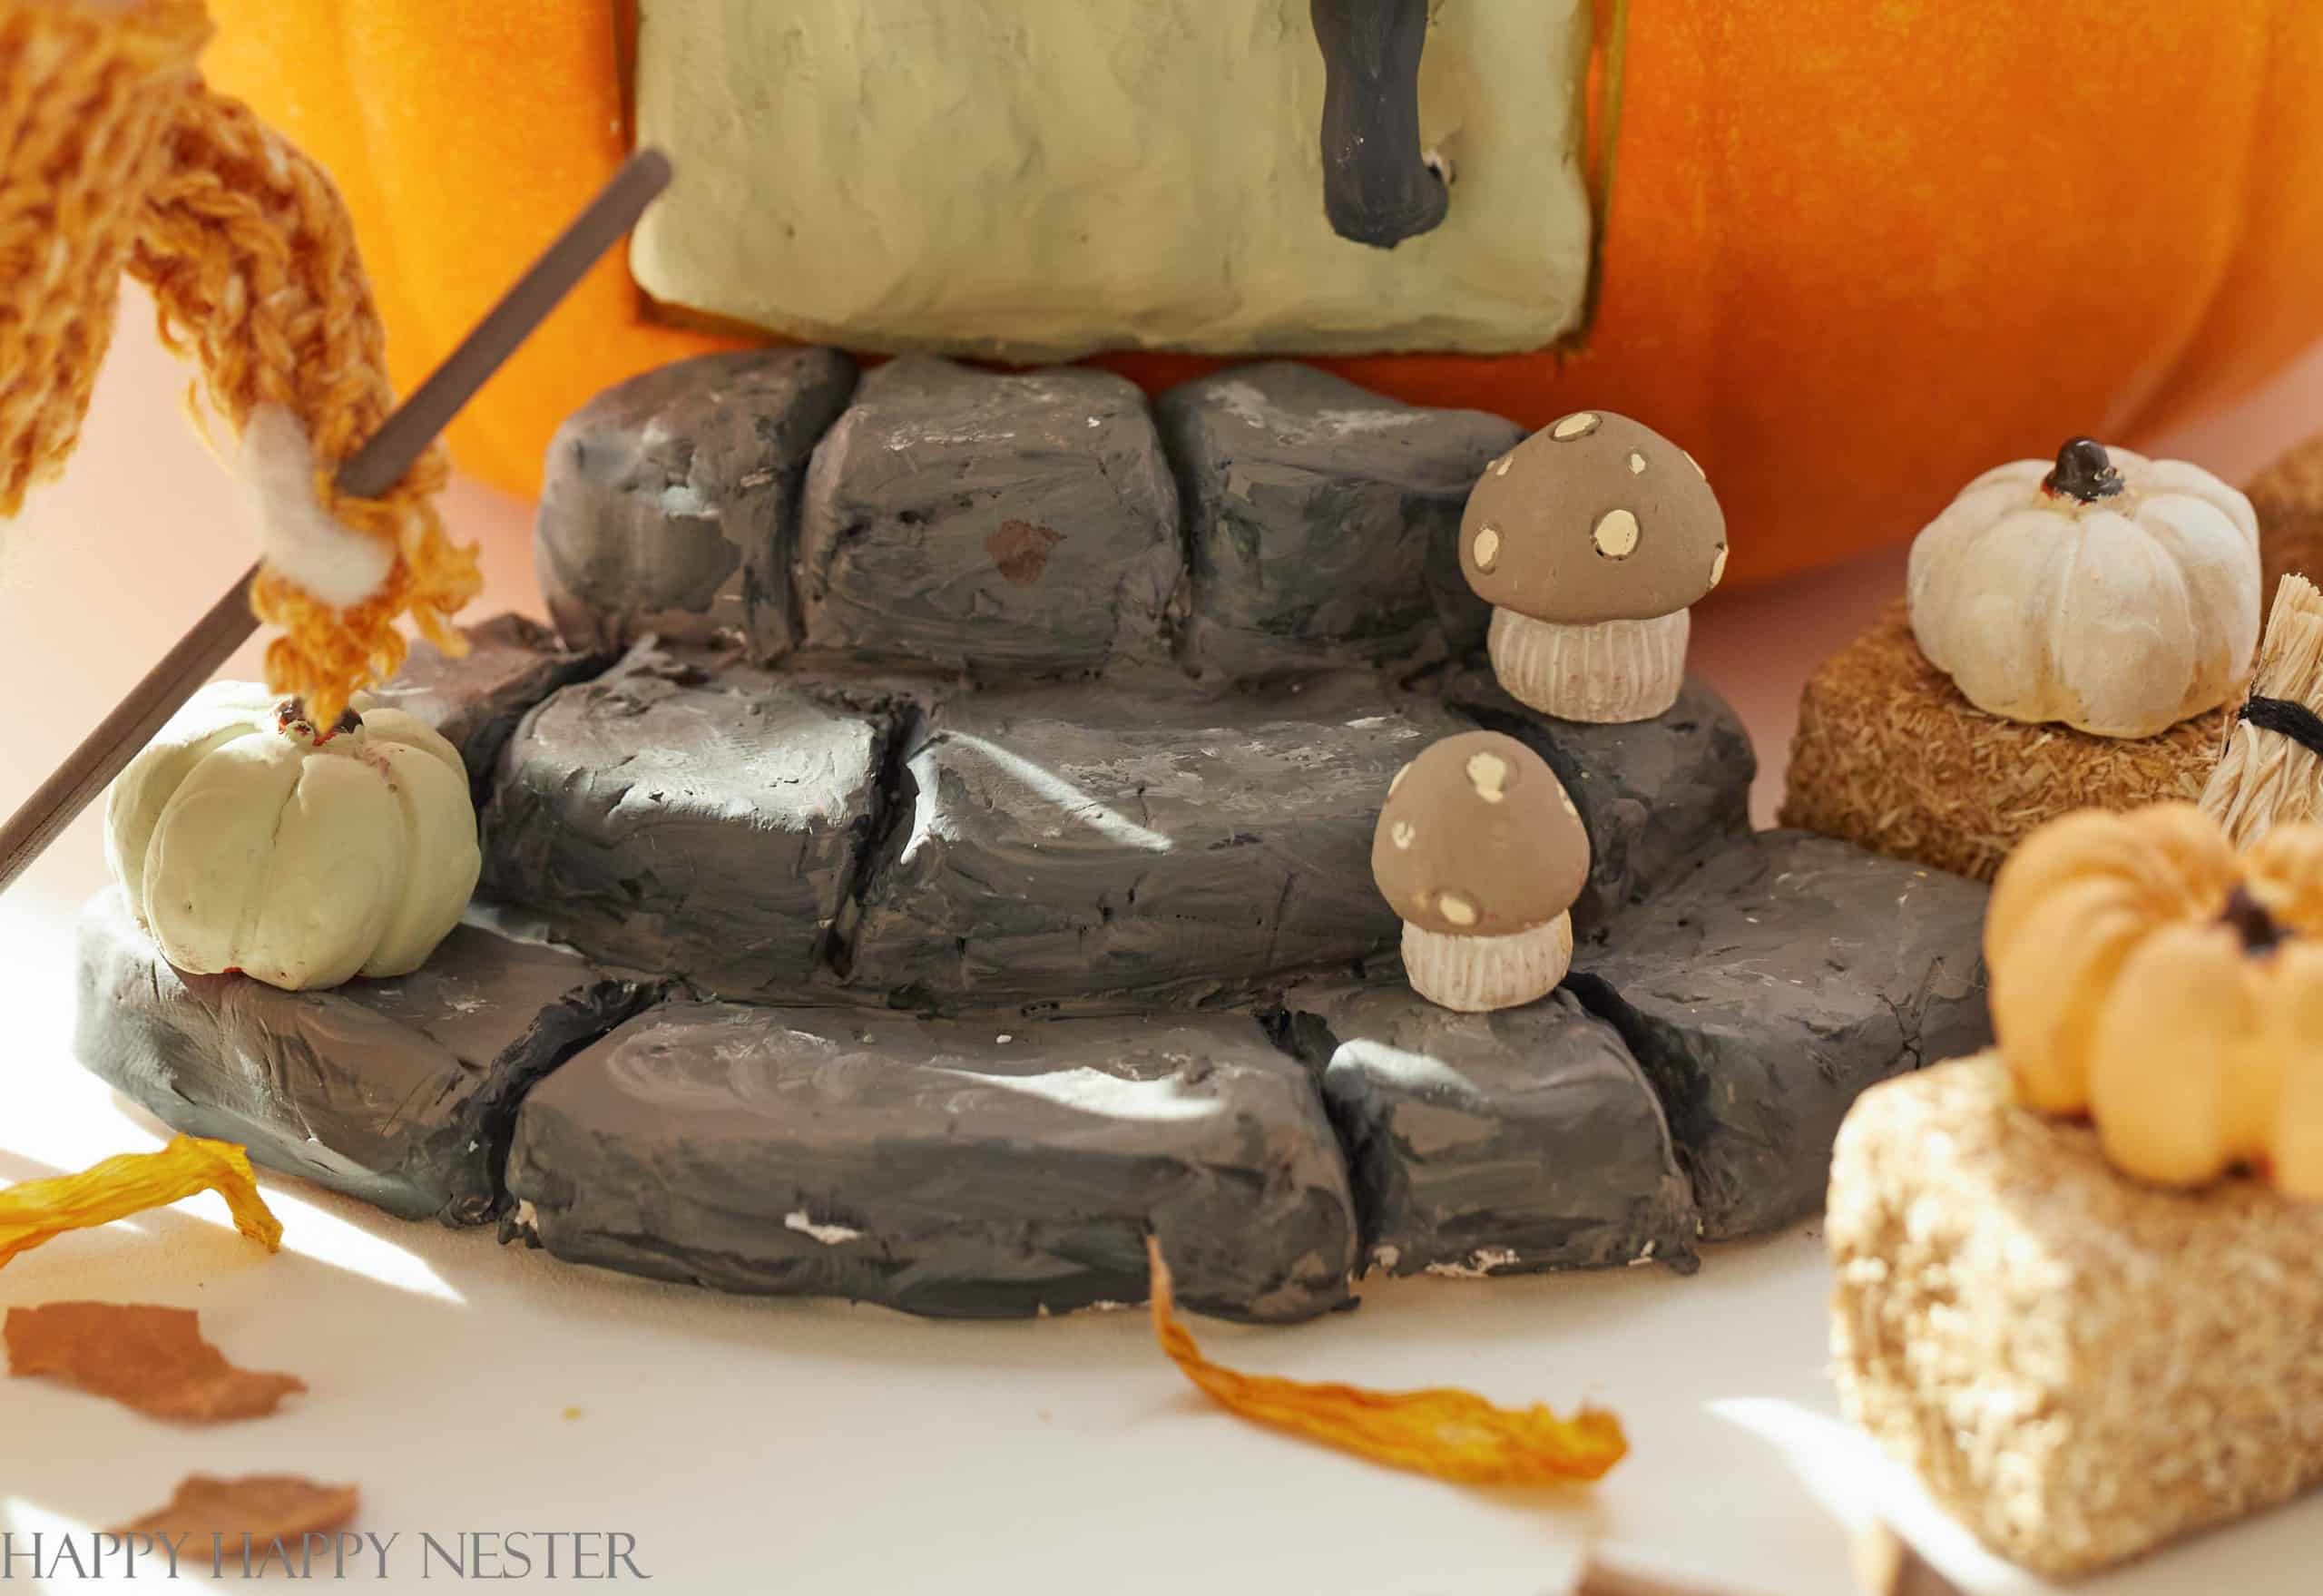
Make the Steps and Stone Porch
Uh, my husband made these, and he is super clever. For the wood-looking stairs, he constructed them with a base and placed top planks to make the steps. Then he carved dividers to delineate the stones. The faux stone porch is one solid piece that he combined with each layer of steps.
The important thing about these steps is that it’s ok if it looks rustic, so don’t worry too much about being perfect in your building.
We painted them with a base color and added a few other darker and lighter shades for highlights and shadows.
Also, we made the little roof that goes over the door. We made the shape first, then placed little shaped tiles on top.
Carving The Pumpkin
Only carve the pumpkin once your window, door, and chimney are made and baked. The clay shrinks when baked, so it will fit better if you cut out the openings with the final pieces.
When carving your pumpkin, you must use good pumpkin carving tools. They are skinnier than a kitchen knife, making it easier to cut shape in the pumpkin.
The door will be the opening where you clear out the inside of the pumpkin. You can carve the top of the pumpkin and access the inside of the pumpkin that way as well.
Here are the steps to carve your pumpkin.
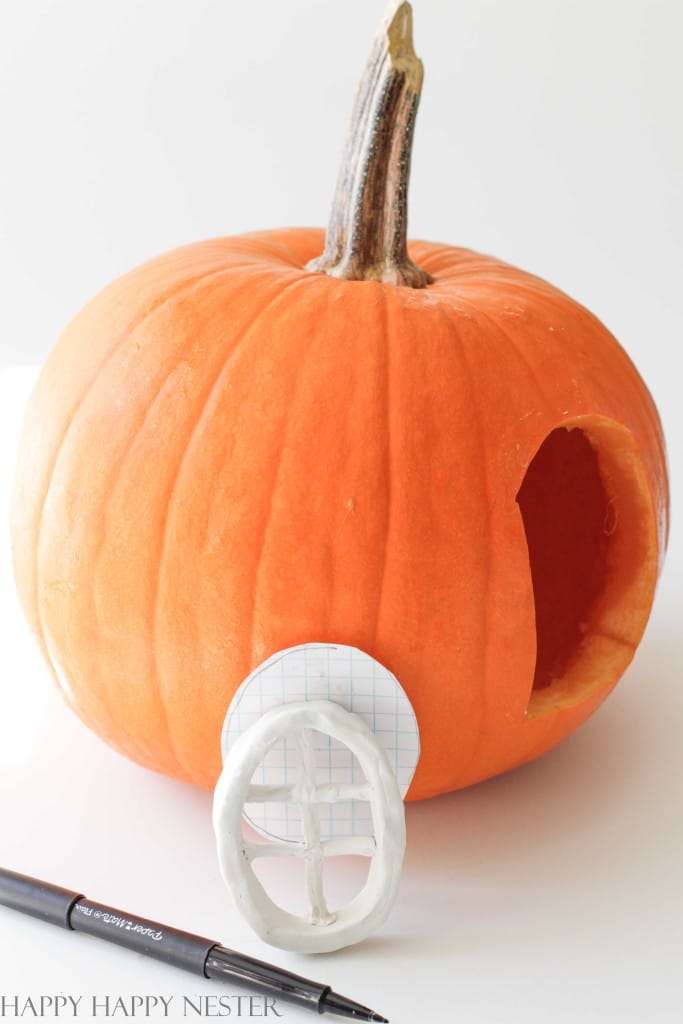
Step 1 – Make Paper Patterns
Take paper and outline your baked window and door on the paper. Cut them out, and these will be the patterns in which to cut your pumpkin.
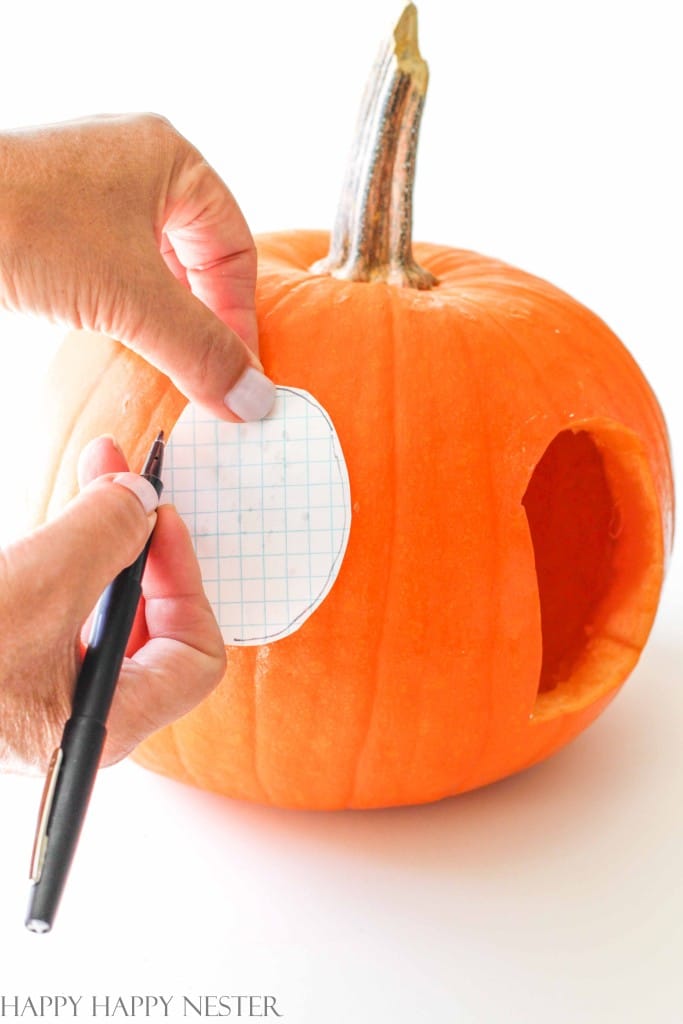
Step 2 – Draw Door and Window Patterns on the Pumpkin
Take your paper patterns and place them on your pumpkin. Take a dark felt tip pen and outline your template onto the pumpkin. Ensure your pumpkin is dry. Otherwise, the pen won’t draw on the pumpkin.

Step 3 – Carve the Pumpkin
I used a kitchen knife to start my carving since the pumpkin carving knives can’t puncture the pumpkin too well.
Once the carving starts, insert your pumpkin carving knife and cut the pumpkin on your line.
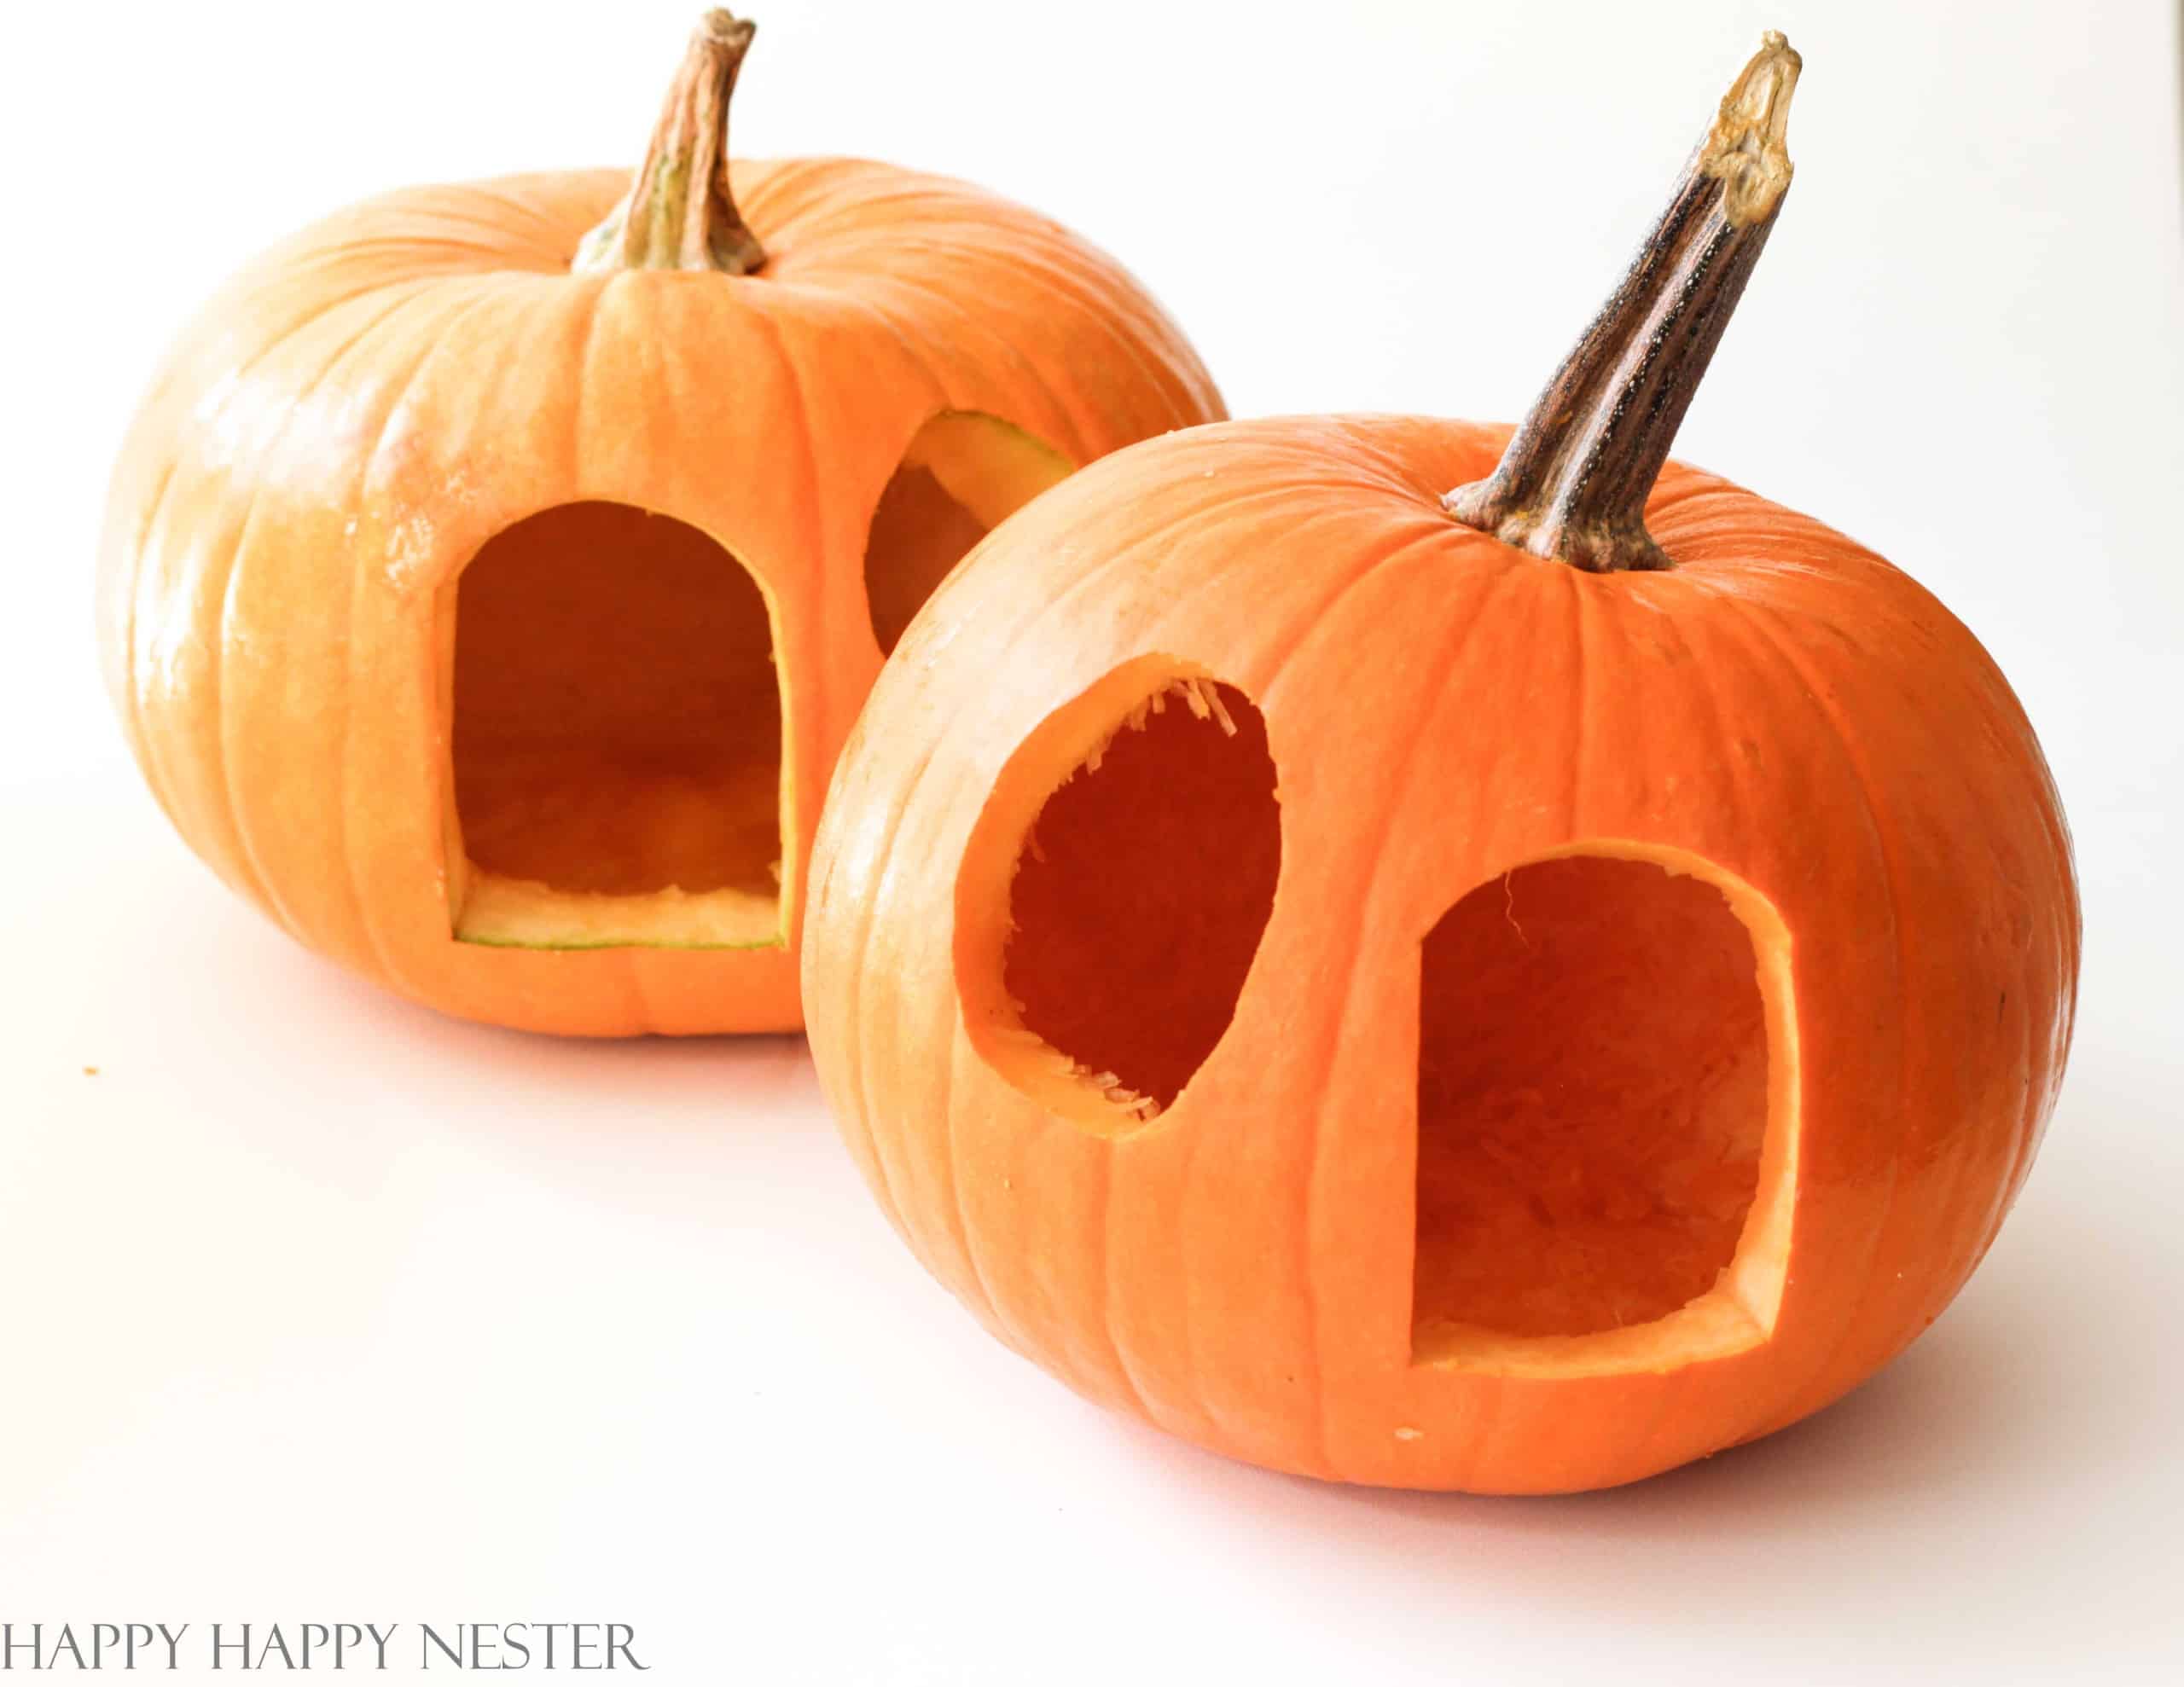
Step 4 – Clean Out Pumpkin
This step is my least favorite part of the project! Clean out the inside of the pumpkin by inserting your hand through the door. I use a pumpkin scooper which is worth buying since it does a great job.
Assembling Your House Pumpkin
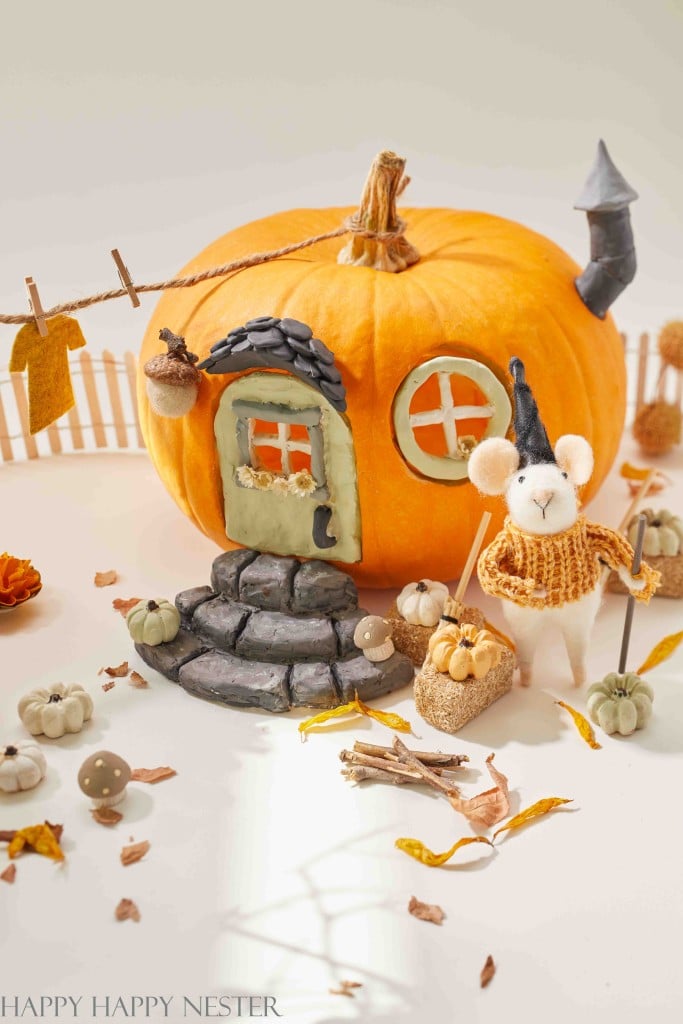
Now for the fun part of the project! Create a cute fall or Halloween scene either in your garden, home or porch.
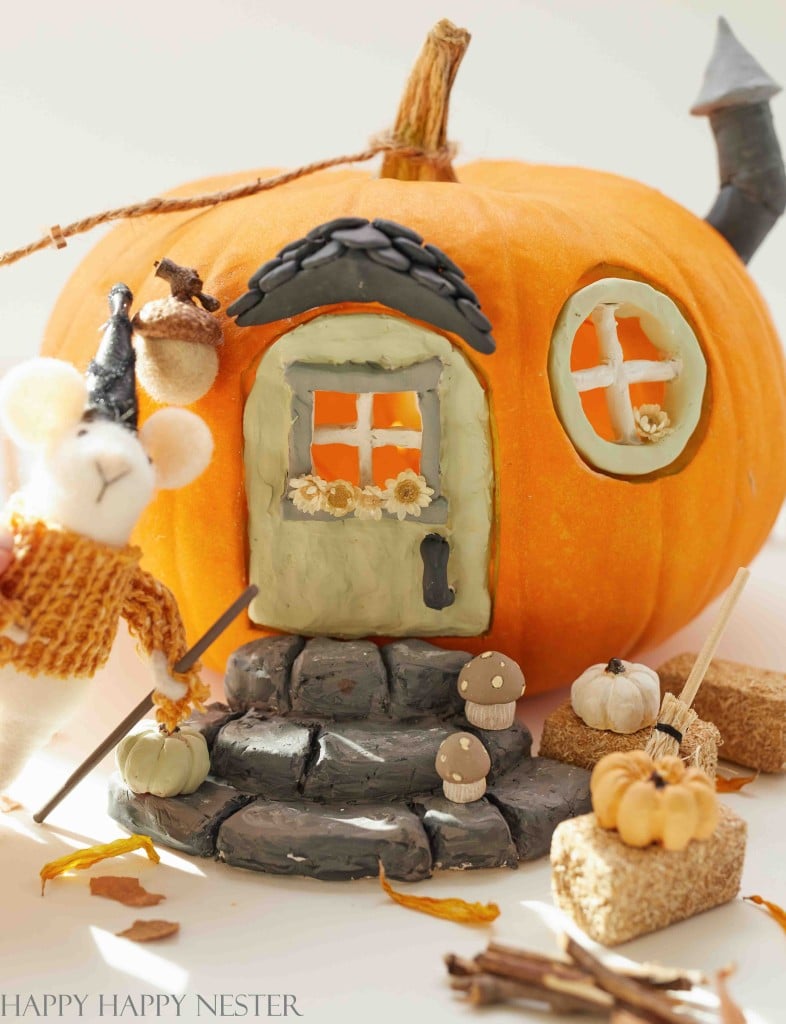
Doors and Windows:
It’s pretty straightforward to assemble the fairy pumpkins. The doors sit snuggly inside their holes. I glued the door roof to the pumpkin with hot glue. I also trimmed the cute mini-dried flowers and glued them on the window sills. They look like flower boxes.
Chimney:
Cutting the pumpkin chimney hole using your baked chimney should fit snuggly into the hole on the side.
Clothes Line:
I tied a piece of twine to the stems of each pumpkin. Then I add mini-clothes pins and hung my homemade miniature clothes. I ended up making the faux clothes out of pieces of felt. I made a paper pattern of a top and pants and then cut them out of the felt I had in my studio.
Picket Fence:
I place my cute white picket fence behind the pumpkins. They bring the whole scene together and group the pumpkins.
Leaves:
I placed pieces of leaves around the houses. I initially wanted the whole surrounding garden to be leaves, but since the pumpkins depict a miniature world, the dried leaves were too big and looked out of place.
Also, I picked some small Manzanita leaves, which looked perfect with the vignette. I guess the key takeaway is to think miniature!
How to keep your pumpkin fresh and last longer
After taking it out, the pumpkin will sweat and get wet. I placed mine in the refrigerator to preserve it from our hot temperatures. The fridge keeps the pumpkin fresh and extends its life.
Sorry for the long pumpkin fairy house tutorial! I didn’t want to miss any details of how we made this cute Halloween project.
If you don’t have the time to make everything, you can create parts of these pumpkin decorations. The fantastic thing about making these clay items is that you’ll have them for each Halloween.
I hope you enjoyed this fun pumpkin project as much as we enjoyed creating it for you!
Happy Fall!
Cheers,


- Easy Homemade Breadsticks Without Yeast (25-Minute Recipe!) - July 24, 2026
- Lazy Saturday Morning Breakfast Ideas - July 18, 2026
- Lemon Blueberry Crumble (With Creamy Mascarpone) - July 16, 2026


Laura Ingalls Gunn
This is absolutely darling! I would love to have a link to the other mouse, haybales, brooms. They seem to be missing in the post. Thank you for sharing!
Janine Waite
Hi Laura,
Somehow my links got erased. I just placed them back in. I’ll keep working on this post and list all you need for this project! Thanks for letting me know.
Robyn Huff
This is absolutely adorable! What a fun project to do with the kids!
Janine Waite
Robyn,
Ah, thanks so much!
Melaine Thompson
This might be the most adorable pumpkin project I have seen in my entire life!!!! Bravo!
Janine Waite
Ah, Melaine, you’re so kind! Thanks!
ashley
What a labor of love! It turned out adorable!
Janine Waite
We enjoyed every part of this fun pumpkin project! Thanks so much, Ashley!
Jackie Hempel
Oh my heavens Janine! My kid’s would love this! Definitely trying these in a couple weeks.
Janine Waite
Jackie,
That is awesome if your kids made one of these enchanted pumpkins! It’s my favorite pumpkin craft!
Jennifer Hadfield
Such a whimsical and sweet idea, Janine! I love it! Pinned 🙂
xoxo
Janine Waite
Ah, thank you, Jennifer! I’m so glad you like my project!
Sara
This is so adorable!
Janine Waite
Thanks for your visit, Sara!
Sharon
Wow! Wow! Wow! I am continually blown away by your creativity and fun projects! This is the cutest thing on the web, in my opinion.😉 You are so talented and I love your blog. Thanks for all the inspiration!